
You are using an out of date browser. It may not display this or other websites correctly.
You should upgrade or use an alternative browser.
You should upgrade or use an alternative browser.
My Little Harry Tate completed build blog
- Thread starter rtfoe
- Start date
- Status
- Not open for further replies.
Thanks Fernando, Guy and Tony. Been busy with my dio and a 1/16 Paratrooper modification. Old 1/72 kits can be quite challenging and fun but sooner or later I may go the larger scales as the eyes are getting weak.
Cheers,
Richard
Cheers,
Richard
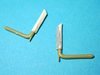
Hi, seriously I didn't have any clear reference on how this worked. Only after I finished the build then only I saw Indiana Jones and the Crusades that I remember a scene when Sean connery was shooting from a biplane cockpit that I saw how it worked. Those straight vertical coming from the serated curved structure should be thinner as they were cables that run down to the cylinder wheels on each side of the cradle.
View attachment 303135View attachment 303136
They're made with plastic strip, copper wire and foil.
View attachment 303137View attachment 303138View attachment 303139
Cheers,
Richard
View attachment 303135View attachment 303136
They're made with plastic strip, copper wire and foil.
View attachment 303137View attachment 303138View attachment 303139
Cheers,
Richard
Attachments
Hi Richard
This is among my favourite builds of yours. Not only that you made a silk purse from this sow's ear but the detailing. The Lewis guns for a start and I know there is more to come.
Jim
This is among my favourite builds of yours. Not only that you made a silk purse from this sow's ear but the detailing. The Lewis guns for a start and I know there is more to come.
Jim
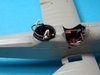
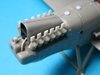
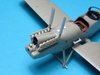
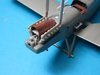
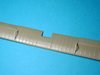
Seeing that the pistons were fine I worked on the exhaust outlets and the exhaust itself...
View attachment 303401
The kit part was too cylindrical so I folded plastic strip on to it and cut the ends.
View attachment 303402
Which resulted in an angled opening. Then I added weld beeding along the whole pipe with thin stretched sprue.
View attachment 303403View attachment 303404
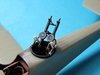
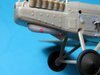
I fitted the Vickers gun onto the side cradle.
View attachment 303405View attachment 303406View attachment 303407
I then added two pipe outlets using electrical wire tubing...the thinnest I could find.
View attachment 303408
Cheers,
Richard
View attachment 303401
The kit part was too cylindrical so I folded plastic strip on to it and cut the ends.
View attachment 303402
Which resulted in an angled opening. Then I added weld beeding along the whole pipe with thin stretched sprue.
View attachment 303403View attachment 303404
I fitted the Vickers gun onto the side cradle.
View attachment 303405View attachment 303406View attachment 303407
I then added two pipe outlets using electrical wire tubing...the thinnest I could find.
View attachment 303408
Cheers,
Richard
Attachments
Wonderful work again Richard. You have a lot of builds going on at the moment. I am surprised there wasn't a palm tree or a steering wheel in the cockpit. :smiling3:
Did you contemplate changing the springs for self made ones?
Steve
Did you contemplate changing the springs for self made ones?
Steve
Hi, I've been away down south in Singapore last weekend and have not done any bench time or been on the net.
Wouter and Steve, thanks for the comments. The builds seem a lot but this is one that was completed about 3 years back but being shared here. The springs ...so that is what they are, well in that scale I thought painting them with washes and highlights would be enough.
Cheers,
Richard
Wouter and Steve, thanks for the comments. The builds seem a lot but this is one that was completed about 3 years back but being shared here. The springs ...so that is what they are, well in that scale I thought painting them with washes and highlights would be enough.
Cheers,
Richard
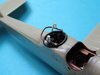
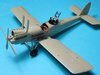
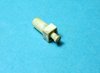
Continuation of the old build...I cut disc from styrene rod for fuel caps and lengths for a sight.
View attachment 304587
Then added bracings on the top wing...this would hold some of the rigging.
View attachment 304588
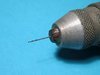
With my trusty drill bit and motor tool I pre drilled the wings that would take the rigging later on...
View attachment 304589View attachment 304590View attachment 304591
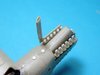
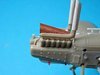
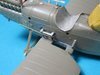
I then replaced the engine top air scoop with one made from copper sheet.
View attachment 304592
The profile of the new airscoop looked crisper than the kit part. A hole was predrilled to take on the rod leading from the Vickers gun to the propeller to synchronise the firing of the gun.
View attachment 304593
Thats all for now.
Cheers,
Richard
View attachment 304587
Then added bracings on the top wing...this would hold some of the rigging.
View attachment 304588
With my trusty drill bit and motor tool I pre drilled the wings that would take the rigging later on...
View attachment 304589View attachment 304590View attachment 304591
I then replaced the engine top air scoop with one made from copper sheet.
View attachment 304592
The profile of the new airscoop looked crisper than the kit part. A hole was predrilled to take on the rod leading from the Vickers gun to the propeller to synchronise the firing of the gun.
View attachment 304593
Thats all for now.
Cheers,
Richard
Attachments

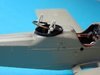
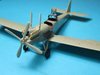
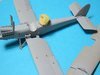
Continuation with the rigging drilling along the fuslage and tail...
View attachment 305067
The syncro rod and Vickers cradle attached...
View attachment 305068
First coat of primer sprayed...
View attachment 305069
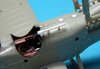
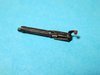
Added the cocking lever to the Vickers and proceeded with detail painting of the ejector chute in brass...and the lever handle in brown
View attachment 305070
Highlighted the raised details with steel...
View attachment 305071
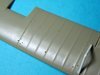
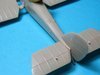
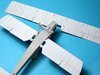
Sprayed the underside with off white concentrating more paint on the raised ribbing.
View attachment 305072View attachment 305073
More next...
Cheers,
Richard
View attachment 305067
The syncro rod and Vickers cradle attached...
View attachment 305068
First coat of primer sprayed...
View attachment 305069
Added the cocking lever to the Vickers and proceeded with detail painting of the ejector chute in brass...and the lever handle in brown
View attachment 305070
Highlighted the raised details with steel...
View attachment 305071
Sprayed the underside with off white concentrating more paint on the raised ribbing.
View attachment 305072View attachment 305073
More next...
Cheers,
Richard
Attachments

- Joined
- Apr 27, 2018
- Messages
- 15,043
1/3
Richard,
Great work on the added detail really looking the part.
Great work on the added detail really looking the part.
G
Guest
Guest
And this is in 1/72 !
Richard, just had an enjoyable time reading through this, what a superb piece of work. That Lewis Gun is a joy to see .
I've never seen this before, must have been before I joined the merry throng
John
Richard, just had an enjoyable time reading through this, what a superb piece of work. That Lewis Gun is a joy to see .
I've never seen this before, must have been before I joined the merry throng
John
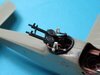
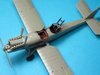
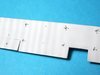
Hi, in some plan drawings provided by a fellow modeler from MM days I noticed a square opening at the bottom of the fuselage. On investigating it was an apature for an attached camera for recce.
View attachment 305403
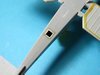
I cut out the opening and fashioned a lip surrounding it with thin card.
View attachment 305404View attachment 305405
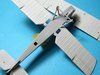
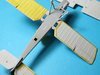
You will have noticed the masking of the wing underside reccessed about 1mm. The surface colour overlapped the edges and a thin strip of the underside.
View attachment 305406View attachment 305407
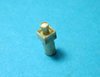
The camera was scratched and support added to the back so it could be glued on the inside of the top panel in the fuselage.
View attachment 305408
More to come.
Cheers,
Richard
View attachment 305403
I cut out the opening and fashioned a lip surrounding it with thin card.
View attachment 305404View attachment 305405
You will have noticed the masking of the wing underside reccessed about 1mm. The surface colour overlapped the edges and a thin strip of the underside.
View attachment 305406View attachment 305407
The camera was scratched and support added to the back so it could be glued on the inside of the top panel in the fuselage.
View attachment 305408
More to come.
Cheers,
Richard
Attachments
- Status
- Not open for further replies.
Legal Notice
scalemodelling.co.uk is a privately operated online discussion forum. All content posted by members reflects their own views and opinions and does not necessarily represent those of the forum owners or administrators. While reasonable efforts are made to moderate content, no responsibility is accepted for user-generated material. By using this site, you agree to comply with UK law and the forum rules.