Theme editor

Scale Model Shop

My second attempt... FW190

Status
Not open for further replies.

spanner570

New member
Joined
May 26, 2009
Messages
15,599
Reaction score
613
Points
0
1/3
Thread owner
As my first build was a bit of a cop out, i.e burying it in the woods and covering it with leaves so I didn't have to do much painting and as it is within the rules, I am going to build this 1/72 night fighter I picked up from ebay for a fiver, £1.72 of which was p/p!

I won't describe the build as there is enough interesting stuff going on at the minute, but when it is ready I would like to show any interested party how I brush paint the model, particularily the mottling. That might inspire other brush hands to 'ave a go!

:beer:

Ron

View attachment 23310

View attachment 135836
 

Attachments

  • FW190 ..2..jpg
    FW190 ..2..jpg
    3.2 KB · Views: 0
I'll be watching Ron, brush painting gives me the heebegeebes.

Joolz
 
Very nice Ron, can't wait. Whats the Revell 1:72 190 like mate? I was going to get this one until i seen the D-9.

:grinball2: John
 
Thread owner
C'mon John, I'm trying to sunbath here!!!

Just opened the box and tried a dry fit of the fus. and wings. Nice fit with no flashing worth a carrot, nice surface detail too.

Yep, first impressions, fine.

Leaps and bounds better than that Fujimi garbage Gern and I have had to suffer. lol

Why you no have fun no more, John?!

Now, where did I put that Ambre Solaire?

Ron
 
You've picked the best detailed 1/72 FW190 there is (so far). It's a great cheap kit to build and looks great when painted.
 
Hey Ron,

You reckon you 'copped' out (your build was any thing but a cop out - just read our comments!) on the build 'cos you got a poor kit.

Does that mean I gotta do another one as well 'cos I got the same poor kit an' I've 'copped' out too?

I like the sound of your brush painting demo! I need lots of help there so I'm looking forward to seein' that.

Gern
 
Oh Paint brushes. I can remember those.

I will be watching with interrest.

And no way was your last one a cop out!
 
Certainly not a 'cop out', it is a very imaginative build. I was looking at the Revell 'starter' pack that has a FW190 with the paints etc, will be interested to see how this works out. I have quite a few old 1:72 Airfix kits but to be honest, they are so rough I am not inspired to start them. The only really good one I had was the Sea Harrier which I messed up on the painting. I think it was the first kit I posted on here.
 
Thread owner
I guess 'Cop out' was the wrong phrase...What I really meant was although I was well happy with my 190 in the woods, I would have liked to have done one stood up! Especially when I see the detail, and effort people are putting into their respective builds.

Although it is only 1/72 and therefore not on the same level of detail, this is a good little kit and should do nicely, I hope!!

Bring it on!!

Ron
 
Ron your 190 in the woods is the nuts mate , I know whats happened you peaked to early pal LOL , I`ve had my lawyers go over the small print and they can not find any rules in the GB that states your are only allowed one go haha , go for it mate , even though I have not finnished mine I find myself looking for another bargin wingy thing , these bird things can come a bit addictive

Richy
 
Thread owner
John. That's much better. I'm happy now!

Richy. I've peaked too early? That's what my bouncy nurse keeps telling me!!!!!!!!!!

I'll get me coat now!
 
Thread owner
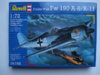
O.K peeps, I offered to show how I brush paint my 190 and some of you actually want to know, the 1/72 scale is a bit small to show how I obtain the mottling, but the principle is the same. Other brush hands methods will know doubt differ from mine but here is stage one:-

Rules I follow....

Use good quality brushes.

Don't fiddle.

Don't be afraid.

Don't go for exactitudes.

Apart from priming, always paint dark over light ( covering light paint with dark is easy...try doing it the other way!)

Have a can of Boddington's handy.

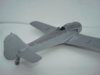
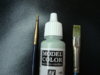
The two brushes I use are as in the picture. One small stubby and one flat. Vallejo Model Colour is the paint.

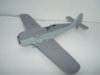
Priming and the pale blue underside and 1st stage mottling...

Everyone is familiar with priming so other than I use the flat brush, it's much the same as A/Bs I guess.

The pale blue is also put on with the flat brush. I squirt enough paint into one of those cheap plastic ice cube trays , add some distilled water and mix to the right thickness. Don't worry about amount, as long as you mix enough for the first coat, the paint stays workable in the pallet so it can be used for a second coat.

I apply to the underside of the wings first as these don't involve any mottling. Always drag the brush from the centre of the surface to the outside edge, if you do it the opposite direction you will have drips and runs forming under the wings.

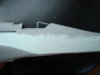
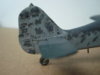
Next, get both brushes ready. You need to work quickly here as the idea is not to have the paint drying 'in a line' but rather blending into the primer.

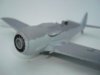
With the flat brush, paint the tail and, with reference to the artwork, work your way in sections along the fus. painting the pale blue solid up to just before the demarkation line with the dark top surface colour. Very quickly with your stubbly brush hardly loaded with paint dab along the paint line to break it up, DON'T FIDDLE! I can't emphasize the need for speed here 'cos as you know Acrylic paint dries fast. Don't be worried if the paint goes where it shouldn't, just look at my photos! ( The dark top coat will easily cover any pale sploshes!) See Rules!

That is it really for the Pale blue mottling. Alway keep an eye open for runs, particularily under the fus. If you spot some gently ease them out with the flat brush before the paint dries too much. Next time we will do the top surface cammo. and finish the mottling.

Me? I'm off at the w/end for a few days touring the S/W, visiting some of the present Mrs. Ron's old school buddies........Can't wait!!!!!!!

Cheers,

Ron

View attachment 23486

View attachment 23487

View attachment 23488

View attachment 23489

View attachment 23490

View attachment 136012

View attachment 136013

View attachment 136014

View attachment 136015

View attachment 136016
 

Attachments

  • FW190 ..2 004..jpg
    FW190 ..2 004..jpg
    1.5 KB · Views: 0
  • FW190 ..2 001..jpg
    FW190 ..2 001..jpg
    1.6 KB · Views: 0
  • FW190 ..2 003..jpg
    FW190 ..2 003..jpg
    1.6 KB · Views: 0
  • FW190 ..2 002..jpg
    FW190 ..2 002..jpg
    1.6 KB · Views: 0
  • FW190 ..2 005..jpg
    FW190 ..2 005..jpg
    2.1 KB · Views: 0
Thread owner
Back after my 'Jolly' in Nth. Cornwall, and very nice it was too....

It seems a bit pointless going through the top cammo as it is exactly the same method as the belly painting, same brushes, same stippling. So I will just post a picture of the rear end finished. The only addition is the application of a very watered down, all over wash of Dk. grey. This is put on to give the model a bit of a 'Mucky look'

That's it really, so now I will add the decals, weather the thing and post the finished 190 on the completed FW forum.

I hope this has been of some help to someone, somewhere....

Ron

View attachment 23601

View attachment 136127
 

Attachments

  • FW190 ..2 006.jpg
    FW190 ..2 006.jpg
    2 KB · Views: 0
Status
Not open for further replies.
Back
Top