Theme editor

Scale Model Shop

Neil's 1-35 Liberty Ship Diorama

Great stuff Neil.Nice to see some figure sculpting.I havent done anything with figures for nearly 3 years.I always got on okish with Magic Sculp.Milliput just seems to cause me grief.Then again im so slow using Epoxy and starts to cure too quickly.
 
Hi Neil, the last time I looked was in November. Loads of fine work have been done since then and I'm amazed by it. Definitely going to be another epic build.
Nice collection of figures to choose from. Unlike you I am the reverse adding the longer blouse and beefing up the figures into winter clothing on my dio. I have loads as well to modify but not as many as you have. Do you like figure conversion? It's a love, hate thing for me and Magic Sculpt is definitely the better putty for sculpting. Bill Horan mixes his with some other putty when he builds up his figures. I still haven't tried Green putty for the finer details. Must get my hands on some.
Your figures are looking good even if the heads aren't from Hornet.

Cheers,
Wabble
 
Thread owner
I've done a bit more on these GI’s, fettling and adding some of the web equipment

IMG_20250305_150004.jpg

IMG_20250305_150004.jpg

This has been quite a learning curve for this project, and I’m glad I limited the number to six. I thought it would be a good idea to press the ammo pouches(many of which are individual- GRRR) into the wet putty , but it didn’t go too well so I will try a different approach next time around. I’ve also decided not to use any more of the Italeri torsos as the sculpting is truly dreadful. I’m dreading the painting of the webbing etc. They would require too much re-working and life is too short with 40 plus figures, so I will just live with these ones. The Italeri standing legs are really useful and the arms are just about useable although the hands are pretty rubbish. The equipment and weapons are all good enough, except for the helmets, which are long since in landfill!
Having got them all to this stage I am working into them one by one and then I will paint them as a batch.
So here is GI no 1, the handsome devil!

IMG_20250305_150703.jpg IMG_20250305_150712.jpg

This is the first one I did ages ago. I’ve drilled out the neck of the shirt and kept the head separate as I always do because I find it easier to paint the face that way- and I often have to have a couple of attempts to get it right so this avoids having to strip the whole figure every time.

And here he is with all his kit.

IMG_20250306_193301.jpg IMG_20250306_193319.jpg
The rifle and helmet are not attached and will be painted separately. In fact I intend to try and represent the plastic covers they had for the rifles , so watch this space...
On the French Fusiliers I painted all the equipment separately and kept the straps separate but if I do that on this project it will definitely never get finished....
So thanks for following and making comments- it keeps me going
cheers
Neil
 

Attachments

  • IMG_20250305_150712.jpg
    IMG_20250305_150712.jpg
    33.4 KB · Views: 0
  • IMG_20250305_150703.jpg
    IMG_20250305_150703.jpg
    37.4 KB · Views: 0
  • IMG_20250305_150035.jpg
    IMG_20250305_150035.jpg
    239 KB · Views: 0
  • IMG_20250305_150004.jpg
    IMG_20250305_150004.jpg
    173.9 KB · Views: 0
Thread owner
Thanks as ever for the encouragement and comments, chaps.
I thought I would just post a couple of pics of the logistics of this operation-the ‘quartermasters stores’ if you will.

IMG_20250319_195236.jpg

Here are some sets already sorted

IMG_20250319_194912.jpg
It got really tedious putting things into bags one by one -especially the individual rifle ammo pouches-so I used bottle tops

IMG_20250228_151110.jpg
and then decanted them into bags for safe keeping
IMG_20250306_141055.jpg

And think of all the fun I am having cleaning up all the mould lines!

Here are the first six Gis finally all ready for paint.

IMG_20250312_173349.jpg
They won’t necessarily be positioned in this order, it’s just a way of keeping track of the heads and kit after painting separately.
IMG_20250312_174152.jpg
IMG_20250312_174215.jpg

The knowledgeable amongst you will notice the BAR gunner, no 6. I had a LOT of fun with those separate BAR pouches,I just couldn’t get them to sit in line on his waist by simply pressing them into the putty,

IMG_20250311_111029.jpg
so I stuck them to a belt of their own to get the look right.

IMG_20250311_113706.jpg

Much better
GI no 6 (1).jpg
And of course they will be mostly out of sight behind the bulwark, unless I position him strategically...
But it would have ANNOYED me.
And then I forgot to remake his jacket skirt at the front, and I wasn’t going to mix a tiny amount of MS or Green Stuff just for that and I want to get down to painting,so he WILL be behind the bulwark!
Anyway, on with the wet stuff at last!
Cheers
Neil
 
Bilmey Neil.Boy you got some patience tackling these bunch of rum dudes.Fair play to you pal.Ive started producing a few bits n bobs again but in smaller scale.
Carry on dear boy.
Richard
 
Neil

This is proving to be a fascinating and very meticulous build. I particularly enjoy the fact that you are able to include one off 3D printed stuff in your build to demonstrate how model making is evolving.

John
 
Looking real good Neil, it's about time to keep them in order or they'll break into a YMCA dance or start a crap game in the corner.

Cheers,
Wabble
 
Thread owner
As ever, thanks everyone for the continued interest.
Well who would have thought it? They’re painted and I quite enjoyed the experience!

But not at first...

As discussed I batch-painted them, and I found it immensely tedious, especially by the time I got to number six every time. I didn’t take any progress shots, mostly because I was so unhappy with all of it until almost the end, when it finally seemed to come together. I guess it’s been such a long time (over six months) since I picked up a paint brush that I had to re-learn the techniques of painting with acrylics (I still default to as if I was using Humbrol enamels in my youth).Thank god I have got into the habit of taking notes for every painting project now, so I was able to refresh my memory quite easily.
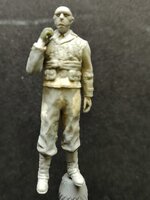
The biggest anxiety was the faces, and I would normally try to vary the skin tones between six figures but I needed to get through them all, so I decided to be lazy about it and paint them all in the same way (apart from hair and eye colour). That said, they will not be side by side in the finished piece so as long as my next batch is different it will all work out fine....(fingers crossed). I pointed out the inadequacies of the sculpts earlier and here’s where it really tells- it’s so much easier to paint a well sculpted face than a poor one. I was very glad I had left the helmets off as well, although I had to change a couple of them because I couldn’t make a decent job of painting the camo nets. I will be exploring ways of representing them in due course.
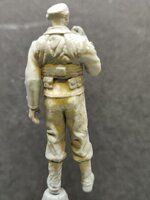
And then we come to painting the webbing.

OMG

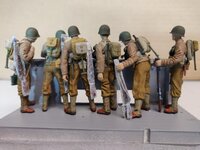
I knew it was going to be bad but this was off the chart. I don’t know what the Italeri sculptor used as reference- if indeed he used anything at all. I reckon he just made it up. Since I have already decided that these are essentially ‘extras’, I just painted lines where the webbing should be and hope that they disappear into the overall texture. To be fair most of the straps are obscured by the respirator at the front and the pack at the back anyway. But they don’t withstand close inspection by any means.
So in spite of them having the life-preservers moulded on I will probably be dumping the remaining Italeri torsos.
And while we’re on the subject of kit, I didn’t enjoy painting around the overhanging bits, so I will be leaving the big stuff off for painting separately in future.
So the conclusion of this experiment is that I will continue to construct the figures in batches of about six but for painting I am going to limit myself to two or three at a time.

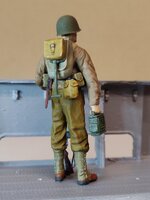
I said in an earlier post that I intended to try and replicate the clear plastic covers that the GIs had for their rifles, and here you see the results of my efforts. I had originally expected to use clingfilm because that had worked for the floor junk in the Higgins Boat model, but to try and get a Garand rifle inside it proved harder than I expected- in short, the cling film didn’t cling. I even used double-sided tape which did stick but made the clingfilm way too rigid. And my intended method of tinting them with Vallejo washes didn’t look great either. So I had to experiment with some other material, which would give me a semi transparent effect but not be too thick for scale representation.
In the end I used white tissue paper(the kind they pack clothes in, not the Kleenex or toilet type)and after several more experiments I found that Cyano glue turned it translucent. The tissue created the right type of creases and with the cyano we can just see the rifle inside- but not too clearly. These were typically slung with thin cord(presumably the web slings were inside the bag), so my first choice for that was solder wire, but what I had was too thick. Next choice was a super-fine copper wire, but I couldn’t get it straight enough to be convincing, and I feared I wouldn’t be able to paint it well enough so I looked for some white thread. Nothing I had was thin enough until I bought some medical gauze with the intention of using it for helmet camo nets. That was not to be but the individual threads used to make it are perfect for these cords-and it’s white. Being thread it’s easy to tie in knots on the rifles and I just coated it with Klear to smooth out the hairy bits.
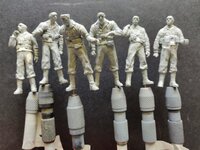
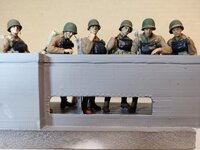
So here are the first six GIs of this epic, not my best painting ever but not bad for a six month lay-off, and certainly good enough for ‘extras’.

Gi no 1
GI no 1(1).jpg
GI no 1(2).jpg

GI no2
GI no 2(1).jpg
GI no 2(2).jpg

GI no 3
GI no 3(1).jpg
GI no 3(2).jpg

GI no 4
GI no 4(1).jpg
GI no 4(2).jpg

GI no 5
GI no 5(1).jpg
GI no 5(2).jpg

GI no 6
GI no 6(1).jpg
GI no 6(2).jpg
And the whole gang
IMG_20250327_113318.jpg
IMG_20250327_113403.jpg
So thanks everyone for sticking with me thus far. I think I need to get back to the ship itself for a while, but I’ll try not to leave it another six months before I start the next batch of figures!
Cheers
Neil
 

Attachments

  • GI no 6(2).jpg
    GI no 6(2).jpg
    251.8 KB · Views: 0
  • GI no 6(2).jpg
    GI no 6(2).jpg
    251.8 KB · Views: 0
  • IMG_20250327_113318.jpg
    IMG_20250327_113318.jpg
    298.4 KB · Views: 0
  • IMG_20250327_113403.jpg
    IMG_20250327_113403.jpg
    245.7 KB · Views: 0
Back
Top