G
Guest
Guest
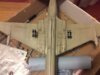
Really coming along well now.

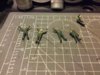
Too many beers in The Hilton the night before!\ said:Looks like your work crew are still asleep Rick looking forward to seeing more
scalemodelling.co.uk is a privately operated online discussion forum. All content posted by members reflects their own views and opinions and does not necessarily represent those of the forum owners or administrators. While reasonable efforts are made to moderate content, no responsibility is accepted for user-generated material. By using this site, you agree to comply with UK law and the forum rules.

")