Theme editor

Scale Model Shop

P-47D 1/48 Monogram

  • Thread starter Thread starter Guest
  • Start date Start date
Status
Not open for further replies.
G

Guest

Guest
Thread owner
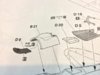
Basic Dry fit looks promising

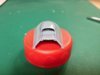
Trying not to go hog wild with a/m goodies on this one so making the most out of whats in the box is a must. First up I gave the wheels a retread and then 'weighted' them,may have weighted them a tad much but I'll roll with it!

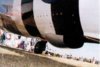
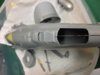
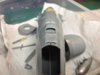
Next I opened up the vents behind the cowl flap area

Cleaned up and thinned the aft fuse vents

More cleaning and drilling,will be straying from the oob by adding some tubing here

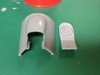
Razor sawed the cowl flaps ,filed them a bit and thinned the trailing edges

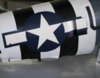
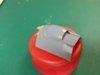
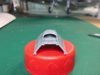
Rescribed and cleaned up the front cowl

on to the office next! cheers Trey
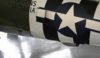
 
Thread owner
I`m to scared to do that with the wheels,but it looks good,could be a slow puncture lol,nice start though

mobear
 
This type of build is right up my street trey! I love to see older basic kits get a revamp and come out up to modern standards . Great start with the refinements , these small things such as thinning the cowl flaps etc really make a big difference and transform the kit , cheers tony
 
Thread owner
Beutiful Trey, i rmember my P47 its a beutiful subject. Can waut to see you do your voodoo on this one.

Cheers

Andy
 
Thread owner
Thanks Fellas,really trying to stay away from the resin stuff on this one. Glad you all appreciate that,sometimes its good to get back to basics. Nothing wrong with all the a/m goodies and resin bits mind you they are great and have their place. I just get tired of dumping my wallet out on every build.

Office is a wrap,not a very accurate molding I might add. A lot of missing and misplaced components .Still trying to avoid resin replacements with this build so in it goes.
 
Nice to see another Monogram kit being built.Ive done this one myself.I finished it as Gabreski's plane with an after market decal sheet.
 
Trey did you literally recut the tyre tread with your razor saw? You are certainly on a roll with this one, all looks good and as you say resin on every model soon gets expensive and to be honest from what I can see you have plenty of detail. Keep the photos coming.

Vaughan
 
Thread owner
Looking good so far Trey .... if you cut a new tread on those tyres then i'm impressed mate.

I'm with Ole on the tyres, maybe a slow puncture:) ... dont think it'll look that noticeable when it's painted up to be honest
 
Thread owner
Looking good so far, nothing wrong with a bit of back to basics
 
Thread owner
Dave thanks,would love to see your 'Gabby' jug did you post any pics? I've got a decal sheet in route but going to go NMF on this one(I hope)

Thanks Vaughan, yes I did resaw the tread and the pics are hiding a myriad of sins it does'nt look near that good in person.

Ole thanks I can live with it and I hope you're right and it does'nt stick out too much once its on a base. Maybe a little tall grass around the wheels........

David appreciate that, basics are sometimes the less is more approach for me.

I'm still cleaning up the fuse and opening up tiny vents

Does anyone have a good detail picture of this area?Been searching for hours and coming up dry. Would be greatly appreciated

cheers Trey
 

Attachments

  • Screen shot 2012-12-19 at 16.17.56.jpg
    Screen shot 2012-12-19 at 16.17.56.jpg
    5.9 KB · Views: 0
  • Screen shot 2012-12-19 at 16.25.41.jpg
    Screen shot 2012-12-19 at 16.25.41.jpg
    6.5 KB · Views: 0
  • Screen shot 2012-12-19 at 16.21.48.jpg
    Screen shot 2012-12-19 at 16.21.48.jpg
    5.9 KB · Views: 0
  • Screen shot 2012-12-19 at 16.18.29.jpg
    Screen shot 2012-12-19 at 16.18.29.jpg
    5.4 KB · Views: 0
Thread owner
Vaughan thanks I appreciate you taking the time to post those up for me. I'm hoping to find a shot looking up into the turbo outlet vent area,just coming up dry. Searched the web for 2 hours and nothing!
 
Trey found this youtube video might be of some help

. It's 45 mins long and does have a pre-flight walk-a-roundVaughan
 
Thread owner
Vaughan it came close on the wailk around but still did'nt get that elusive shot,thanks again all the same appreciate the effort!
 
Oh well, you'd have thought that there would have been a shot somewhere. Next time I'm at Duxford I will get on the floor and get a shot. Trey I've just cut these off the spru as I'm not at this stage yet but here's the intake on my Hasegawa P47D it does have some detail.

Vaughan

View attachment 57110

View attachment 57111

View attachment 57112

View attachment 57113

View attachment 57114

View attachment 170136

View attachment 170137

View attachment 170138

View attachment 170139

View attachment 170140
 

Attachments

  • 20121219_1049.jpg
    20121219_1049.jpg
    5.4 KB · Views: 0
  • 20121219_1048.jpg
    20121219_1048.jpg
    5 KB · Views: 0
  • 20121219_1047.jpg
    20121219_1047.jpg
    4.9 KB · Views: 0
  • 20121219_1046.jpg
    20121219_1046.jpg
    5.4 KB · Views: 0
  • 20121219_1045.jpg
    20121219_1045.jpg
    5.1 KB · Views: 0
Thread owner
Vaughan you ROCK ! Thats just what I needed, on to more surgery! I owe you big time Bro THANKS!!!!!!!!
 
Thread owner
Vaughan thanks again ,really appreciate the help. Thanks to you I was able to slog on and get going again!

B-17 in the stash gave up a turbo(more to come on that build later) and using the donated part I finished up the aft turbo vents.

I also used some sheet styrene painted black to block light from passing thru the opened vents and installed the office.

Glued the fuse halves together

started working on the gun sight

after it sets up it will be time to decide what to do about the raised panel lines,not really wanting to rescribe this thing. Geuss it depends on how much detail I loose sanding the seams
 
Status
Not open for further replies.
Back
Top