Theme editor

Scale Model Shop

Pete's Eduard FW190A-8

Status
Not open for further replies.
Thread owner
You're right Alan, there's no engine. There are quite a few fiddly parts inside the wing, for the u/c bays, which don't fit terribly well and have needed trimming. Why they designed it like this I don't know, maybe just to increase the parts count.
Also an integral pitot - what are the chances of that surviving I wonder.
View attachment 320727
Coming on though, but slowly.

Pete
 

Attachments

  • P1140637.JPG
    P1140637.JPG
    3.4 KB · Views: 0
Why they designed it like this I don't know, maybe just to increase the parts count.

There have been quite a few complaints about the A series aircraft design and build. But they apparently sorted it out for the D series kits and they go together a lot easier. At least a pitot would be easy to scratch build should the worst happen :)
 
More PE today.
View attachment 320588
These handles on the IP are stupidly small!
View attachment 320589Broken one off already, but luckily Eduard include some spares.
Glad I had the foresight to leave the rudder pedals attached to the fret while I bent up the heelrest and threaded the foot strap through the buckle:
View attachment 320590
All in place now:
View attachment 320591
View attachment 320592
They've had a touch of RLM66 on the pedals and leather brown on the straps. Should be able to get the fuselage together tomorrow.
Thanks for watching.

Pete
Incredible detail for a1/72 kit!. Remember the days when you only got a stick for the pilot to sit on and nothing else in the cockpit?!.
 
Hi Peter
Cockpit looks superb. At 1/72 a real credit to your patience and skill. There does seem to be a trend towards more and more ever smaller parts. You may well be right that it is to get the parts count up. How long the pitot will last - not to completion that's for sure :rolling:
Jim
 
Thread owner
Incredible detail for a1/72 kit!. Remember the days when you only got a stick for the pilot to sit on and nothing else in the cockpit?!.
Yes, it is well detailed, and yes, but they gave you a pilot to perch on that stick - perhaps just to fill the otherwise empty space! These Profipacks do seem to be well detailed. Shame my Spitfire had some fit issues. this one seems better, except for the bit inside the wing - the wing/fuselage fit seems perfect.
Hi Peter
Cockpit looks superb. At 1/72 a real credit to your patience and skill. There does seem to be a trend towards more and more ever smaller parts. You may well be right that it is to get the parts count up. How long the pitot will last - not to completion that's for sure :rolling:
Jim
Stubbornness and meanness Jim! I've paid for these little blighters, and I'm going to use them, even if they do break off later!

Pete
 
Nice work Peter, I would cut the pitot tube off now, drill a little hole then fit it later.
 
Thread owner
Might just as well leave it Ian, if (when) it does break off it'll save me having to cut it!
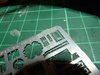
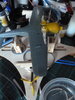
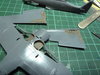
Brush-painted the internals of the u/c bays:
View attachment 320820
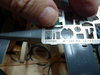
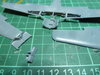
Also fitted the wing cannons, which have to go in before the upper wings are fitted.

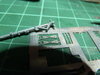
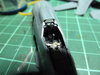
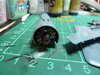
Then fitted the upper part of the IP, with some difficulty, because:
a) the locating slots in the fuselage are wide enough for the plastic panel, but not when it has two layers of PE on it, and
b) I'd stupidly assumed that I could drop it into place from above after the fuselage was assembled, but it need to go in from below, so I had to lower it into the cockpit then lift it into place with a fine pair of tweezers.
View attachment 320821
It's in now though. Letting that set before fitting the coaming over it. You might notice that you can't see those tiny little PE 'handles' that were on the lower part of the IP. There are 3 reasons for that:
1. They're too small to see,
2. The upper IP is in the way,
3. They've disappeared. Possibly abducted by aliens, although there is a remote possibility that I'd knocked them off while fitting the upper part. However, see 1) and 2).

I'm going to fit a spare closed canopy (Eduard give you 2 designs of canopy, each one either open or closed), gluing it in with Maskol. That seemed to work well on my Spitfire, and I don't want to risk damaging the cockpit detail with foam, tissue, or whatever. A canopy will also protect that rather vulnerable gunsight.

Thanks for looking.

Pete
 

Attachments

  • P1140639.JPG
    P1140639.JPG
    3.2 KB · Views: 0
  • P1140638.JPG
    P1140638.JPG
    3.3 KB · Views: 0
Nice update Pete. Your certainly heading in the right direction despite all the alien interventions:smiling2::thumb2:
 
Thread owner
I've a confession to make. Eduard supply PE replacements for those bendy bits on the u/c legs (what are those bendy bits called?) but I'm not going to use them. I'd have no problem with fitting them but they replace a plastic part that is moulded on, and I'm not sure I could remove the plastic part without weakening the leg.
View attachment 321047
The wings, ailerons, tail and fin are on now, it's starting to look like an aircraft.
View attachment 321048
The wing was a perfect fit when dry-fitted, but needed a bit of filler when the glue was on. Why/how does that happen?:confused:
The spare canopy is on to protect the cockpit. When I've fitted the masks to the windshield and the canopy I'm going to use, we might see some paint!

Pete
 

Attachments

  • P1140642.JPG
    P1140642.JPG
    3.3 KB · Views: 0
  • P1140641.JPG
    P1140641.JPG
    2.9 KB · Views: 0
Thread owner
Hmmm. There's a frame aerial under the rear fuselage, supplied as both plastic and PE.
View attachment 321075
You can see the PE version, part 15, in the photo above. Inside it is the plastic part, so clearly the PE is a lot larger.
It has to fit here, in this slot in the fuselage:
View attachment 321076
Am I supposed to twist the 'legs' to fit them into that slot, then fill the space in between, or what? If I use the plastic part, it fits the slot, but it's already broken once and surely will again.
Any ideas?

Pete
 

Attachments

  • P1140644.JPG
    P1140644.JPG
    3.1 KB · Views: 0
  • P1140643.JPG
    P1140643.JPG
    3.2 KB · Views: 0
Thread owner
Paint!!!
Well, a start:
View attachment 321308
This is the scheme I'm using:
View attachment 321309
I'll give that plenty of time to cure before masking. Then the red tips on the prop, then the black - I can try some pre-shading while the black is in the airbrush.

Pete
 

Attachments

  • P1140645.JPG
    P1140645.JPG
    3.8 KB · Views: 0
  • P1140646.JPG
    P1140646.JPG
    2.9 KB · Views: 0
Excellent work. I swore no more PE for 1:72 builds. However, it does add a level of detail which is difficult to beat.
 
Status
Not open for further replies.
Back
Top