Theme editor

Scale Model Shop

Pete's Eurocopter

Status
Not open for further replies.
Hi Peter, just had a good read trough from the start.:smiling4:
Sorry to read about all the troubles this one has given you but you're making a very nice helo.:thumb2:
Good luck with the landing gear fix.

Fernando
 
Thread owner
Well, after spending a few sessions touching up the overspray as well as working on some of the external details, I thought I'd better try to fix the undercarriage before starting on the decals. So, a few minutes with a 0,8 mm drill, and a couple of short lengths cut from a paperclip, and we have this:
View attachment 303358
A couple of blobs of thick CA glue, and it seems to have gone back together quite well - I'll leave it alone for a day for the CA to really cure. Meanwhile, I have rotors to paint and assemble!

Pete
 

Attachments

  • P1140268.JPG
    P1140268.JPG
    3.1 KB · Views: 0
Sorry to hear that Joe. Not too much damage I hope?
Enough to have to spend a day doing repairs rather than painting. It's my fault, one of those moments we all seem to have every now and again.

Your fix is coming along nicely too, the use of the paperclips to create a join is well done.
 
This is fighting you all the way Peter, your putting up a good fight and you will beat it I'm sure.
 
Wow! What a challenge. I admire your tenacity to stick with this build. I am sure it will all be worth it in the end. Great stuff:thumb2:
 
Thread owner
Thanks Steve. I might not be skilled, but I'm stubborn!

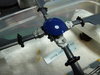
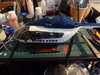
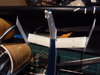
A few more bits done: these little beggars have to be fitted to the rotor blades:
View attachment 303812
They're a little less than 3 mm long. There's a tiny recess on the end further from the ball, which looks as though it should fit on a pin on the rotor blade, but there is no pin to fit them to. After several failed attempts to hold them in place while the cement took hold, I settled for applying a blob of Tamiya cement on the blade, placing the ball-ended thingies in the blob, and letting the surface tension of the cement pull them into place.

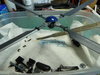
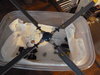
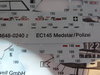
There are also 4 pitch control links to fit between the blades and a slotted disc on the spindle, which don't show up well on the photo:
View attachment 303813

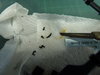
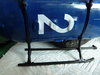
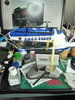
Surprisingly, none of the parts were captured by the carpet monster, so here's the rotor complete except for decals:
View attachment 303814

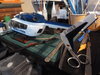
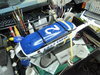
Revell give you a choice of having the main rotor permanently attached, or removable, and I've gone for removable so I could assemble and paint it separately from the main body. The repair to the undercarriage went well, so the next stage will be a massive decalling session, then I'll add the numerous little bits (aerials, grab handles, rescue winch, nav lights, etc) that would inevitably get knocked off if I fit them before finishing the decals.

Pete
 

Attachments

  • P1140273.JPG
    P1140273.JPG
    3.2 KB · Views: 0
  • P1140272.JPG
    P1140272.JPG
    3.6 KB · Views: 0
  • P1140271.JPG
    P1140271.JPG
    2.4 KB · Views: 0
Thread owner
Started on the decals; the main rotor:
View attachment 303970
The main body (LH side only so far):
View attachment 303971View attachment 303972
Currently waiting for the Micro Set to dry.
I still haven't decided whether or not to add the 'phone number on the side windows, as shown on the instructions here:
View attachment 303973
It's made up of 3 separate decals, and I think my chances of getting them all lined up correctly are slim, and they'll obscure the view of the interior. Any thoughts anyone?

Pete
 

Attachments

  • P1140278.JPG
    P1140278.JPG
    2.6 KB · Views: 0
  • P1140275.JPG
    P1140275.JPG
    4 KB · Views: 0
  • P1140274.JPG
    P1140274.JPG
    3.9 KB · Views: 0
  • P1140277.JPG
    P1140277.JPG
    3.3 KB · Views: 0
That's looking very smart Pete. Personally I'd leave the phone number off, it detracts from an otherwise attractive scheme.
 
Thread owner
Thanks Joe, I agree, it would look a bit cluttered with that number on.
More fun with the decal numbering - decals number 169 go on the tailplane - but which 169? There are two different pairs with that number!
View attachment 304171
Must be the upper ones, which state "No Handling". Done:
View attachment 304172
RH side now completed:


As I've said before, I'm very impressed by these decals, which allow quite a bit of pulling about with tweezers to get them in the right place, and they respond well to Micro Set/Sol - this big one on the underside was a wrinkled mess where it goes over the protruding panels, but settled down nicely after a couple of coats of Micro Set.

View attachment 304174

Checking over the decal instructions showed that I'd missed a couple on the LH side. They're now added, but I won't bore you with another photo as they're too small to see anyway!

Now on to adding grab handles, aerials, and other fiddly bits.

Pete
 

Attachments

  • P1140283.JPG
    P1140283.JPG
    3.4 KB · Views: 0
  • P1140282.JPG
    P1140282.JPG
    3.8 KB · Views: 0
  • P1140281.JPG
    P1140281.JPG
    3.3 KB · Views: 0
  • P1140280.JPG
    P1140280.JPG
    3.1 KB · Views: 0
Thread owner
Thanks Ian. Amazing how decals can improve a model isn't it.

Pete
 
Amazing exercise in tenacity. Some good decisions enabled an excellent outcome. PaulE
 
Hi Peter
I see this is still giving you grief but sheer bloody minded determination will see it done. Masking the windows has actually worked pretty well. Shame about the drop but as you say it is repairable - just another :flushed: :worried: :cold-sweat: moment.
Jim
 
Thread owner
Getting to be hard to find anywhere to hold this! Should've stuck all the fragile bits on the bottom first, but I was trying to alternate bottom and top so the cement could set without risk of disturbing it. Never mind, a bit of foam taped to the engine cover to give some clearance, then the whole thing taped to my vice:
View attachment 304308View attachment 304308View attachment 304309
Apologies for Britmodeller in the background!:rolling:

Did I mention that this thing has a lot of small sticky-out bits?
View attachment 304310

Just two more aerials to fit, then the tail rotor, a couple more lights, and the winch. Oh, and the searchlight and the IR pod, but I've broken a bit of the searchlight, and Revell haven't included the mounting for the IR pod!:sad:

Pete
 

Attachments

  • P1140286.JPG
    P1140286.JPG
    4.1 KB · Views: 0
  • P1140285.JPG
    P1140285.JPG
    4.8 KB · Views: 0
  • P1140287.JPG
    P1140287.JPG
    4.7 KB · Views: 0
Thread owner
Yet another problem! You can see in the last photo above, a recess in the nose that should house a light, as shown in a photo of the original at http://www.airliners.net/photo/Poli...G6K+CSZuc6sWpBuijZTpfKg/RSuK2AeeYaN+/R/cyIA==
At one point in the instructions we're told to paint the interior of this recess silver, so it seems a fair guess that there's a clear part to be glued in there, yes? Sure enough there's a clear part of the right shape, but it's shaded out on the sprue layout, and isn't mentioned anywhere in the instructions. Still, It's the only part that could possibly be intended to fit there. Only problem - it's too b****y small! We'll, it'll have to do, too small or not. I'll just try to fill the gap around it. On the bright side, I mentioned earlier that the instructions refer to two parts (aerials) numbered 86, but there was only one; checking over the parts remaining, I found an identical aerial... numbered 137.
I need something simpler to build. Anyone know a kit where things fit, and the instructions match the kit?

Pete
 
Good save on the landing gear Pete.:thumb2:
The decals look very nice and are really turning this in a very colourful birdie.:hugging-face:

Fernando
ps. Bandai and Finemolds are excellent manufactures of kits:smirk:
 
Thread owner
Thanks Fernando! It is rather nice, just a pity the manufacturers make it such hard work. Maybe I should stick to Airfix starter kits!:cool:
I have a few of those in the stash, and a couple of Eduard aircraft... but the one that's begging to be built next is... wait for it... another Revell helicopter! Glutton for punishment aren't I!

Pete
 
Status
Not open for further replies.
Back
Top