Theme editor

Scale Model Shop

Phil's 1/48 Hasegawa Typhoon Mk.Ib car door

Status
Not open for further replies.

PhilJ

New member
Joined
May 14, 2015
Messages
1,145
Reaction score
0
Points
0
1/3
Thread owner
Hi all,
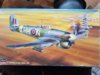
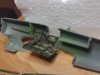
So this is my next build, which will probably be finished with reference to a local example stationed at RAF Manston Kent.
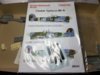
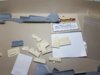
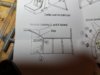
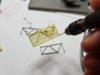
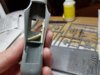
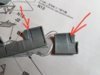
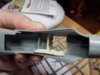
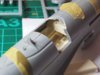
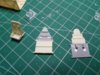
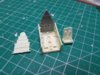
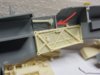
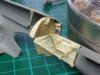
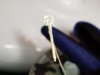
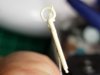
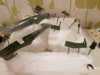
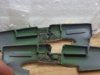
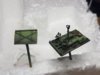
I have lots of extras including eduards BIG ED (PE including landing flaps), Barracudas resin cockpit, exhausts and intakes and techmod decals. Some of this is doubled as I also have the teardrop version in the stash so will use the barracuda resin for this one as it will probably be more visible due to the car door and the detail looks lovely. This is my first attempt at a resin cockpit so here goes.
 
Thread owner
This is the my first attempt at a resin cockpit and as such I tried to find a vid of this particular one to see if there was any fit issues but nothing.
I read the quite brief instructions and it explained that it is important to make sure the control panel fits, if it does then the whole lot will be fine.
View attachment 289996
You'll notice above it says to remove the coaming on both halves, this is to give space for the panel.
I decided to dry fit and mark either side of the panel with a pencil and see if I could get away with just thinning a section so not to hack to much and have to fill later by first the side panels had to be drilled and dry fitted...
View attachment 289997
 

Attachments

  • 20171106_235947.jpg
    20171106_235947.jpg
    2.1 KB · Views: 0
  • 20171106_210049.jpg
    20171106_210049.jpg
    2.1 KB · Views: 0
Thread owner
View attachment 289998
I sized up a drill bit with the origional side wall frame and used this to drill the holes for the resin side wall which dry fitted perfectly.
As you can see from above I then held the control panel in place and marked either side with a pencil (the panel has been moved in the image to show result).
View attachment 289999
I then run a blade along the two pencil marks and in between and scrapped away until a neat recess was made as shown above.
View attachment 290000
As you can see the panel now fits in place but now the kit part to the left is hampering a clean fit, after a quick sand (being careful not to damage the locating pin) this is solved and all seems ok. Some more dry fitting will be need with the floor this time but now the panel fits the I structions said it should all fit, well we'll see...
 

Attachments

  • 20171106_221042.jpg
    20171106_221042.jpg
    3 KB · Views: 0
  • 20171107_005145.jpg
    20171107_005145.jpg
    2.3 KB · Views: 0
  • 20171106_235837.jpg
    20171106_235837.jpg
    2.9 KB · Views: 0
Thread owner
Floor panel, side panel and instrument panel dry fitted and all seems ok without the need to touch any of the exterior fuselage. Now I can start building the cockpit.
View attachment 290030
 

Attachments

  • 20171107_124447.jpg
    20171107_124447.jpg
    2.8 KB · Views: 0
Thread owner
So I checked my reference on the bulkhead and it turns out that it is the triangular topped one and not the rounded type that comes with the resin kit...
View attachment 290056
Problem is the resin seat won't fit so some mutilation takes place...
View attachment 290057
The white round marks are filled release pin marks. A piece of styrene rod from an unused piece from a previous kit was used to emulate the bar for the seat location. While I was at it I joined the one on the right together and this will be for the future bubbletop version thus killing two birds with one stone.
 

Attachments

  • 20171107_181634.jpg
    20171107_181634.jpg
    3 KB · Views: 0
  • 20171107_153818.jpg
    20171107_153818.jpg
    2.9 KB · Views: 0
Thread owner
A piece of plasticard was shaped and placed to show more detail and to carry some resin instrument.
View attachment 290060
 

Attachments

  • 20171107_232503.jpg
    20171107_232503.jpg
    2.6 KB · Views: 0
Working at a great pace Phil. I've only used a resin cockpit once, and they really make quite a difference.
 
I built this kit last year. Typical Hasegawa with fuselage inserts. Instructions need to be ignored and fuselage inserts glued to fuselage halves first as you have done. Thus avoiding a load of filling and sanding.Otherwise a nice kit.
 
Thread owner
Getting there with the resin, I decided to give quite an informative description on this part as I couldn't find any build reference to the barracuda set online so hopefully this will help someone going forward as there are some fit issues and dry fitting is highly recommended.View attachment 290084
As you can see the door jam in front of the panel has had to be thinned and a little piece cut out to take an instrument, it will be filled and tidied up before priming.
 

Attachments

  • 20171109_111207.jpg
    20171109_111207.jpg
    2.9 KB · Views: 0
Thread owner
Some more wiring added for detail to the side walls and the panels were finally glued in place now that everything has been dry fitted, note the small piece of styrene strip added to the top of one half of the fuselage to help fill the gap.
View attachment 290157

Everything was then primed and most parts painted either cockpit green, flat black (I used tamiya rubber black).

View attachment 290158
 

Attachments

  • 20171111_001542.jpg
    20171111_001542.jpg
    3.1 KB · Views: 0
  • 20171111_000435.jpg
    20171111_000435.jpg
    2.6 KB · Views: 0
Nice work Phil. There was a big gap to fill on mine between the inserts as well. I'm glad I was experienced enough with Hasegawa kits to know not to glue the inserts together first and then attach to fuselage as the instructions tell you to do.Would have ruined the model trying to put it right
 
Thread owner
Nice work Phil. There was a big gap to fill on mine between the inserts as well. I'm glad I was experienced enough with Hasegawa kits to know not to glue the inserts together first and then attach to fuselage as the instructions tell you to do.Would have ruined the model trying to put it right
Cheers Dave. Excuse my ignorance this is my first hasegawa kit, what do you mean by gap between the inserts? Where abouts is this?
 
Thread owner
View attachment 290883 View attachment 290884 View attachment 290885 View attachment 290886
Here's where I'm up to on the cockpit so far, after a seal of klear I treated the cockpit to some ak interactive wash for green and some oil paints to lighten/darken some areas, just trying some new techniques really. Some placards were touch/dry brushed and some (like the red one on the floor of the cockpit) were airscale 1/48 raf placards.
 

Attachments

  • 20171123_212246.jpg
    20171123_212246.jpg
    2.4 KB · Views: 0
  • 20171123_212324.jpg
    20171123_212324.jpg
    1.9 KB · Views: 0
  • 20171123_212340.jpg
    20171123_212340.jpg
    2.2 KB · Views: 0
  • 20171123_212608.jpg
    20171123_212608.jpg
    2.3 KB · Views: 0
Thread owner
View attachment 290887
A couple of pieces together under hopefully some better light, before closing up.
Thanks for looking, any constructive critism is welcome as always.
 

Attachments

  • 20171123_213126.jpg
    20171123_213126.jpg
    2.5 KB · Views: 0
This is a very helpful thread and a great build. I'll be looking back to this when I get round to my tiffy.
 
Status
Not open for further replies.
Back
Top