
You are using an out of date browser. It may not display this or other websites correctly.
You should upgrade or use an alternative browser.
You should upgrade or use an alternative browser.
Phil's 1/48 Hasegawa Typhoon Mk.Ib car door
- Thread starter PhilJ
- Start date
- Status
- Not open for further replies.
As I'm slowing the pace awaiting my new AB, I thought I would scratch build some lighting. Here's what I have done so far.
First of all I made the flat plastic standard light piece concave with the appropriate size round sanding head bit on my battery operated multi tool, hopefully you'll see the effect.
View attachment 291126
View attachment 291127
First of all I made the flat plastic standard light piece concave with the appropriate size round sanding head bit on my battery operated multi tool, hopefully you'll see the effect.
View attachment 291126
View attachment 291127
Attachments
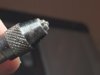
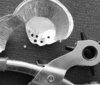
Next I prepared some bulbs which were tag ends from the clear parts spruce, I got two pieces of similar size and held them half way in a pin vice while sanding it to a round shape. Now this is fiddly and they ping off into oblivion on a couple of attempts but the result is good as I hope you can see here:
View attachment 291128
View attachment 291128
Attachments
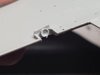
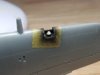
Next I drilled the back of the "bulbs" and glued some copper wire in place and drilled the appropriate size hole through the reflector dish to take it.
View attachment 291129
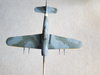
Next I will glue the tops of the wings on and make some reflectors for the lights before final fit of the bulbs.
View attachment 291129
Next I will glue the tops of the wings on and make some reflectors for the lights before final fit of the bulbs.
Attachments
G
Guest
Guest
Wow, those bulbs look fiddly! Great work here, watching with interest.
View attachment 291145
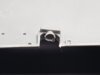
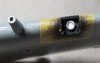
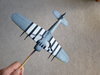
With reflectors in place a hole was drilled in the middle of both and the dummy bulbs were introduced.
View attachment 291146
With reflectors in place a hole was drilled in the middle of both and the dummy bulbs were introduced.
View attachment 291146
Attachments
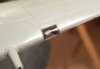
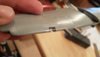
After looking at the kit light glass they are pretty thick with some distortion which seems a shame after the work that's been done so decided to try the cellotape option.View attachment 291190
And after trimming...
View attachment 291191
I pre cut some masks to go over the "glass" which will give me the panel line through the centre for when it comes to painting. Hopefully with some gentle care they should look ok.
And after trimming...
View attachment 291191
I pre cut some masks to go over the "glass" which will give me the panel line through the centre for when it comes to painting. Hopefully with some gentle care they should look ok.
Attachments
Well I've never seen that trick before. Nice one. Have you used it before, any chance of it yellowing over time ?cellotape option.
Super impressed so far! I have both the car door and bubble top Hase Typhoon's in the stash waiting to be built.
The Barracuda cockpit looks good too!
I'm also impressed with the wing lens trick too and it's the first time I've seen it.
The Barracuda cockpit looks good too!
I'm also impressed with the wing lens trick too and it's the first time I've seen it.
Got the bubbletop myself too, will be nice to do that one with the rockets. Thanks for the comments.Super impressed so far! I have both the car door and bubble top Hase Typhoon's in the stash waiting to be built.
The Barracuda cockpit looks good too!
I'm also impressed with the wing lens trick too and it's the first time I've seen it.
Thanks for the comments guys, not sure if it will yellow over time to be honest, worst case scenario is it will look good for initial photos and I can always swap for the kit if it happens.
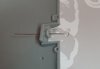
Masking up the frame for the lights was fiddly and still not sure how it's gonna turn out when removed so will have to wait and see I spose. More to follow tomorrow.
Masking up the frame for the lights was fiddly and still not sure how it's gonna turn out when removed so will have to wait and see I spose. More to follow tomorrow.
Well I've never seen that trick before. Nice one. Have you used it before, any chance of it yellowing over time ?
View attachment 296038
Primed and painted with tamiya and Mr color.View attachment 296039
...and the start of the decals, this will be DN406 PRF out of Manston Kent. Decals by Techmod.View attachment 296040
Primed and painted with tamiya and Mr color.View attachment 296039
...and the start of the decals, this will be DN406 PRF out of Manston Kent. Decals by Techmod.View attachment 296040
Attachments

G
Guest
Guest
That’s what I was worried about when I saw the tape-the yellowing and brittleness/cracking over time. Will be interesting to see what happens over long term. Btw, looking good and will be good to see this shape up.Thanks for the comments guys, not sure if it will yellow over time to be honest, worst case scenario is it will look good for initial photos and I can always swap for the kit if it happens.
Masking up the frame for the lights was fiddly and still not sure how it's gonna turn out when removed so will have to wait and see I spose. More to follow tomorrow.
Cheers, John
Thinking about it. I bet the real Perspex covers went a bit yellow / cloudy over time anyway.Thanks for the comments guys, not sure if it will yellow over time to be honest, worst case scenario is it will look good for initial photos and I can always swap for the kit if it happens.
Masking up the frame for the lights was fiddly and still not sure how it's gonna turn out when removed so will have to wait and see I spose. More to follow tomorrow.
- Status
- Not open for further replies.
Legal Notice
scalemodelling.co.uk is a privately operated online discussion forum. All content posted by members reflects their own views and opinions and does not necessarily represent those of the forum owners or administrators. While reasonable efforts are made to moderate content, no responsibility is accepted for user-generated material. By using this site, you agree to comply with UK law and the forum rules.