Theme editor

Scale Model Shop

Pushing Back .......

Thread owner
Last images for tonight .....

two failed manhole cover and frame casts ......

P1010691.webp

both cover and frame broken .....

P1010692.webp

cover survived but frame Kaput .......

I'll attempt again tomorrow.

cheers for now

toto
 
Thread owner
So ....
The mancave is under lock and key. Thinking on too tomorrow.

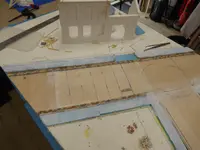
Was going to do a primer coat to the subroad surface but decided notto bother. Once these cobbles are down, nobody is gong to see anything. N9t just that. It would cover my cobble laying reference points.

I decided to vspend a little more time with the plaster casting in order to get say .... 4 sets of manhole covers and frames cast.

I originally envisaged 3 sets but the creator from the explosion has done away with one of them ..... right in the middle of the T junction. That leaves two and one spare.

Once I get the " wet " stuff away, I will start cobbling. Its going to be a time consuming exercise but believe it or not..... once you get started, its amazing the coverage that you can achieve.

I will of course need to cut out the hole for the explosion on the Tee junction ( not that hard really ) and dig down into the foam to create the crator. I only have 40mm of foam depth which at 9mm per foot ( scale ) only gives me 4 and a half foot of depth. It will have to do.

I need to look at the footprint of the buildings and decide whether or not they need raised to meet pavement level ( to be decided ). Then start gluing the buildings together akigng any last minute adjustments to final positioning.

Then ...... from a life of plaster .... to a life of balsa wood and a proxxon table saw to get started on kitting the buildings out with floors ceilings ad roofs ........ or parts thereof. :D

So .... I have given you a bit of an insight into my head and planning thoughts for now. The running order could of course change ( without notice ) but I will try and stick to it as jmuch as possible to make the thread as followable as possible .....

Time to go and see what everone else has been up to now.

Cheers

Toto
 
Last edited:
Fascinating to follow and see techniques that non diorama guys like me have no clue about - following with interest.
 
Thread owner
Hi Stefee,

Glad it is of interest. Its all reasonably new to me as well. I used to dabble in railway modelling before now but all the skills are transferable.

The cobbling process starts today and I also need to find a route into my bomb crator for some cabling before things go to far. ?.. always need to be one step in front.

Im just really getting a grip of things myself and there will be plenty mistakes and compromises along the way. I have taken on a big project for my first but .... well .... I tend not to do things in half measures.

Looking forward to you popping in with your comments.

Cheers

Toto
 
Thread owner
Started the cobbling this afternoon. Only just started it about an hour ago so not too much to show.

I need to go and pick up the missus from her work so I will carry on when I come back and post up a photo or two of my progress so far.

The jury is out on the use of some of the " specials " but its too late now. They will be getting weathered down with black washes etc so that will help take a bit of the kick out of them.

They are only used in any great number in the gutter areas with the main roads width being done mainly in greys with the odd bit of colour again all weathered down on completion.

More on my return.

Toto
 
Thread owner
OK ...... here is where I am with the guttering so far .... feel free to give me it tight on the choice of colours used here ...

P1010693.webp

some more .....

P1010696.webp

they will calm down significantly after a dark wash is applied ( I hope ) :D

P1010697.webp

a better view ....

P1010699.webp

working my way into where the explosion will be sited....

P1010700.webp

last one for now ..... About to start the main road section after marking in some more reference / guidance lines ....

more later

toto
 
Thread owner
OK ..... started on the first " bay of 8 rows " ....
P1010701.webp

you'll see what I mean by that now ....

P1010703.webp

the first row down ....

P1010704.webp

and from higher ....

P1010705.webp

we are flying now .....

P1010706.webp

and one last image for the moment....

I'm away for a coffee ..... I need one ..... all that lifting and laying ..... :D

cheers

toto
 

Attachments

  • P1010702.webp
    P1010702.webp
    462.6 KB · Views: 0
Thread owner
I have been....... :D

another 8 rows done .... to be precise.

P1010707.webp

takes a bit of time .....

P1010708.webp

there is a bit of an undulation in the road .... probably a bit warping due to the balsa having been dampened with the PVA but I'm not too phased as these roads would have been a bit knackered. They certainly would not have been built for heavy military vehicles ......

P1010709.webp

and an ariel shot to finish off for the night.

more tomorrow.

cheers

toto
 
Thread owner
Well ..... i guess we all know what I am on tomorrow then.

I hope to get the other 3 or 4 bays that are marked up completed and then start working in from all directions towards the explosion area.

That will let me get the explosion footprint worked out ..... and cut out. yes ..... there will come a point that I will need to move backwards in order to move forwards if that makes sense. :oops:

I will have to dig out the foam to about baseboard ( plywood ) level in order to incase a small stand for the LED pack and to hide the wiring etc. the wiring should be able to be fished and concealled under the camber of the road with a bit luck to a switch on the perimeter of the baseboard, maybe housed in a small outhouse or something.

lets see what I can come up with nearer the time ..... its all done on the run .....

cheers

toto
 
Thread owner
OK ...... absolutely the last post for tonight ..... at risk of boring the crap out of you all...... Just whilst I had the explosion in my mind ....... what I'll be using .....

P1010710.webp

some light gauge wiring to go from the explosion site to a switched 9 volt battery on the perimeter ...

P1010711.webp

some heat shrink ....

speaking of which .....

P1010715.webp

and here it is ..... the switched battery unit.

P1010716.webp


with a handy little switch

P1010712.webp

and one of these ....

P1010713.webp

which has one of these inside ....

P1010714.webp

with the option for more should the intensity of one not be enough but I doubt it.

P1010717.webp

we will be needing some of this to create the shape of the explosion cloud and inside which will hide the LED ........

P1010718.webp

last but by no means least ..... cotton wool balls and pads for the illusion of smoke plumes etc. Obviously painted to illuminate the desired flame colours etc.

now that I have that off my chest ..... hat .... coat ..... gone

toto
 
Large warehouses often had large incinerators for the disposal of packing waste. Tall chimneys for good draft & heavy iron doors to contain the fire. Just an idea w/late cuppa.
 
Thread owner
I csrtainlyhave ths space around the buildings but going by the amount of damage already done, would any of these elements have survived ?

Worth thinking about though as I still have plenty of time for changes.

Cheers

Toto
 
The thought was justification for chimney & fireplace on piece to be added.
 
All looking very impressive Toto, you have some patience with those cobbles.

Your comment about the roads not being up to military vehicles reminded me of a story my dad told me. He did national service in the 50's and was a tank driver, specifically a Mk V Centurion. He told me about driving it through tight Italian streets, the weight of the tank flipping the kerb stones out of place. :D

With the crater, have you thought about having half a car or van poking out with the front end destroyed by the explosion?
 
Thread owner
Hi Mr Bowcat,

Thanks for your comments. The cobbles are tedious and theraputic at the same time. I done 16 rows last night and will hopefully gat at least the same knocked off tonight. Hopefully more.

I thought about a car or something, preferably an easy build to sacrifice in the creator. I'll have a look online and see whats available .....I recall a Simca being available, looked straight forward but if there any other suggestions of a easy build before I hit the buy button ..... :D ..... I'll consider it.

I also am looking into an Archer self propelled anti tank gun that I have. I'll create another thread for that as I am trying to work out if it would be doable in sub assemblies for painting purpose's.

More on that elsewhere.

Cheers for now

Toto
 
Last edited:
Thread owner
Simca 5 staff car will join the stash ....... its going down the hole.

Looks like an easy build and would make a great practice piece for air brushing etc. Should arrive tomorrow so will get it built quick for use in posturing my chicken wire for the explosion framework.

Given that most of the car ( its just a wee one ) will be consumed in the explosion, painting wont reaaly need to be the best. However, I am going to try to make a reasonable job of it given that it will be my first real attempt at air brushing a vehicle. ...... could be interesting ...... or embarasing ...... still, as they say ..... he who hasn't made a mistake ....... hasn't made anything.

Hopefully catch you all in the shed later for some more cobbling.

Cheers for now

Toto
 
I had the same issue when I was casting the manhole frames. I added a few drops of PVA to the mix and brushed neat washing up liquid into the mould before pouring that seemed to help a lot.
 
Thread owner
Hi scottie,

I always rinse my moulds in a washing up liquid and water mix to both clean and break the surface tension of the mould. I have not tried the PVA trick though so maybe add a tad to the mix.

Do you dilute the PVA prior to adding ?

Cheers

Toto
 
Last edited:
Back
Top