Theme editor

Scale Model Shop

Revell 1/32 Grumman Wildcat circa 1969

Status
Not open for further replies.

Vaughan

Well-known member
Joined
Apr 1, 2011
Messages
3,246
Reaction score
51
Points
48
1/3
Thread owner
Hi all

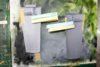
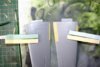
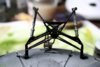
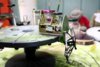
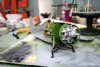
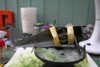
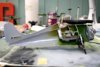
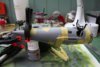
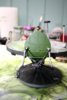
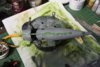
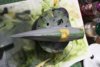
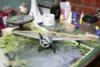
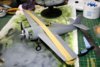
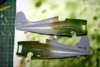
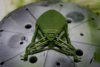
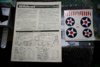
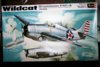
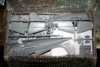
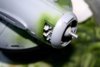
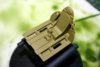
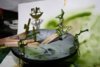
Have made a start on the Wildcat that I bought off eBay. Thought I'd get started on it as I was waiting for the decals to arrive for the BF109G6. The Kit was complete and all on the original sprues. There are going to be a lot of fit issues mainly with the fuselage and also the cowling I can't complain considering its age. Also the under carriage has to be fitted when the fuselage halves are glued together so that might present a few problems. I gather from further research that the exposed parts of the undercarriage were in fact painted black and not green zinc chromate, so will have to change that.

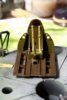
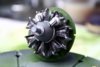
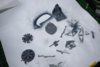
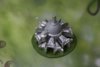
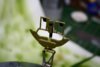
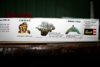
There is not a great deal of detail in the cockpit area and the engine is only made up of 4 parts but still looks ok anyway here are some images of my progress so far.

View attachment 35321

View attachment 35322

View attachment 35323

View attachment 35324

View attachment 35325

View attachment 35326

View attachment 35327

View attachment 35328

View attachment 35329

View attachment 35330

View attachment 35331

View attachment 35332

View attachment 148347

View attachment 148348

View attachment 148349

View attachment 148350

View attachment 148351

View attachment 148352

View attachment 148353

View attachment 148354

View attachment 148355

View attachment 148356

View attachment 148357

View attachment 148358
 

Attachments

  • _MG_0347.jpg
    _MG_0347.jpg
    5.9 KB · Views: 0
  • _MG_0339.jpg
    _MG_0339.jpg
    5.5 KB · Views: 0
  • IMG_0013.jpg
    IMG_0013.jpg
    5.1 KB · Views: 0
  • _MG_0341.jpg
    _MG_0341.jpg
    5.5 KB · Views: 0
  • _MG_0322.jpg
    _MG_0322.jpg
    5.2 KB · Views: 0
  • _MG_0357.jpg
    _MG_0357.jpg
    5.6 KB · Views: 0
  • _MG_0320.jpg
    _MG_0320.jpg
    2.4 KB · Views: 0
  • _MG_0317.jpg
    _MG_0317.jpg
    2.9 KB · Views: 0
  • _MG_0318.jpg
    _MG_0318.jpg
    2.8 KB · Views: 0
  • _MG_0018.jpg
    _MG_0018.jpg
    5.6 KB · Views: 0
  • _MG_0340.jpg
    _MG_0340.jpg
    5.7 KB · Views: 0
  • _MG_0344.jpg
    _MG_0344.jpg
    5.9 KB · Views: 0
I built this klit many many years ago and can see already that you are making a better job than I did.

I was always fascinated byb the folding wings and will be watching with interest as the build progesses.
 
Thread owner
Hi All

Just a question regarding the exhaust on the Wildcat there are two blimps on the underside of the fuselage (see image) on this model are they in fact the exhausts. I don't seem to be able to find an image of this particular part so unsure.

Vaughan

View attachment 35333

View attachment 148359
 

Attachments

  • _MG_0019.jpg
    _MG_0019.jpg
    5.7 KB · Views: 0
One photo I have of the Wildcat shows the exhausts very clearly.They are the two lumps you refer to on the underside of the nose coming out of the rear of the engine cowling in line with the cooling flaps.Hope this helps.
 
Thread owner
Hi Dave

Any chance that you could post the photo on the forum.

Vaughan
 
Hi Vaughan. Don't know if this helps but ......

Grumman F4F-3 Wildcat Photo Walk Around

Gern
 
Sorry for changing the subject, but that undercarriage must take up an enormous chunk of fuselage space!
 
Thread owner
Hi Dave

That's fine thanks for looking up the information anyway.

Vaughan
 
Thread owner
Hi all

Have made some progress regarding weathering the cockpit area and engine. The undercarriage has been painted black following some more research(I thought it was supposed to be green zinc chromate).

I made some seat belts from masking tape they're not brilliant but I think will look ok once viewed in situ. I have also made a start on the folding wings but I'm not sure if I will opt for them in the folded position as the hinges are quite crude.

Vaughan

View attachment 35610

View attachment 35611

View attachment 35612

View attachment 35613

View attachment 35614

View attachment 148636

View attachment 148637

View attachment 148638

View attachment 148639

View attachment 148640
 

Attachments

  • _MG_0084.jpg
    _MG_0084.jpg
    5.9 KB · Views: 0
  • _MG_0085.jpg
    _MG_0085.jpg
    5.7 KB · Views: 0
  • _MG_0078.jpg
    _MG_0078.jpg
    2.9 KB · Views: 0
  • _MG_0081.jpg
    _MG_0081.jpg
    5.7 KB · Views: 0
  • _MG_0080.jpg
    _MG_0080.jpg
    6.1 KB · Views: 0
Thread owner
Andy thanks for that. I have been watching your build with great interest. You attention to detail is outstanding.

Vaughan.
 
Nice build Vaughan.I think your seat belts look very good,Especially considering they are home made.I remember making a Revell 1/32 Wildcat in my youth.I think its still available as the Fleet Air Arms Martlet version.
 
Thread owner
Hi Dave

Yes I think your right. I don't know if it is from the 1969 molds or wether it has been retooled.

Vaughan.
 
Thread owner
Hi all

A bit more progress today managed to fit the cockpit undercarriage and engine to the left side of the fuselage and then followed up with the right half once dry. there are serious fit issues worse that I had originally thought. I had to fight with the undercarriage to line it up with its locator pin. Clamps every where and loads of tape. Left for several hours to dry and then on with the filler. I'm trying the MMD fast drying green putty for the first time so it should be interesting.

Vaughan

View attachment 35640

View attachment 35641

View attachment 35642

View attachment 35643

View attachment 35644

View attachment 35645

View attachment 148666

View attachment 148667

View attachment 148668

View attachment 148669

View attachment 148670

View attachment 148671
 

Attachments

  • 2.jpg
    2.jpg
    6.2 KB · Views: 0
  • 3.jpg
    3.jpg
    6.3 KB · Views: 0
  • 4.jpg
    4.jpg
    5.9 KB · Views: 0
  • 5.jpg
    5.jpg
    6.1 KB · Views: 0
  • 6.jpg
    6.jpg
    6 KB · Views: 0
  • 1.jpg
    1.jpg
    2.6 KB · Views: 0
Looking good vaughan,as far as the battle with the kit goes , id say that at the moment youre ahead on points!! I know itll turn out great though, you can still get a nice result from these older revell kits. Keep the pics coming, cheers tony
 
Thread owner
Hi all

More progress, I have now started the filling and sanding. The green putty seems to be going on OK. Tried a dry run with the wings, cowl, propeller and tail plane. Will need to tape wings to create the correct dihedral. I have decided the wings will remain in the open position as the hinges apart from being incorrect didn't work very well.

Vaughan

View attachment 35661

View attachment 35662

View attachment 35663

View attachment 35664

View attachment 35665

View attachment 148687

View attachment 148688

View attachment 148689

View attachment 148690

View attachment 148691
 

Attachments

  • 8.jpg
    8.jpg
    6.2 KB · Views: 0
  • 9.jpg
    9.jpg
    6.1 KB · Views: 0
  • 12.jpg
    12.jpg
    6.3 KB · Views: 0
  • 14.jpg
    14.jpg
    6.4 KB · Views: 0
  • 15.jpg
    15.jpg
    6 KB · Views: 0
Status
Not open for further replies.
Back
Top