Theme editor

Scale Model Shop

Revell 1/32 Hawker Tempest Mk.V

Vaughan

Active member
Joined
Apr 1, 2011
Messages
3,246
Reaction score
51
Points
48
1/3
Thread owner
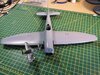
It's been a while since I posted a build thread so here we go with the Hawker Tempest Mk V. This is a re-boxing of the Special Hobby kit minus resin and p.e at around £40 it's not too pricey. The plastic is slightly darker than the normal Revell colour. It's difficult to explain but it's quite soft but at the same time quite brittle. Sanding it is odd too the plastic reminds me of the 21st Century kits even using Tamiya extra thin it takes a long time to set despite how fast it evaporates.
Anyway on to the build the Revell instructions are the in the new style with colour, and believe it or not the sprus have letters to identify them and this is included in the instructions too!!!! (most probably because they are Special Hobby originals)paints are still the Revell ones with no other equivalents.
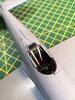
Detail is very good plenty of rivets panel lines, cockpit has lots going on plus the exhausts are made of two parts so we have hollow pipes. There are also two types of weighted wheels included too.
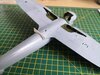
I have so far painted the fuselage wall interior green and black and have made a start on the cockpit frame work. I noticed interestingly that they have included the front half of a radial engine I believe there was a Hawker Tempest II that looks like a Fury and the kit could be made in that version if the other nose was provided.


IMG_20201230_091223.jpg

IMG_20201230_091204.jpg

IMG_20201230_091110.jpg


IMG_20201230_091144.jpg

IMG_20201230_091318.jpg

IMG_20201230_113551.jpg

IMG_20201230_091236.jpg
 
Thread owner
Have spent the last few days building the cockpit.The detail is very good and includes over 40 parts. Not together yet weathering not complete yet. Instrument panel is made of three parts and I have used the decals provided for the dials which went down well with plenty of decal soft

IMG_20210105_112031.jpg
 
Love the Tempest in all its declentions and evolutions.
I will follow your build.
Andrea
 
Looking good so far. As the others have said, the Tempest is a great looking bird.
 
This should be a nice kit. I built the Special Hobby version a few years ago and it went together very nicely, so hopefully this one will too!

The only place that the P-E and resin is really visible on my version is the rather complicated radiator assembly under the nose but there's no reason a decent approximation can't be done in plastic.
 
Thread owner
Interesting Steve this is the assembly instructions for the radiator. Seems quite straight forward but once you start putting the components inside the cowling that's when the problems start. The radiator grills don't fit until you have sanded them into a new shape. When you get to section 35 part number 18 doesn't fit in the cowling at all. I got there in the end but it was a bit of a struggle. All the cockpit components are ready to assemble but I think I'm going to need a couple of pairs of hands to hold all the parts and glue at the same time.
IMG_20210106_154938.jpg

IMG_20210106_160129.jpg

IMG_20210106_160156.jpg
 
Thread owner
I managed to complete the cockpit it was a bit of a challenge trying to lineup everything at the same time. I thought I had some harnesses in the spares box but alas no. So I've ordered some Eduard pre painted belts from eBay should arrive by the 13th. There's plenty to get on with in the mean time so it's not going to slow me down.

IMG_20210107_153907.jpg

IMG_20210107_153849.jpg
 
Office is looking good....you can see the hurricane ancestry there as well.
 
Looking very nice Vaughan. The 'pit has a nice well used look.
 
Thread owner
Harnesses have arrived and are now fitted before they arrived I spent a couple of hours building a 1/144 scale Tempest V that my daughter bought me several years ago. The scale is way too small for me I don't know how you guys build these miniature kits.
Wings are on a bit of a gap where they join the fuselage plastic card was required to fill it. View attachment 411603View attachment 411604View attachment 411605
 

Attachments

  • IMG_20210121_123553.jpg
    IMG_20210121_123553.jpg
    3.5 KB · Views: 0
  • IMG_20210121_123518.jpg
    IMG_20210121_123518.jpg
    3.5 KB · Views: 0
  • IMG_20210119_105258.jpg
    IMG_20210119_105258.jpg
    3.4 KB · Views: 0
Thread owner
Thanks Steven, I airbrushed the camo using a 0.3 needle which was a real challenge, I think I'll stick to the larger scales.
 
Thread owner
I have been busy building and completing the last few stages. All is painted and decals done. I will post the finished Tempest V in the completed section. Thanks for watching. Here's the link to the finished Tempest V


IMG_20210127_104114.jpg
IMG_20210127_104133.jpg

IMG_20210128_151231.jpg

IMG_20210128_151313.jpg

IMG_20210128_164518.jpg
 
Back
Top