Theme editor

Scale Model Shop

Revell 1:32 Mk 22 Spitfire

Status
Not open for further replies.

colin m

Moderator
Staff member
Joined
Dec 26, 2008
Messages
9,113
Reaction score
380
Points
83
Location
Stafford, UK
1/3
Thread owner
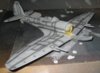
Many will know that this model is actually an old Matchbox model from many years ago, did you build one all those years ago ?

These days it can be bought for between £10.00 and £15.00 ish, I wonder how much it cost all those years back ? It's not great on the detail front, but for the price it's a 1:32 Spitfire ! At this scale you could add a lot more detail, I did look at PE seat belts, but these cost more than the kit, which for me, seemed to defeat the exercise of a big cheap Spit.

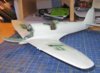
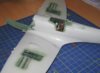
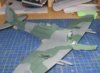
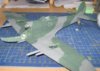
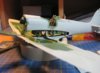
The construction of the model seems a bit complex in areas that it just doesn't need to be. The wings don't meet the fuselage, they meet a filler piece instead, so you don't have one seam to deal with, you get two to fill - oh joy !

The fit is a bit vague in places, just an old mould I guess, so lots of trial fitting and loads of tape required for sure. This old dear is certainly no Tamiya !

View attachment 23705View attachment 23706View attachment 23707

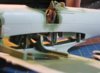
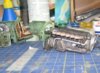
But at least you get an engine to build !

Regards

Colin M....

View attachment 30314

View attachment 30315

View attachment 30316

View attachment 143340

View attachment 143341

View attachment 143342
 

Attachments

  • IMG_0182.jpg
    IMG_0182.jpg
    2.7 KB · Views: 0
  • IMG_0174.jpg
    IMG_0174.jpg
    3.2 KB · Views: 0
  • IMG_0179.jpg
    IMG_0179.jpg
    2.8 KB · Views: 0
It's interesting to think though that there are modellers out there who couldn't really do justice to the Tamiya kit so with that being around the hundred pounds mark I think it's great that you can have a 1/32nd Spit for a tenth of the cost.

Thanks for bringing this to our attention and letting us see just what can be made of it.
 
It's a previous generation kit but,according to the Spitfire experts,it's a good representation of the type. It looks like it will need a bit of beating into shape but that can all be part of the fun. Good luck with it,I for one am looking forward to the finished article. You can't have too many Spitfires!

Cheers

Steve
 
I built 1 before christmas and had a few fitting problems.One being where the gun bays that fit inbetween the halves of the wings. The instructions say to shave a little off certain sides my advice is take more off than you would like or the two halves wont line up. Also had a nightmare trying to line up the front end .Dont know what is was but it was all warped and out of shape.But the end result is a very good model for as you say not alot of money.View attachment 23708View attachment 23709

View attachment 30317

View attachment 30318

View attachment 143343

View attachment 143344
 
I have one of these in the stash, good to see a build so I can make notes :-)
 
Hi colin, great looking spit so far, ive always fancied doing one of these in the silver scheme, keep it up ,cheers tony
 
Thread owner
So, at last the wings are attached to the fuselage, I really don't understand why it was made so difficult, but anyway, attached they are. Dingbat, you look like you got a really good fit with your wings, I wasn't so lucky. My front end (where the engine sits) was also warped. I soaked it in hot water and carefully twisted it into shape, and next day it had returned to its previous shape !!

View attachment 23744View attachment 23745

The gun carriers in the wings are indeed to thick, the instructions do tell you to either remove 0.8mm, or make them 0.8mm thick, I don't know which, so I just sanded them down until they fitted. This is the model's good side, you should see the filler on the other wing ! However, even at this stage, the shape looks about right.

I'm not too concerned about the front panels not fitting that well as I want the engine on show, now my complaint. Why, when I search google images for a good pic of a Rolls Royce Griffon, do I get loads of Merlin Engines popping up ?

Regards

Colin M........

View attachment 30347

View attachment 30348

View attachment 143373

View attachment 143374
 

Attachments

  • IMG_0174.jpg
    IMG_0174.jpg
    2.9 KB · Views: 0
  • IMG_0176.jpg
    IMG_0176.jpg
    2.3 KB · Views: 0
Nice work so far, i can see this being a stunning model when its finished, well dine Colin,

Andy
 
That's looking realy good so far.To be honest it took forever to get everything close.God knows how many times i was prepared to throw it in the bin, it was that frustrating.Also my front end was so warped i ended up glueing one side and the top cover together just so it didn't have huge gaps everywhere.Hope it turns out ok in the end.
 
\ said:
So, at last the wings are attached to the fuselage, I really don't understand why it was made so difficult, but anyway, attached they are. Dingbat, you look like you got a really good fit with your wings, I wasn't so lucky. My front end (where the engine sits) was also warped. I soaked it in hot water and carefully twisted it into shape, and next day it had returned to its previous shape !!View attachment 23744View attachment 23745

The gun carriers in the wings are indeed to thick, the instructions do tell you to either remove 0.8mm, or make them 0.8mm thick, I don't know which, so I just sanded them down until they fitted. This is the model's good side, you should see the filler on the other wing ! However, even at this stage, the shape looks about right.

I'm not too concerned about the front panels not fitting that well as I want the engine on show, now my complaint. Why, when I search google images for a good pic of a Rolls Royce Griffon, do I get loads of Merlin Engines popping up ?

Regards

Colin M........
These any good for you?

http://upload.wikimedia.org/wikipedia/commons/thumb/f/fb/Griffon58.JPG/800px-Griffon58.JPG

http://upload.wikimedia.org/wikipedia/commons/thumb/1/11/Rolls_Royce_Griffon.jpg/800px-Rolls_Royce_Griffon.jpg
 
A couple I found:

Spitfire Griffon Engine. Large version of image no. 7082 from Pixstel=

Go down to the bottom of this page:

Spitfire Mk 1

and lower down this one as well for another good shot:

Chapter 4
 
Ive just started this kit myself, so anything i find i will share on here.
 
Thread owner
Thanks for the leads on the pics gentlemen, all very useful. But what a shame that MK 24 only had 7 hours flying ?? Paul, This may help you a bit, I found it easier to attach one bulkhead at a time, to one half of the fuselage and then just tape the other half on to keep the alignment. I didn't want to risk getting all three in the right place (bearing mind that the location is a bit hit and miss) and trying to attach the fuselage as well.

Regards

Colin M.......
 
Thread owner
A busy Sunday so only managed a bit of work on the 'Big Spit' Because of the amount of filler used, I primed this model. I don't normally bother priming (then again I normally work in 1:72, so it tends to be small amounts of filler which can't be easily seen) However, I think I'm going to be a convert. Priming has helped spot most of the blemishes that needed rectifying and also helped the pre-shading a bit. After all the priming and remedial work was completed I able to paint the underside grey. When I discovered Humbrol 64 is exactly the same as Halfords grey primer ! That made spraying fun.

View attachment 23836View attachment 23835View attachment 23834

Regards

Colin M......

View attachment 30426

View attachment 30427

View attachment 30428

View attachment 143452

View attachment 143453

View attachment 143454
 

Attachments

  • IMG_0176.jpg
    IMG_0176.jpg
    2.6 KB · Views: 0
  • IMG_0180.jpg
    IMG_0180.jpg
    2.3 KB · Views: 0
  • IMG_0175.jpg
    IMG_0175.jpg
    2.5 KB · Views: 0
Coming along great colin, it seems like youre winning the fight! The halfords primer is a great match for US neutral grey once its been darkened by the final varnish , keep it up mate, cheers tony
 
Good job with the filler. I'm not a big fan of pre-shading but I have to admit that yours looks very effective on the underside. I'd say you are definitely winning.

Cheers

Steve
 
Thread owner
Tony, primer - what fun, When I realised the greys clashed I nearly used red primer, maybe I sould get some white just 'incase' !

I know what you mean about pre-shading Steve. It's something I've been working on for my last few models. It's quite difficult with my normal 1:72 models, simply because I can't spray a line fine enough (the AB claims it can do something like 0.5mm, shame I can't). But at 1:32, it's a lot easier, the lines can be so much bigger. I view pre-shading as a bit of a back up. If I put too much colour on and loose it, it's gone, lost, then it's post shading to the rescue.

Regards

Colin M........
 
\ said:
I can't spray a line fine enough (the AB claims it can do something like 0.5mm, shame I can't). Regards

Colin M........
I know what you mean! One of mine should do "pencil thin lines". Not with model paint and me operating it won't.

Red primer is great under yellow by the way.

Cheers

Steve
 
Thread owner
At last, some paint.

View attachment 24155View attachment 24154

I've managed to pull my finger out and do some work to the 'Big Spit'. I did some pre-shading, which was fine for the lighter colour (grey) but not so good on the darker green. So here I tried a bit of post shading, a new process for me, but one I will have to investigate further as I will certainly use it again. I need to correct a few little things but the rest of the day might be taken up by some engine fitting / plumbing.

Regards

Colin M.......

View attachment 30674

View attachment 30675

View attachment 143700

View attachment 143701
 

Attachments

  • IMG_0175.jpg
    IMG_0175.jpg
    2.7 KB · Views: 0
  • IMG_0176.jpg
    IMG_0176.jpg
    2.7 KB · Views: 0
Just jumped back to see this. Top job on the paint. I hope I can get my wings to fit like that.

Cheers

Steve
 
Status
Not open for further replies.
Back
Top