Theme editor

Scale Model Shop

Revell 1/32 P51 5NA MUSTANG

Status
Not open for further replies.
Thread owner
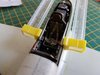
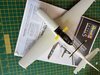
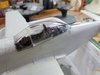
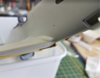
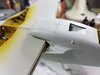
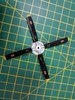
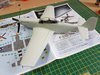
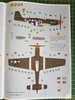
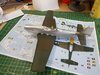
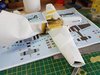
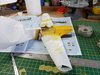
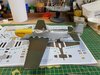
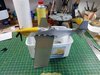
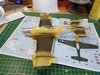
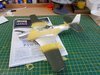
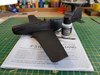
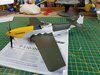
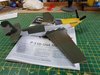
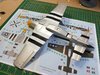
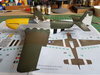
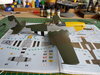
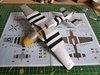
Theuns it's a great kit with a few minor fit issues wing roots at the leading edge need a little attention and a smear of filler. After closing the fuselage the canopy appeared a little too narrow but it was down to the fact that I didn't glue the cockpit walls correctly I should have used clamps to hold it together. But clamping and glueing after the event I managed to correct it. I was able to get some extra thin cement in the gap without damaging the paint work so all's good. Radiator air intake fitted, will need some filling as there are gaps but again will be easily remedied. Prop painted and decales applied needs a matt coat and some weathering to complete.

View attachment 295598View attachment 295594View attachment 295595
View attachment 295596View attachment 295599View attachment 295600
 

Attachments

  • 20180309_123310_resized.jpg
    20180309_123310_resized.jpg
    3 KB · Views: 0
  • 20180309_123633_resized.jpg
    20180309_123633_resized.jpg
    3.5 KB · Views: 0
  • 20180309_160901_resized.jpg
    20180309_160901_resized.jpg
    2.8 KB · Views: 0
  • Screen Shot 2018-03-09 at 16.30.43.png
    Screen Shot 2018-03-09 at 16.30.43.png
    13.3 KB · Views: 0
  • 20180309_163343_resized.jpg
    20180309_163343_resized.jpg
    2.6 KB · Views: 0
  • 20180309_162259_resized.jpg
    20180309_162259_resized.jpg
    3.9 KB · Views: 0
Looking very nice. Quite a good looking kite the Mustang....
 
Thread owner

Attachments

  • 20180313_120411.jpg
    20180313_120411.jpg
    3.6 KB · Views: 0
  • 20180313_120915.jpg
    20180313_120915.jpg
    3.2 KB · Views: 0
  • 20180313_120931.jpg
    20180313_120931.jpg
    3.4 KB · Views: 0
Thread owner
Anyone have some hint's or tips on painting nose cones I've got a yellow and red stripes to do. Had a go but was a total disaster also the checkered pattern on the forward fuselage . Maybe an attempt on NMF is calling, as the nose cone is only yellow, we will see.
 
Thread owner
I took the plunge and went for the NMF option(I couldn't face doing that nose cone and the checkered pattern behind it). I bought a bottle of the Vallejo Metal color for airbrushes, expensive at £6.99 for a 32ml bottle but it sprays easily and drys in 5 minutes which is a bonus. There's no clogging of the airbrush it comes with a ball bearing as an agitator so no chance of sludge building up at the bottom of the bottle . I sprayed a coat of Vallejos black surface primer followed by the Metal Color.
Camos down with olive drab and dark green still to add to the tail section and upper fuselage. Yellow section added to front of fuselage and prop nose cone painted too. This has been a full day of modelling but I'm pleased with the result.View attachment 296019


View attachment 296020

View attachment 296021

View attachment 296022

View attachment 296023

View attachment 296024

View attachment 296025

View attachment 296026

View attachment 296028
 

Attachments

  • 20180319_152716.jpg
    20180319_152716.jpg
    3.5 KB · Views: 0
  • 20180319_161211.jpg
    20180319_161211.jpg
    3.5 KB · Views: 0
  • 20180319_162314.jpg
    20180319_162314.jpg
    3.4 KB · Views: 0
  • 20180319_162916.jpg
    20180319_162916.jpg
    3.8 KB · Views: 0
  • 20180319_174839_resized.jpg
    20180319_174839_resized.jpg
    3.6 KB · Views: 0
  • 20180319_151538.jpg
    20180319_151538.jpg
    3.6 KB · Views: 0
  • 20180319_144537.jpg
    20180319_144537.jpg
    3.4 KB · Views: 0
  • 20180319_134748.jpg
    20180319_134748.jpg
    3.4 KB · Views: 0
  • 20180319_141452_001.jpg
    20180319_141452_001.jpg
    3.7 KB · Views: 0
Looking very nice V.
Bit late now but for the next one maybe... Yellow is a great colour as a base for red, so I would start with painting the spinner, and band yellow. Than mask off the yellow squares and spray the red. As for the spinner, much the same, yellow overall, then find a latex glove and cut a couple of fingers off. Poke a hole in the end and pull it over the spinner to the widest edge of the red band then do the thinnest edge, spray and remove. Sounds a pain, but easier than faffing about with masking tape.
 
Thread owner
Further progress dark green added to the upper fuselage and tail fin . Some tricky masking there as it had to be cut from Tamyia tape free hand. Also I've added the anti reflective area in front of the wind screen. Next I will need to make a start on the fuselage invasion stripes not an easy task as there's a lot of curves to contend with.


View attachment 296046


View attachment 296047
 

Attachments

  • 20180320_160239_resized.jpg
    20180320_160239_resized.jpg
    3.6 KB · Views: 0
  • 20180320_160311_resized.jpg
    20180320_160311_resized.jpg
    3.4 KB · Views: 0
That is looking sharp as a knife. Nice.
 
Thread owner
Thanks guys, I opted out of doing the fuselage and plumbed for the under wing set. Still not easy getting the spacing right and working around the under carriage bay doors but all has gone well. There are some areas to touch up with a little bleed in two places but I'm pleased with the results. Still to tackle the fuselage there will be some careful masking required.

View attachment 296060
 

Attachments

  • 20180321_120039.jpg
    20180321_120039.jpg
    3.8 KB · Views: 0
Thread owner
Thanks Joe, well it was a bit of a struggle but I managed to mask off the fuselage for the invasion stripes. As a precaution I masked the whole Mustang so I didn't overspray the white or black paint. The only downside is that I used Kamoi tape as its wide, trouble is the tape tack is greater than the Tamiya tape and it has pulled off some aluminium paint on the underside of the wing, as you can see in the third photo :tired:. So this now needs sorting out. All in all the plane has been a little bit of a challenge but I'm getting there.

View attachment 296160View attachment 296161View attachment 296162
 

Attachments

  • 20180323_105913.jpg
    20180323_105913.jpg
    3.8 KB · Views: 0
  • 20180323_105924.jpg
    20180323_105924.jpg
    4.2 KB · Views: 0
  • 20180323_105859.jpg
    20180323_105859.jpg
    4.3 KB · Views: 0
Beautiful clean work vaughan , it looks superb, cheers tony
 
Status
Not open for further replies.
Back
Top