Theme editor

Scale Model Shop

Revell 1/32 Tornado GR1 - Desert War

Lookin forward to this build Barry as I really like the plane But a question please if I may an you will proberly have to look forward in the instruckions please to answer but I have often wondered do the weapons when fitted to the hard points angle in an out when the wings move forward or back like on the real plane ? AS ITS A BIG KIT
CHRIS
 
Thread owner
While waiting for parts to dry I have got on with some bits.

I decided not to fit the radar and have the nose come closed. So I weighted it instead.
First I filled it with this and sealed it with thin ca glue.
A06C93CD-C064-40A5-ACAC-D446857F26A1.jpeg

Then on top a little of this to add a little more weight.
B4727410-3FBF-4BC2-9B60-535E23B4E468.jpeg

44C2E5C3-0301-4193-B043-95A02E91B90D.jpeg

Previously I filled a hole in the nose with some sprue. I will drill it later

D79E507E-A623-4BDA-8E09-148863DA510F.jpeg

Seems odd to have these gaping voids and not having the inner structure.

2A21EEDB-7BC3-4CA1-990B-58DAA5CEBD3D.jpeg

DB251421-20EA-4C84-B13C-E0048FEC0F3E.jpeg
Popped some more weight into a small void.

AFD695FB-6530-43B0-A1E3-14D852B616EB.jpeg


I am treating the seems. I will do a closer shot of the pit when finished.

A few more components ready.
DFD75016-E7B7-4A79-808E-3A343E03C1A8.jpeg


That is it for a week or so. I am off on a cruise.

82AA15C5-9999-449D-8D7D-413410B0E3F6.jpeg
 
do the weapons when fitted to the hard points angle in an out when the wings move forward or back like on the real plane ?
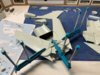
This review on Cybermodeler.com provides the answer:
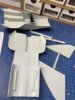
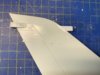
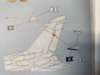
The underwing pylons are designed to be attached to the wings so that they can move with the wings as per the real aircraft, this was another weak spot on the kit as the mechanism for allowing this is a little crude, consisting of a four little plugs that are attached to the various pylons through holes in the lower wing parts, but it makes the pylons very wobbly
 
Good call with the liquid gravity Barry I've found it very useful for getting into recesses and awkward places. Your progressing well with the build.
 
I'd never heard of the liquid gravity before this build. Will be very useful when i come to build my He219 as it's renowned for being a tail sitter.
 
Alan I used it on my arado a while back putting it in the floats. Not cheap but it does go a long way.
 
Thread owner
Hi all. Back from my relaxing cruise, overindulged as usual, good food backed up by decent wine, gin and plenty of beer.

Managed to get an hour in today.

Chris. You can see how I have attached the pylons so they can swivel, each one independent. I will be cementing them and the wings in place though as I do not really like moveable parts and the swivel connection while simple is not strong. I won’t cement them until all is ready so I make sure I get all the right angles

View attachment 352163

I have cemented some plastic strip to help reinforce the nose/fuselage join.

View attachment 352164

Some more subs got ready. View attachment 352165

I will do some sanding tomorrow before pulling some subs together.
 

Attachments

  • 3657BDB7-CFD1-4F31-8F6C-282CDD657A25.jpeg
    3657BDB7-CFD1-4F31-8F6C-282CDD657A25.jpeg
    3.7 KB · Views: 0
  • 29922296-849B-40B3-B820-5344754724AD.jpeg
    29922296-849B-40B3-B820-5344754724AD.jpeg
    3.4 KB · Views: 0
  • DF6B083D-B741-4AB4-A0A7-58ED0EBB855F.jpeg
    DF6B083D-B741-4AB4-A0A7-58ED0EBB855F.jpeg
    3.3 KB · Views: 0
Thread owner
A bit more progress

The nose cone securely glued on. I just need to sand around the join after applying a smudge of filler.
View attachment 352550

I then need to do some paint touch ups around the pit.

The exhausts glued together.
View attachment 352551

Now this was an issue.
View attachment 352555

See the location holes in the side of the fin. They are not there and there was nothing in the instructions about drilling them. Maybe there are marks on the inside suggesting where they go, too late to look

So, using mark 1 eyeball I worked out where to drill the first hole. I then drew a straight line using panel lines as a guide to help work out where to drill the second hole. When drilling I went through both parts of the fin making sure the drill was vertical. That way I did not need to measure for the other side.
View attachment 352552

Some ipa cleaned away the sharpie ink.
 

Attachments

  • 361D0421-7B99-43AA-99D6-E247B6DAC318.jpeg
    361D0421-7B99-43AA-99D6-E247B6DAC318.jpeg
    3.2 KB · Views: 0
  • 1765A7C4-5FDB-4422-85FC-6D39F061F6CA.jpeg
    1765A7C4-5FDB-4422-85FC-6D39F061F6CA.jpeg
    2.8 KB · Views: 0
  • 88D1EE7D-722D-46D6-8F1B-8228AAC045DB.jpeg
    88D1EE7D-722D-46D6-8F1B-8228AAC045DB.jpeg
    2.4 KB · Views: 0
  • 11F4193B-FD5A-4363-95F8-630716D1372C.jpeg
    11F4193B-FD5A-4363-95F8-630716D1372C.jpeg
    3.3 KB · Views: 0
Thread owner
I had a bit of fun this evening trying to fix the swing wing mechanism into place to
glue the top and bottom fuselage halves together. I tried it several ways but get one part in place and another gets dislodged. In the process two of the pylons fell out of their locations and I decided there had to be another way.

Here it all is after giving up on putting it together as per instructions.
View attachment 352803

I did not intend to have the mechanism working anyway as I am not a fan of moving parts on a model. So I decided to cement the swing wing mechanism to the lower fuselage half, which I did and here it is all clamped up.
View attachment 352804

I will cement the tail and upper half tomorrow and then cemwnt the pylons into place
 

Attachments

  • 42651F9C-7066-475F-8247-09BCCAC9EA57.jpeg
    42651F9C-7066-475F-8247-09BCCAC9EA57.jpeg
    3.9 KB · Views: 0
  • 97A427C0-9050-433B-A7F0-40A1029008B0.jpeg
    97A427C0-9050-433B-A7F0-40A1029008B0.jpeg
    3.9 KB · Views: 0
Thread owner
Some progress shots.

Fuselage top cemented in place. I think the Tornado looks better with the wings forward but I fixed them swept to save shelf space.

30C198E3-DE79-416D-BDDF-F3D9098D24A6.jpeg

Some clean up to do.

U/c legs cemented

1B10B65B-DE77-48D9-940C-0E09B7A4D564.jpeg

The SAC white metal legs fit well into the plastic but I am not sure how well they will hold. May be OK

I applied the Eduard masks and sprayed with the internal colour. I now need to spray a ‘rubber’ colour before removing the masks and then apply some other masks to spray the camouflage colour. Be interesting to see how it looks.
F79B28AB-CF2C-473E-AE98-1BC4C9381CEF.jpeg
 
Hi Barry
Good progress although it has not been without its issues. I agree about moving parts. Models like this are certainly not for children and I can't really see you 'playing' with this when complete :rolling:
Jim
 
The SAC white metal legs fit well into the plastic but I am not sure how well they will hold. May be OK
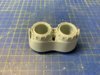
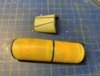
I’d glue that with two-part epoxy for strength, after thoroughly cleaning the metal parts, especially the areas where they will be glued.
 
Thread owner
A little more work done. I sprayed the canopy with MRP tyre rubber over the interior colour then removed the masking and replaced it with the next set. I will spray the camouflage colour with the canopy attached.

View attachment 353322
 

Attachments

  • D9819226-20A5-4AA0-B21A-9922160E3A5A.jpeg
    D9819226-20A5-4AA0-B21A-9922160E3A5A.jpeg
    3.1 KB · Views: 0
Thread owner
Last night I added some plastic card to strengthen the nose to fuselage join.

0FB9E5A5-D45E-4984-B597-CCBAECDCDD04.jpeg

I also finished cleaning the seams etc on the main fuselage. Note that the remaining pylons broke off. The fixing on these is very weak. I will cement them into place.

304A5CBD-C9D1-4B43-8345-07A49DB24A8B.jpeg

Tail pipes also fitted.
 
Back
Top