Theme editor

Scale Model Shop

Revell 1:48 DH Mosquito B Mk IV

Status
Not open for further replies.
Yes had the same problem Colin with the pit & fuselage. Thought it was my building ability but seems not.

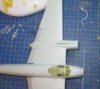
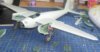
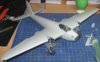
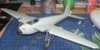
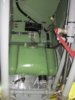
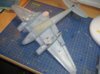
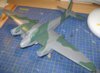
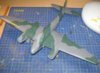
Now finished the two wings except for few odd things. Next job is to sand & fill wings & fuselage Some big gaps around the long side of both the nacelle but may be me.

At my age my attention span is not as great as it was so not a fast builder. Also I believe like you this is my first 1/48 & there is a vast difference between that & the five 1/72 I have built in my first modeling year.

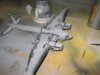
Have to sort out which props to use. Mine also will be the Woodford (think that is the name). Any body know the significance of the different props ? One set provided is a slim Jim type the other set has really chubby blades.

Must find time ( and courage) to sort out publishing photos of my efforts.

Laurie
 
Thread owner
Well Laurie,

I've got the wings done and had a play with the nacelles - gaps everywhere ! As for the props, I'm using the wide ones, just because I like them. I'm fairly sure the 105 Sqn Mosquitos used the thin ones but the instructions are no help here, they don't even refer to 105 sqn !

Colin M.........
 
Morning Colin

My research shows that Wooldrige took over 105 squadron from 17 March 1943.

!05 squadron were using the Mk 1V at that time. This from all accounts used the thin props. They continued using this Mk until 1944

But 105 obviously slowly upgraded in July 1943 to the MK 1X. This had a two stage engine & was equipped with heavy paddle wheel props, the fat ones. But replacement must have been a slow progress perhaps replacing losses of the MK1V rather than a complete squadron change.

So really we should be using the thin props. But for me as you Colin, using artistic licence, I am going to fit the paddle props they seem to fit this rugged aircraft.

Yes you need a lot of patience & expertise, hopefully, in bringing the nacelle parts up to standard. Worst detailing I have seen so far in my first six models never the less rewarding to get it looking OK.

Laurie
 
Thread owner
Nice one Laurie,

Well we'll never make a good pair of rivet counters will we ?

Colin M.......
 
Thread owner
So, the wings were built and fitted (a nice tight fit) without a fuss. Then I had a play with the landing gear. As I wasn't happy about fitting them later, althought I would have normally done this, they're in place now just as the instructions say. I really didn't need to fit the wheels but just wanted to see what it was going to look like on the ground. They're coming off before spraying ! The nacelles don't fit too well. I'm not sure if I've done something wrong, or they just don't fit. Anyway, I'm going to use the stretched sprue trick on these tapering gaps. This will fill the gap and add some strength to the joint.

Anyway, it's really looking like a Mosquito now.

Colin M.....

View attachment 39470

View attachment 39471

View attachment 39472

View attachment 39473

View attachment 152496

View attachment 152497

View attachment 152498

View attachment 152499
 

Attachments

  • What a gap.jpg
    What a gap.jpg
    2.7 KB · Views: 0
  • Nacelles.jpg
    Nacelles.jpg
    2.3 KB · Views: 0
  • Wings 2.jpg
    Wings 2.jpg
    2.5 KB · Views: 0
  • Wings 1.jpg
    Wings 1.jpg
    2.3 KB · Views: 0
Fascinating watching you building the same model Colin.

I fitted the inside half of the nacelle before attempting the landing gear. Also completed each wing first & have yet to fit the wings to the fuselage after filling & sanding each one.

One thing it looks as though you have fitted the tank to the landing gear. It should go on the bulkhead which as yet in the pictures you have taken is not fitted & which has a couple of fixing points for the tank.

Think that if I had thought enough I would have followed your build procedure. I fitted one half of the nacelle with it strapped temporarily to the other half to get proper alignment. Certainly poor fitting in that area. My poor fit was on one long side of the nacelle. I have used plastic board cut to shape & slipped into the open joint.

Do not forget Jericho Operation on BBC 2 tonight Colin which is all about the Mosquito.

Laurie
 
The Engine oil tank in the Nacelles is indeed fixed to the upper frame work of the undercarriage and not the firewall

This is a photo of a mossie under restoration in Canada. The upper most part of the U/C is fixed and I think the firewall is also fixed to this 'leg'. The knee is just below the tank where the diagonal brace meets it. Don't worry about the colour in the photo. Deep red is the right colour. (in most cases...)

If you have fixed your tank to the fire wall it might be why there was problems getting the U/C in.....

I think that your build is looking good. A very different way of attacking the U/C and nacelles, which incidentaly looks like the way its really done.

Ian M

View attachment 39489

View attachment 152515
 

Attachments

  • mossiejan2011-0021-375x500.jpg
    mossiejan2011-0021-375x500.jpg
    2.8 KB · Views: 0
"Indeed" indeed the tank is fitted onto the landing gear. My aplogies Colin.

Just shows what age does for the memory as I have fitted both tanks in the correct place & only about 5 days ago. Woe is me.

Must find out which year I am in !

Laurie
 
Might I suggest some extra vitamin D lol.

I only pulled it up as I had seen the photos of the re-build when I was doing my mossie.

I was going to give it some with the lead wire and all that. How ever, once I saw just how much would actually be seen, once the legs where in, the doors on and all that, I deemed it to be a "wast of time".

Ian M
 
Hi Colin.

This is looking very much like a Mossy! Shame about the joint problems in the top of the Nacelles! You will sort it out.

Looking at the pictures you posted, made me think of this Victoria Air Maintenance Ltd. - Total Repair, Overhaul and Major Rebuild Service » June - July 2009 It is where I 'borrowed' the picture of the oil tank from. Very well worth a look. Some where in all those photos in the link, is a great diorama just waiting to be built!!!

Ian M
 
Thread owner
\ said:
"Indeed" indeed the tank is fitted onto the landing gear. My aplogies Colin.Just shows what age does for the memory as I have fitted both tanks in the correct place & only about 5 days ago. Woe is me.

Must find out which year I am in !

Laurie
You had me going then Laurie. I did think why would this tank be attached to the landing gear ? But thanks Ian for clearing this one up. Mind you, there was nothing I could do about it, the nacelles are all sealed up now and sanded down. I missed the Mosquito on TV, but I reckon Iplayer will come to my rescue tonight. Assuming I get my primer and preshading done this evening.

Colin M.......
 
Thread owner
View attachment 35131View attachment 35132View attachment 35133View attachment 35134

All nasty gaps gone. It actually looks quite normal now, you would never guess what is hidden under the primer ! Pre shading, yes here we go again, I always like to have a go, knowing if I loose it, post shading will be my saviour.

Using stretched sprue in the gaps worked well, a trick I'll use again, well if I have to.....

Colin M.........

View attachment 39605

View attachment 39606

View attachment 39607

View attachment 39608

View attachment 152631

View attachment 152632

View attachment 152633

View attachment 152634
 

Attachments

  • Pre shade 1.jpg
    Pre shade 1.jpg
    2.4 KB · Views: 0
  • primer 2.jpg
    primer 2.jpg
    2.3 KB · Views: 0
  • primer 1.jpg
    primer 1.jpg
    2.2 KB · Views: 0
  • Pre shade 2.jpg
    Pre shade 2.jpg
    2.4 KB · Views: 0
Looking good Colin.

Like the idea of using a bit of sponge to mask the bomb bay.

Messed up twice today remarking the panel lines where they have been filled & sanded. Had to refill & will scratch about tomorrow.

Should be finished mine by Christmas !!!!!!!!!

Laurie
 
Thread owner
View attachment 35383View attachment 35384View attachment 35385View attachment 35386View attachment 35387

A twin engined 1:48 model meant, I nearly ran out of blutak. I had to beg bits off the kids just to finish the painting. The preshading worked underneath, but not so well on top. But that's ok, after the clear / decals / clear / wash / matt varnish, I'm then going to try a bit of matt white added to the clear coat in an attempt to make the paint a bit more faded. This is where it could all go horribly wrong. Maybe I should have tried this trick on something a lot smaller and quicker to make first !

This is my first attempt at large scale spraying with acrylics. The finish is nice, but the gun does seem to clog a bit more than my old enamels used to do. But don't they dry quick - that's nice.

Colin M.....

View attachment 39839

View attachment 39840

View attachment 39841

View attachment 39842

View attachment 39843

View attachment 152865

View attachment 152866

View attachment 152867

View attachment 152868

View attachment 152869
 

Attachments

  • underside 1.jpg
    underside 1.jpg
    2.7 KB · Views: 0
  • Camo 2.jpg
    Camo 2.jpg
    2.7 KB · Views: 0
  • Camo 1.jpg
    Camo 1.jpg
    2.6 KB · Views: 0
  • Blu tak 2.jpg
    Blu tak 2.jpg
    2.5 KB · Views: 0
  • Blu tak 1.jpg
    Blu tak 1.jpg
    2.6 KB · Views: 0
Progressing well Colin. Like the sausages.

Mine is going to be a straight out of the factory effort. I have 3 to choose from 1/72 to try shading for my next project.

What acrylics are you using ? I am devoted to Vallejo Model Air & I only occasionally have problems. I use about 20% Vallejo thinners.

Laurie
 
Thread owner
Good heavens, 5 days since I last updated. This proves I'm not very good at these WIP things ! Anyway, it's finished, the pics will be posted in the Aircraft pictures bit. Laurie, I also use Vallejo and do like them, but being a bit tight, I'm only using water to thin them.

Colin M.
 
Status
Not open for further replies.
Back
Top