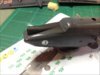
I was planning on having mine shut - oh well.\ said:Also forgot to mention I tried to fit the bomb bay doors in the closed position as there's no bombs to fit which might have looked good left open. DON'T as the doors don't fit they don't line up with the contour of the fuselage. I'll be glad when this ones finished!

You are using an out of date browser. It may not display this or other websites correctly.
You should upgrade or use an alternative browser.
You should upgrade or use an alternative browser.
Revell 1/72 Avro Shackleton AWE2
- Thread starter Vaughan
- Start date
- Status
- Not open for further replies.
It's interesting watching this Vaughan. You're having to use some old-school techniques on a modern kit, which is not good from the manufacturer, but the satisfaction of bashing this into shape will outweigh the frustrations you are experiencing at the moment with this one.
Dave it makes you wonder if that was the case.
Some progress made over the last few days fit issues are still abundant but I won't mention them it's getting a bit boring and predictable. Have sprayed the wings with primer followed by dark sea grey. Two coats of Klear and then a start on the decals( 26 so far). Not looking forward to walk area decals will most probably cut them into individual sections. Next up will be spraying the fuselage.
View attachment 252845
Attachments
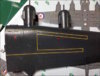
Well I had a go with the walkway lines. I cut them up into individual sections, difficult to still apply but I think their ok for a first attempt. Decalsoft is still taking effect so should look better when dry. Well that's one wing done now for the next
View attachment 252852
View attachment 252852
Attachments
They look well decent Vaughn good job, chopping 'em up is a good method, I think next time I haven't got broken/dash walkway lines I'm gonna try masking and painting them.\ said:Well I had a go with the walkway lines. I cut them up into individual sections, difficult to still apply but I think their ok for a first attempt. Decalsoft is still taking effect so should look better when dry. Well that's one wing done now for the next
View attachment 153631
G
Guest
Guest
That is looking quite impressive. For all the issues, you are making a Stirling job of this Vaughan.
G
Guest
Guest
Whenever I do masking (eg. camo) I find some bleed under the tape. I use Tamiya yellow tape, press the edge down firmly and coat that edge, both the part and the tape, with a thin line of Pledge (to seal it). I never get a crisp sharp edge.\ said:I think next time I haven't got broken/dash walkway lines I'm gonna try masking and painting them.
Has anyone conquered this?
Hi Steve, not sure what the pledge is for? I have never had any bleed when using Tamiya tape so not sure what's happening here, maybe it's a smoothness thing Steve? Are you getting the surface nice and smooth before painting and masking? Maybe PM me in case we get our collar felt for hijacking this thread\ said:Whenever I do masking (eg. camo) I find some bleed under the tape. I use Tamiya yellow tape, press the edge down firmly and coat that edge, both the part and the tape, with a thin line of Pledge (to seal it). I never get a crisp sharp edge.
Has anyone conquered this?
HI Colin thanks for posting the YouTube video it really gives an insight into the Shackleton and a great comparision to the Lancaster. Will have a go at the other walkway lines this week fingers crossed all goes well.
Well it's taken me an hour to put down this last set of walkways. A nightmare! It's not perfect but it's as good as it's going to get. Thank god that's over with. Now I can get on with spraying the fuselage which should be a darn sight easier.
View attachment 253210
View attachment 253210
Attachments
G
Guest
Guest
Have to say Vaughan, this is looking tidy. From the pics you would have no idea of the fight you have had with it.
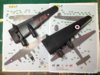
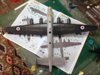
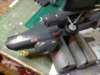
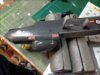
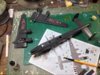
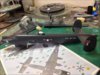
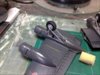
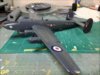
Some more progress since last Tuesday main undercart attached. Fuselage is now painted plus two coats of Klear and decaling has started in ernest it's going to take some time this is my second day. Have found leaving the wings detachable has made decaling somewhat easier. Props are in the process of being painted but as Colin said it's a matter of masking spraying masking spraying it just goes on!
View attachment 253665
View attachment 253666
View attachment 253667
View attachment 253668
View attachment 253669
View attachment 253670
View attachment 253671
View attachment 253665
View attachment 253666
View attachment 253667
View attachment 253668
View attachment 253669
View attachment 253670
View attachment 253671
Attachments
- Status
- Not open for further replies.
Legal Notice
scalemodelling.co.uk is a privately operated online discussion forum. All content posted by members reflects their own views and opinions and does not necessarily represent those of the forum owners or administrators. While reasonable efforts are made to moderate content, no responsibility is accepted for user-generated material. By using this site, you agree to comply with UK law and the forum rules.