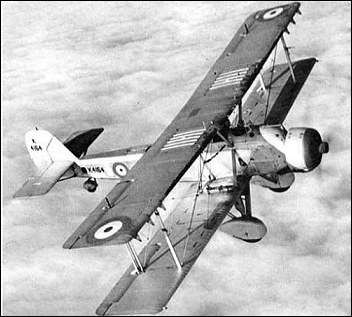
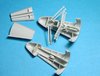
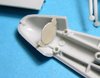
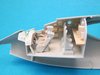
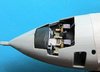
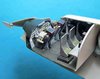
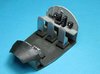
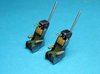
Theme editor

Scale Model Shop

Richard's Revell Ex-Matchbox 1/72 Victor Resurfaces

rtfoe

Well-known member
Joined
Apr 29, 2018
Messages
9,251
Reaction score
542
Points
113
Location
Shah Alam, Malaysia
1/3
Thread owner
Hi Ex Milmodians,
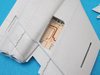
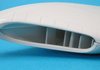
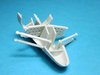
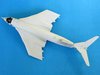
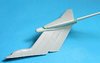
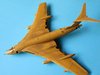
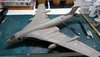
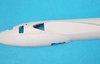
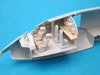
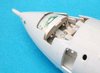
I'm sure some of you remember this build I did 3 years ago midway through a trip to Sydney. I didn't actually complete it as I had painted it in the wrong colours. Learnt the lesson never to mix paints at night under bad lighting. Now it feel a bit like Dejavu as I'm re-visiting this build just when I'm about to make another trip to Sydney again. The delay in attempting to repaint the correct colours was made even harder by the fact that I had applied decals and stencilling. So in the past 3 days I took a deep breath and masked all the decals and stencilling using white glue and a tooth pick. Thank goodness the operation was a success. For the benefit of those who have not seen the build I will start from the beginning but before that I'll just show a glimpse of the before and after shots...now it's not complete yet , still needs a pin wash and weathering...

View attachment 326220

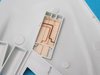
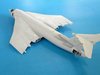
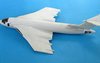
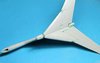
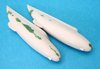
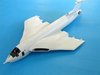
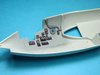
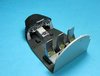
...now in the correct colours of Hemp...

View attachment 326221

I will begin at the next post.

Cheers,
Richard
 

Attachments

  • V66.jpg
    V66.jpg
    6.4 KB · Views: 0
  • 72.jpg
    72.jpg
    6.3 KB · Views: 0
Thread owner
Hi, the build starts with the image of the box top. Now if I had paid more attention to it I might have seen the colour difference...

View attachment 326225

The kit came with raised panel lines which was surprising as I expected the deep engraved lines usually found on Matchbox kits. I used a needle from one of my Bofa set of dividers and chucked into a pin holder and with my aluminum draftmans template I scribed away... the one on the right is scribed...

View attachment 326223View attachment 326224

Once that was done I tackled the cockpit which was very spartan, starting with the seats. My aim was to make it semi finished as most of the cockpit was closed up. Using bits of plastic and wire I made arm rests, cussion, side supports and ejector handles...

View attachment 326227View attachment 326228

I made two of those and test fitted them into the cockpit along with the rest of the additions...basically boxes for intrument panels, a table for radio and radar equipment and piping from the ceiling fuel pod.

View attachment 326232

I made the destinct shape of the steering controls from rod and wire and extended the dash hood further forward to hide a gaping hole.

View attachment 326234

You will notice an access panel door on the floor just behind the pilots seats...that's for the bombedier.

View attachment 326235View attachment 326236View attachment 326237

Once satisfied that it looked busy enough I proceeded with painting...and I added ejector rails to the back of the seats...

View attachment 326239View attachment 326240

The decals were good and quite convincing...

View attachment 326241View attachment 326242

The ejector rails don't reaaly go till the end as it would be hidden from view...this just looks like a cockpit from a Captain Scarlet episode. :tears-of-joy:

View attachment 326243View attachment 326244View attachment 326245

Worried that the plane would be tail heavy I packed lots of weights into the nose. Good thing that the bombediers view is sealed.

View attachment 326246

That's it for tonights post... the next will show how I did the intakes which many say was the kits worst features. Thanks for looking in.

Cheers,
Richard
 

Attachments

  • v30.jpg
    v30.jpg
    6.3 KB · Views: 0
  • v4.jpg
    v4.jpg
    6.2 KB · Views: 0
  • v5.jpg
    v5.jpg
    6.3 KB · Views: 0
  • v14.jpg
    v14.jpg
    5.3 KB · Views: 0
  • v13.jpg
    v13.jpg
    5.4 KB · Views: 0
  • Revell Victor.jpg
    Revell Victor.jpg
    2.6 KB · Views: 0
  • v7.jpg
    v7.jpg
    4.8 KB · Views: 0
  • v6.jpg
    v6.jpg
    5.4 KB · Views: 0
  • v3.jpg
    v3.jpg
    6.2 KB · Views: 0
  • v2.jpg
    v2.jpg
    5.9 KB · Views: 0
  • v29.jpg
    v29.jpg
    5.9 KB · Views: 0
  • v25.jpg
    v25.jpg
    6.6 KB · Views: 0
  • v23.jpg
    v23.jpg
    6.5 KB · Views: 0
  • v22.jpg
    v22.jpg
    5.9 KB · Views: 0
  • v21.jpg
    v21.jpg
    5.9 KB · Views: 0
  • v20.jpg
    v20.jpg
    5.9 KB · Views: 0
  • v19.jpg
    v19.jpg
    5.7 KB · Views: 0
  • v1.jpg
    v1.jpg
    5.7 KB · Views: 0
I always thought that the Matchbox Victor was a much underrated kit - it was a brave issue on their part - 1983 - a response to the Airfix Vulcan ( or was it the other way round? ). It's nice to see that it's still available from Revell................
Davr
 
Hi Richard
That looks good. Cockpit is really effective. Presumably when you have raised panel lines they all have to be sanded back before rescribing. I never realised that you could mask with white glue. Though it would stick too firmly and cause damage when peeled away.
Jim
 
Thread owner
Hi Dave, at the time I think it was the only kit but now Airfix has a new one...I don't think I can match it.

Cheers,
Richard
 
Thread owner
Hi Richard
That looks good. Cockpit is really effective. Presumably when you have raised panel lines they all have to be sanded back before rescribing. I never realised that you could mask with white glue. Though it would stick too firmly and cause damage when peeled away.
Jim

Thanks Jim, yes the sanding will leave the tell tale line to be rescribed. On the contrary...just a little rub and it peels off as white glue doesn't adhere very well to smooth surfaces. My decals had a coat of varnish before the process. To be even safer just wet and rub off.

Cheers,
Richard
 
Thanks for that Richard. I did wonder how you knew where to scribe having sanded the raised lines away.
Jim
 
Thread owner
You're welcome Jim, if you look at the image after the boxtop you will notice the sanded left wing before scribing, the lines are just about noticeable.

Cheers,
Richard
 
Well, the Revell/Matchbox Victor is available for around £20, and the Airfix version for about £50 - I've no doubt it's vastly superior, but............................
Dave
 
The kit came with raised panel lines which was surprising as I expected the deep engraved lines usually found on Matchbox kits.
Odd, I don’t think I’ve ever seen a Matchbox aircraft kit like that. I thought maybe it was one they sourced elsewhere, but looking it up on Matchboxkits.org the sprues are Matchbox-style so it does look like an original kit.

It looks like you’re turning a mediocre kit into a much better model :)
 
The Matchbox model I made at the time, and I keep on hoping will reappear is the PB4Y Privateer - this was an impressive model, just different enough to a Liberator to draw attention. Some of the Matchbox models were really out of the ordinary, like the Wellesley, Stranraer, Seafox, and the Heyford, but where they competed with other makers they didn't fare so well ( B-17 & Wellington spring to mind )
The 3 colour sprues were a marketing ploy, that worked for a while, but were never taken up by any other makers
Dave
 
Quite a remarkeable safe this:thumb2:! What's next, are you going to put it on a base?

DIRK
 
The Matchbox model I made at the time, and I keep on hoping will reappear is the PB4Y Privateer
I have fond memories of that one as well, built it about 30–35 years ago.

Will you believe I bought an original issue kit of that maybe 15 years ago and mostly built it, but have it sitting still unfinished behind me in my modelling room? It’s one of the planes that always intrigued me for some reason in the 1980 Matchbox catalog (the most-read book of my childhood :)) so when I came across the kit at a convention, I bought it.

The 3 colour sprues were a marketing ploy, that worked for a while, but were never taken up by any other makers
That was what made Matchbox kits great for me building them as an 8-year-old, before I got Humbrol paints and learned how to use them.
 
Thread owner
Odd, I don’t think I’ve ever seen a Matchbox aircraft kit like that. I thought maybe it was one they sourced elsewhere, but looking it up on Matchboxkits.org the sprues are Matchbox-style so it does look like an original kit.

It looks like you’re turning a mediocre kit into a much better model :smiling3:

Thanks Jakko. The kit did give quite a good fight with dimples and gaps to fill.

The Matchbox model I made at the time, and I keep on hoping will reappear is the PB4Y Privateer - this was an impressive model, just different enough to a Liberator to draw attention. Some of the Matchbox models were really out of the ordinary, like the Wellesley, Stranraer, Seafox, and the Heyford, but where they competed with other makers they didn't fare so well ( B-17 & Wellington spring to mind )
The 3 colour sprues were a marketing ploy, that worked for a while, but were never taken up by any other makers
Dave

Dave , they had one PB4Y for sale here and I made a mistake of deliberating. The Stranraer is a solid kit and still available. I'm looking for a Wilderbeast...don't know who makes them.

Quite a remarkeable safe this:thumb2:! What's next, are you going to put it on a base?

DIRK

Thanks Durk, haven't thought of a base yet...perhaps the standard refuelling on a tarmac.

I like the clean lines that Matchbox produced without rivets for 1/72 scale. As for fit it has the same faults as most kits depending on the batch that had perfect temperatures during mold release stage. I still have a Lancaster in the stash.

Cheers,
Richard
 
Lovely job ,Richard.
Not my era but its always good to follow your thought processes and techniques.
I always think the provision of ejector seats for only the pilots is very indicative of the class system in the UK at the time....!
Maybe the charitable explanation is that the pilots keep the plane flying to allow the rest of the crew to evacuate, then eject at the last possible moment?
 
I'm looking for a Wilderbeast...don't know who makes them.
Do you mean a Vickers Vildebeest?

Vickers_Vildebeest_in_flight.jpg


There are a couple of choices for that: https://www.scalemates.com/search.php?fkSECTION[]=All&q=Vildebeest
 
Thread owner
Lovely job ,Richard.
Not my era but its always good to follow your thought processes and techniques.
I always think the provision of ejector seats for only the pilots is very indicative of the class system in the UK at the time....!
Maybe the charitable explanation is that the pilots keep the plane flying to allow the rest of the crew to evacuate, then eject at the last possible moment?

Thanks Neil, :tears-of-joy: I believe the procedure was to have the crew exit from the side door that has blast shields on both sides and then the pilots eject. The bombedier exits on his own somewhere else.

Do you mean a Vickers Vildebeest?

Vickers_Vildebeest_in_flight.jpg


There are a couple of choices for that: https://www.scalemates.com/search.php?fkSECTION[]=All&q=Vildebeest

Thanks Jakko for the info. Will be checking it out to see if any are available especially the Azurs kit. Nice to have one of these on the Malayan campaign.

I think I'll be finishing this before the trip to Australia.
In a months time I'll be down under tasting the hot weather but according to my sister, the forecast is milder but who knows. Definitely visiting Hobby Co at QVB and upstairs to the Elite Military Miniatures figure shop just to oggle at painted figures by the St Petersburg painters....can't afford them. Wonder if anyone knows of other hobby shops in Sydney in the area of Quakers Hill. I know there's an artshop at Castle Hill and on the way for DIY my Sis says I'll die in Bunnings. :smiling2:

Cheers,
Richard
 
Thread owner
Here is more progress on the Victor...

First I added gizmology to the wheel well just to make it look busy with plastic strips and wire for piping.

View attachment 326425

Looked the part but not accurate once closed up...

View attachment 326426

The Matchbox Victor engine intakes had a reputation of being the archilles heel for the kit. I wasn't going to let that get in the way. On dry fitting I decided that two part putty was going to solve it, the reason was it was easy to build up and smoothen and it does not shrink which negates accessive sanding and it can be painted while it is curing.

View attachment 326421

But to make it easier I made sure that all the slats were sanded to match the top and bottom halves. Then I painted the interior

View attachment 326422View attachment 326423

Glued and clamped the wing halves together...

View attachment 326427

Talk about overkill :tears-of-joy::tears-of-joy:...

View attachment 326428

The result turned out ok...

View attachment 326429

Cheers,
Richard
 

Attachments

  • v45.jpg
    v45.jpg
    5.6 KB · Views: 0
  • v16.jpg
    v16.jpg
    7.4 KB · Views: 0
  • v15.jpg
    v15.jpg
    6.9 KB · Views: 0
  • v9.jpg
    v9.jpg
    6 KB · Views: 0
  • v8.jpg
    v8.jpg
    5.4 KB · Views: 0
  • v18.jpg
    v18.jpg
    5.7 KB · Views: 0
  • v17.jpg
    v17.jpg
    6.7 KB · Views: 0
  • v11.jpg
    v11.jpg
    5.5 KB · Views: 0
Thread owner
Meanwhile Matchbox at times do give some interior...bits of it that are not too bad so I used them as is. One of them is the landing flaps. They did however needed extra plastic strips as I was going to pose them fully open.

View attachment 326433

Puttied and sanded...later actuator arms were added. I'll show that process later.

View attachment 326434

The other interior were the tail airbrakes...

View attachment 326435

I added the wall so you don't see end of the tail.


View attachment 326436

The struts were quite delicate at the attachments and I tried as much to avoid breaking them...thankfully everything aligned. I didn't glue the covers to help with painting.

View attachment 326437

Cheers,
Richard
 

Attachments

  • v32.jpg
    v32.jpg
    6.3 KB · Views: 0
  • v31.jpg
    v31.jpg
    6.3 KB · Views: 0
  • v36.jpg
    v36.jpg
    5.9 KB · Views: 0
  • v34.jpg
    v34.jpg
    6.4 KB · Views: 0
  • v35.jpg
    v35.jpg
    6.4 KB · Views: 0
Thread owner
Now we move onto...slapping the parts together and adding the green stuff

View attachment 326479

You can see that every joit needed some amount of putty and sanding. The awkward tail inlet interior joint also was puttied as it was visible.

View attachment 326480View attachment 326481View attachment 326482

Assembling the tail section was critical to get alignment right. The wing roots were a tight fit but still had a thin gap to be filled.

View attachment 326483

Dimples on a child is cute but not on a kit...they were everywhere...

View attachment 326484

Very noticeable step at the nose just in front of the cockpit....

View attachment 326485

Cheers,
Richard
 

Attachments

  • v39.jpg
    v39.jpg
    5.7 KB · Views: 0
  • v38.jpg
    v38.jpg
    5.4 KB · Views: 0
  • v37.jpg
    v37.jpg
    5.8 KB · Views: 0
  • v27.jpg
    v27.jpg
    5.2 KB · Views: 0
  • v26.jpg
    v26.jpg
    5.3 KB · Views: 0
  • v10.jpg
    v10.jpg
    6 KB · Views: 0
  • v40.jpg
    v40.jpg
    5.7 KB · Views: 0
Back
Top