Theme editor

Scale Model Shop

Richard's Revell Ex-Matchbox 1/72 Victor Resurfaces

Thread owner
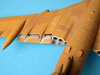
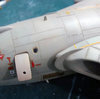
Here it is the disasterous results of a momentarily lapse of concentration...mixing colours and the domino effect that continued... :tongue-out2:

View attachment 327275View attachment 327276View attachment 327277View attachment 327278View attachment 327279View attachment 327280

Remind me that this needs sun tan lotion...and it even got darker with a layer of gloss varnish. Adding the decals was the nail to seal the disaster. The only consolation was it was a good base of pre shadow for the repaint.

Cheers,
Richard
 

Attachments

  • V66.jpg
    V66.jpg
    6.4 KB · Views: 0
  • V67.jpg
    V67.jpg
    5.7 KB · Views: 0
  • V68.jpg
    V68.jpg
    6.1 KB · Views: 0
  • V69.jpg
    V69.jpg
    6.4 KB · Views: 0
  • V70.jpg
    V70.jpg
    6.3 KB · Views: 0
  • V71.jpg
    V71.jpg
    6.7 KB · Views: 0
Hi Richard
Sorry to be a pest but I can't figure out what you meant by the following.
On top of this will be sprayed interior gray and then black and then primer to create the opaque frame for the canopy. It's always annoying to see transparency through a supposed solid frame.
As always your careful, considered approach does you credit. The way the flaps were done is an example of this.
Jim
 
Thread owner
Hi Richard
Sorry to be a pest but I can't figure out what you meant by the following.

As always your careful, considered approach does you credit. The way the flaps were done is an example of this.
Jim

No worries, Jim, I'll be happy to explain. Many a times I have painted canopy frames with just the main body colour and when put up against the light, the frames didn't look solid and were transluscent. So I have since painted the interior colour then a coat of black then primer to match with the rest of the fuselage before spraying the body colour. Sounds like overkill but it blots out any light through the painted frame making it solid looking.

Hope that helps. :smiling2:

Cheers,
Richard
 
Thread owner
Hi, from here onwards the WIP is nearly real time as I had resuscitated the build with repainting only two weeks ago.

The first process was dusting the Victor with a soft brush...a lot of dust collects in three years even in glass cabinets. Then the painstaking application of white glue to all the decal stencils before spraying. Mr Color 336 has the exact Hemp BS4800/10821.

View attachment 327389

I didn't have to do any shading as the underlying paint was strong enough to leave its mark so the effect is by accident. Now I can add this to my preshade notes for the next kit.

View attachment 327390

The long decals were masked with thin strips of Tamiya tape.

View attachment 327391View attachment 327392

Roundel masks were cut with a blade following circles marked with a circular template.

View attachment 327393

I could breath a sigh of relief after this...and continue with the rest of the decalling and weathering.

Cheers,
Richard
 

Attachments

  • V76.jpg
    V76.jpg
    5.9 KB · Views: 0
  • V72.jpg
    V72.jpg
    6.3 KB · Views: 0
  • V73.jpg
    V73.jpg
    5.2 KB · Views: 0
  • V74.jpg
    V74.jpg
    5.8 KB · Views: 0
  • V75.jpg
    V75.jpg
    5.4 KB · Views: 0
Thanks Richard.
All is now clear. Another useful tip for my book.
Paint job looks great. Masking in one form or another must have been a long, painstaking task.
Jim
 
Oh, it's a lovely job! Really nice.
Ref the wrong colours: I take your word for that, but would be very happy to get that kind of finish on an aircraft. There's a long way to go here...!!
 
Thread owner
Thanks Guys,

Thanks Richard.
All is now clear. Another useful tip for my book.
Paint job looks great. Masking in one form or another must have been a long, painstaking task.
Jim

I found that masking with white glue was easier than anticipated...should have doen it 3 years back instead of procrastinating. :smiling2:

Oh, it's a lovely job! Really nice.
Ref the wrong colours: I take your word for that, but would be very happy to get that kind of finish on an aircraft. There's a long way to go here...!!

The new Hemp colour was easy to apply with two coats just enough for the underlying shades to show through. You're right...a long way to go to finishing.

Cheers,
Richard
 
Thread owner
As shown earlier in the post thread, I made these refuelling probes from plastic sprue and the cut out ring from the existing kit part.

View attachment 327466

The probe is covered with some form of plastic which I simulated with a coating of white glue.

View attachment 327467

The probes are usually retracted fully but I left mine sticking out a bit since I spent quite a bit of time making it.

View attachment 327468

Meanwhile I searched references for the aerial, avionics and navigational light attachment points. The kit does not provide these so they were made from plastic strip and clear sprue...

View attachment 327469View attachment 327470View attachment 327471

That's it for now...

Cheers,
Richard
 

Attachments

  • V78.jpg
    V78.jpg
    3 KB · Views: 0
  • V79.jpg
    V79.jpg
    2.7 KB · Views: 0
  • V80.jpg
    V80.jpg
    2.1 KB · Views: 0
  • V81.jpg
    V81.jpg
    3.2 KB · Views: 0
  • V82.jpg
    V82.jpg
    1.8 KB · Views: 0
  • V77.jpg
    V77.jpg
    3.1 KB · Views: 0
Actually, I meant there's a long way to go HERE.
Techniques still a little rudimentary when I model aircraft.
 
Thread owner
Actually, I meant there's a long way to go HERE.
Techniques still a little rudimentary when I model aircraft.

:smiling2: Oh I see...don't sell yourself short Dave, I am myself still learning the dark arts of aircraft building and finishing and can't get anywhere near competition level especially decalling.

Cheers,
Richard
 
Thread owner
On a recent local GB I brought my Victor along and many were surprised that it was a Revell kit.

The other comment was that it sat so low and on taking a closer look and referencing I decided that the front undercarriage was a little low which made the fuselage slope down to the front and added 3mm to it with plastic rod and a steel wire drilled through for added support. You can see the addition in white which will be painted in chrome silver making it look like extra play on the oleo struts...

View attachment 327501

The underneath shot shows off the unique shape of this plane. You don't often see this in todays plane designs.

Cheers,
Richard
 

Attachments

  • V83.jpg
    V83.jpg
    2.6 KB · Views: 0
Richard,
You have a skillful knack or taking the ordinary and turning it into the extra ordinary.
 
Thread owner
Thanks both of you Paul and Jim, at this age I have learnt a few tricks to solve inaccuracies that are within my forte. I still marvel at incredible finishes that some modellers have achieved.

Ian, :tears-of-joy: it took 3 years before I felt or heard the whip...that sure got me going. It should be finished before the trip down under. Just waiting to start the toon build.

Cheers,
Richard
 
Thread owner

Attachments

  • V84.jpg
    V84.jpg
    2.5 KB · Views: 0
  • V84a.jpg
    V84a.jpg
    3.6 KB · Views: 0
:smiling2: Oh I see...don't sell yourself short Dave, I am myself still learning the dark arts of aircraft building and finishing and can't get anywhere near competition level especially decalling.

Cheers,
Richard
Decals get me down....!
 
Thread owner
Decals get me down....!

Dave, decals will almost uplift a kits presentation if done properly...basically gloss varnish the surface apply the decal add decal softener and let it settle, roll away any excess fluids with a cutip, re-coat with gloss or matt vanish. Some will coat with gloss varnish and wet sand till there is no trace of the step of the decal film and then revarnish with either matt or gloss coat...so don't let it get you down. :smiling4:

Cheers,
Richard
 
Thread owner
With little bench time last night I scratched that pipe at the front end of the huge tank...I don't know what it's for but it needed to be added. I made two of these...

View attachment 327835

After painting...on hindsight I should have used insulating wire tubing instead of scratching and drilling plastic rods. :tongue-out2:

View attachment 327836

Cheers,
Richard
 

Attachments

  • V85.jpg
    V85.jpg
    1.7 KB · Views: 0
  • V86.jpg
    V86.jpg
    2.7 KB · Views: 0
Back
Top