Theme editor

Scale Model Shop

Rick's Airfix 1/72 Avro Shackleton MR2

Status
Not open for further replies.
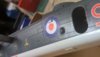
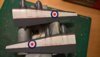
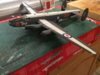
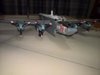
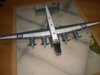
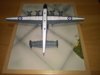
I have seen on another forum a method where you dip cotton wool in boiling water and use this to press the decal down, the heat helps the decal to conform to whatever's under it.  Rubber gloves are recommended and I use the little circular pads of cotton wool that are sold for removing makeup.  I've used it few times fairly successfully with Airfix decals though never on anything as big as that fairing under the roundel.


Hope this helps,


Simon
 
That is just nasty. The hot pad might work but I see cursing in your immediate future...


I normally resolve my issue s with micro-sol and or warm water, but I've never seen one that bad.
 
Oh dear, that's a tricky one Rick. First thing that came to mind was to cut the GT from the white number panel. At least then you can manipulate that part over the bulges a bit easier. After that, not sure, maybe cut and place in pieces, filling with paint as required? The hot pad idea is worth a go I suppose. Lots of decal solution... Or paint that white panel and place the numbers on it individually.
 
Thread owner

Attachments

  • image.jpeg
    image.jpeg
    2.1 KB · Views: 0
  • image.jpeg
    image.jpeg
    2.4 KB · Views: 0
  • image.jpeg
    image.jpeg
    1.8 KB · Views: 0
  • image.jpeg
    image.jpeg
    2.2 KB · Views: 0
Is ti possible to repaint in between the GT letters Rick? Hopefully you can fill in the white bits easily enough with white. Bit of a nightmare decal that one!
 
With a very sharp blade, stab all the silver bits, then apply the decal softener of your choice. I had a similar problem on my Shackleton (Revell) 
 
Thread owner
With a very sharp blade, stab all the silver bits, then apply the decal softener of your choice. I had a similar problem on my Shackleton (Revell) 

I've done this already (it was actually much worse) but as you can see it will need another go to clear it up. The macro on the camera is brutally honest isn't it!? I'll get there.
 
I've done this already (it was actually much worse) but as you can see it will need another go to clear it up. The macro on the camera is brutally honest isn't it!? I'll get there.

Yes the camera shows so much more than we can see. Well the next step maybe to weather it to death !
 
How about if you carefully cut all the clear film with a new blade, the soften it with decal solv and peel it off while wet. As for the white decal I'm sure a careful touch up will cure that.
 
Thread owner
Now that my Mig-21 & Dauntless are off the bench I have picked this up again, actually I have been picking at it here and there. So, touch up of the roundel has been done along with finishing the full decal set, other work includes sealing coats of gloss and Matt varnish, a pin wash and exhaust staining.
Lots of appendages have also been done - flaps, main landing gears and doors and of course the wings and tail planes.
View attachment 274132 View attachment 274133 View attachment 274134 View attachment 274135
 

Attachments

  • image.jpeg
    image.jpeg
    2.6 KB · Views: 0
  • image.jpeg
    image.jpeg
    2.7 KB · Views: 0
  • image.jpeg
    image.jpeg
    2.6 KB · Views: 0
  • image.jpeg
    image.jpeg
    2.2 KB · Views: 0
Looking good Rick. the decals have come out well despite your initial problems. Looking forward to your complete photos.
 
Oh yes, I remember this. Nice to see it on the move again.
 
I prefer to press down the decal not too softly but a little aggressively without damaging it to force out all water and air using a cotton bud. I then liberally apply decal sol by micro scale industries. This works a treat for less conforming decals such as Trumpeter. My latest 1/32 Trumpeter Bf 109 G-2 worked really well with that approach. Btw, I love your work on that shackelton. looks a beast
 
This is coming along very nicely Rick, looks like you conquered that decal issue.
 
Thread owner
I'm still chipping away at this, the masking has been removed from the transparencies and a bit of touch up has been done. Unfortunately the yellow dotted line decal around the pilot's side windows came away with the masking tape.
The bomb doors and wheels are also fitted - note to fit the RH door in the RH side!
I am tantalisingly close to the finish with some aerials remaining and the weapons load though I am contemplating displaying them on bomb trolleys next the the Shackleton - I am going to pose the model on the base I made for my Nimrod a while back.

View attachment 275345 View attachment 275346 View attachment 275347
 

Attachments

  • image.jpeg
    image.jpeg
    2.5 KB · Views: 0
  • image.jpeg
    image.jpeg
    2.6 KB · Views: 0
  • image.jpeg
    image.jpeg
    2.8 KB · Views: 0
That looks amazing, I think it would look good with the bombs set up on a loader waiting to be fitted, will give even more intrested on the base.
 
Status
Not open for further replies.
Back
Top