
You are using an out of date browser. It may not display this or other websites correctly.
You should upgrade or use an alternative browser.
You should upgrade or use an alternative browser.
Rick's Airfix 1/72 Harrier GR3 - engine change & crew in
- Thread starter rickoshea52
- Start date
- Status
- Not open for further replies.
rickoshea52
Active member
1/3
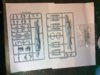
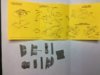
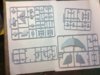
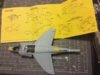
Time to cut plastic so here are the sprue shots. This is the model that will have the engine on show.
View attachment 278876 View attachment 278877 View attachment 278878 View attachment 278879
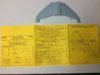
The engine kit instructions confused me for a moment, when looking at the sketch showing the panels to cut out it appears to me that they are on the wing panel, in fact the panels that need removing are on the two fuselage halves.
View attachment 278880
The instructions are misleading with this sketch.
View attachment 278881
I have marked out in black the outline of the panels that need to be removed on the right hand side, the left hand side is the same.
View attachment 278883
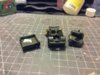
After the panels have been removed.
View attachment 278884
A dry fit with the wings installed. After an evening tinkering I think this will have to be presented as a point in the engine change task as only the overwing access panels will be open with the top of the engine on view.
View attachment 278876 View attachment 278877 View attachment 278878 View attachment 278879
The engine kit instructions confused me for a moment, when looking at the sketch showing the panels to cut out it appears to me that they are on the wing panel, in fact the panels that need removing are on the two fuselage halves.
View attachment 278880
The instructions are misleading with this sketch.
View attachment 278881
I have marked out in black the outline of the panels that need to be removed on the right hand side, the left hand side is the same.
View attachment 278883
After the panels have been removed.
View attachment 278884
A dry fit with the wings installed. After an evening tinkering I think this will have to be presented as a point in the engine change task as only the overwing access panels will be open with the top of the engine on view.
Attachments

rickoshea52
Active member
1/3
Looking good so far rick
Found this online hope it may be of some help
http://www.fightercontrol.co.uk/forum/viewtopic.php?f=17&p=123779
Thanks Colin. I have found this thread when researching this subject earlier, the pictures here seem to be the best there is and they are a valuable resource. What I picked out from them is the Unimog, camo netting and the engine change scene. My build won't be that in depth because the engine kit is quite limited in its use and I dont fancy scratch building the lifting jacks that are a seemingly unique feature of Harriers - I recall seeing the backing arrangement when on my rigger courses at Halton and Cosford, quite different to backing any other fixed wing aircraft.
rickoshea52
Active member
1/3
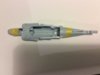
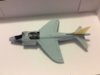
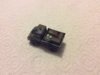
I just buttoned this up, as you can see there is a gap between the two halves of the intake casing - this is my lousy assembly skills. However, there is a piece of resin with the engine kit that will cover part of the gap. The wings are not fixed on yet.
View attachment 279811
View attachment 279811
Attachments
rickoshea52
Active member
1/3
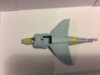
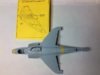
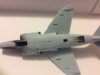
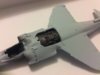
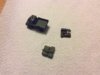
Engine, wings, tailplane and fin fitted along with a bulkhead moulding at the front of the wing section and a translator sleeve at the front of the engine.
View attachment 280107 View attachment 280108
The gun pods have two locating pins on them but the holes on the fuselage aren't there, just faint sink holes that need to be drilled out with care. The slots on the centreline will be filled but there is the option to fit a pylon in this position.
View attachment 280109
Attachments
G
Guest
Guest
I am following this one ") looking fantastic so far, keep up the good work.
looking fantastic so far, keep up the good work.
looking fantastic so far, keep up the good work.rickoshea52
Active member
1/3
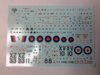
The Unimog has been transformed from an orange abomination into a NATO potato green & black camouflage scheme. With the decals on a sealing coat of varnish will be applied before some light weathering then reassembly. The decals are spares from JB Models Landrover kits.
View attachment 281527
View attachment 281527
Attachments
G
Guest
Guest
Liking this one Rick, looking good so far matey.
Have fun, John
Have fun, John
rickoshea52
Active member
1/3
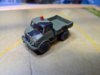
All back together for the Unimog, next will be some light weathering and some bits to go in the load bed, maybe some wing mirrors.
View attachment 282823
View attachment 282823
Attachments
rickoshea52
Active member
1/3
I found a pair of resin trailer loads from Kingfisher miniatures that I forgot I had, by good fortune they fit the load bed on the Unimog perfectly. This isn't really what you would find as a load, the limited photos I have seen of Unimogs in the field show them with a water tank - I assume for the Harrier's water aspiration system - but I cannot find a clear photo to scratch build an accurate replica.
View attachment 284109 View attachment 284110
View attachment 284109 View attachment 284110
Attachments
- Status
- Not open for further replies.
Legal Notice
scalemodelling.co.uk is a privately operated online discussion forum. All content posted by members reflects their own views and opinions and does not necessarily represent those of the forum owners or administrators. While reasonable efforts are made to moderate content, no responsibility is accepted for user-generated material. By using this site, you agree to comply with UK law and the forum rules.