
You are using an out of date browser. It may not display this or other websites correctly.
You should upgrade or use an alternative browser.
You should upgrade or use an alternative browser.
Ron's Tamiya 1/35 Panther Ausf. A - With home made zimmerit.
- Thread starter spanner570
- Start date
- Status
- Not open for further replies.
No canopies to mask either!As an aircraft builder we spend ages getting things smooth. Then I see this zim' stuff. And I'm slightly jealous.................
Pete
'scuse me, you smoothy aeroplane types, but there is a bit of effort in the process.
.....or. as they say in certain quarters - 'Up Yours!':tongue-out3:
Lots of love.
Enid Blyton (Ret)
.....or. as they say in certain quarters - 'Up Yours!':tongue-out3:
Lots of love.
Enid Blyton (Ret)
Thanks for your interest and support folk.
This weather has it's advantages - A good excuse to be at the bench.
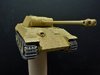
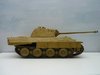
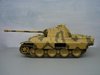
I've finally got the coating behind me - Thank gawd! The round thingy on the turret front was a real pain to do.
Here is the result, ready for a final all over coat of dk. yellow on the upper hull, turret etc., before I add the bits.
I've added the vinyl tracks and started to introduce the 'sag'. You can see the track join by the drive sprocket. This will be nicely hidden by the skirts.
View attachment 295308
View attachment 295309
.....yes, I know it was to be an OOB build, but I couldn't resist making the side skirt whatsits.
View attachment 295310
Cheers all.
Ron
This weather has it's advantages - A good excuse to be at the bench.
I've finally got the coating behind me - Thank gawd! The round thingy on the turret front was a real pain to do.
Here is the result, ready for a final all over coat of dk. yellow on the upper hull, turret etc., before I add the bits.
I've added the vinyl tracks and started to introduce the 'sag'. You can see the track join by the drive sprocket. This will be nicely hidden by the skirts.
View attachment 295308
View attachment 295309
.....yes, I know it was to be an OOB build, but I couldn't resist making the side skirt whatsits.
View attachment 295310
Cheers all.
Ron
Attachments
Thanks for your support and input, Ian. I appreciate it.
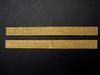
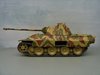
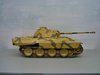
I've added the skirts ( I can't spell sureitzun, let alone pronounce it!) and stuck on some small joining brackets - all made from thin plastic card.
It's all supposed to be OOB, so I appologise for that, but we all need a bit of a challenge in life, hence the add on's.
Here is the result. For a bit of fun, variation and to see a bit of the tracks, I've omitted some of the skirts.
View attachment 295402
View attachment 295403
Thanks for looking.
Cheers.
Ron
Attachments
Thanks chaps.
Paul - I'm very happy you consider my attempt at zimmerit'ing "A fair facsimile." Thank you.
After a bit of experimenting, it's a strong mix, and holds up well enough for purpose - I don't know how it would react to knocks. That reads a bit abrupt, doesn't it? It's not meant to, and I hope it goes some way to answering your questions.
Cheers.
Ron
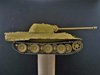
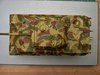
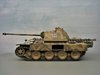
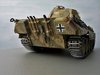
Camouflage painted on with Vallejo Model Air acrylics, using a small flat headed brush. I didn't use a pencil to outline the pattern, I just sort of made it up as I went along.
The green first....
View attachment 295500
View attachment 295501
Brown added....
View attachment 295502
View attachment 295503
Top shot.
View attachment 295504
Ready for toning down a bit.
The camouflage was usually/ sometimes/ perhaps/ never/ maybe painted in the field, either by paint brush, yard brush, sweaty sock or spray.
The patterns were down to the individual tastes (Good, bad or Poor), artistic licence/ in a hurry or plenty of time - Perhaps not.
Of the 6000 odd produced, perhaps more, perhaps less, I wouldn't think there would be any two painted alike. There again perhaps/maybe there was....No one can state for absolute 100% certainty. However, perhaps there is someone on the planet who was around at the time, and saw all the Panthers ever made.
I think the above leaves me on reasonably safe ground...... :upside::thumb2: .....There again....
Cheers all.
Ron
Attachments
Thanks for your nice comments and continuing support folks. I appreciate it.
My last post, although a bit of fun, will hopefully serve to keep any potential 'Rivet Counters' at arms length. Although, mercifully they are a rare breed on S.M.
Next up, more bits, and the decals - and who knows what else might pop up.....
Cheers.
Ron
My last post, although a bit of fun, will hopefully serve to keep any potential 'Rivet Counters' at arms length. Although, mercifully they are a rare breed on S.M.
Next up, more bits, and the decals - and who knows what else might pop up.....
Cheers.
Ron
Thanks Bob - Mind you, I've had buckets full of years to practice.....and still not been tempted to get an A.B. Long may I hold out!
An update :-
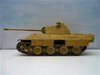
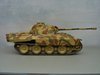
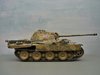
Decals added, the whole model toned down with a brushed on, overall coat of yeller. Then the tools added. I glued the tools in place on the frame first, then painted them. Nothing worse than painting first, and then watch your luuurvelly paintwork bubble up when you glue the bits on.
View attachment 295591
View attachment 295592
Here's how the back end is shaping up. The left hand track looks a bit wonky, it's just the camera angle - Honest!
View attachment 295593
I've knocked the turret M.G. off twice now, so it's staying off until the last minute!
Next up is the weathering proper.
Cheers.
Ron
An update :-
Decals added, the whole model toned down with a brushed on, overall coat of yeller. Then the tools added. I glued the tools in place on the frame first, then painted them. Nothing worse than painting first, and then watch your luuurvelly paintwork bubble up when you glue the bits on.
View attachment 295591
View attachment 295592
Here's how the back end is shaping up. The left hand track looks a bit wonky, it's just the camera angle - Honest!
View attachment 295593
I've knocked the turret M.G. off twice now, so it's staying off until the last minute!
Next up is the weathering proper.
Cheers.
Ron
Attachments
I've been having a look at Panther images and discovered they carried loads of different 'extras', which I've decided to add from my spares box, so as the model is nearly finished, I'll leave it at this stage, and post the end result soon.
Thanks for the posts and support.
Cheers.
Ron
Thanks for the posts and support.
Cheers.
Ron
- Status
- Not open for further replies.
Legal Notice
scalemodelling.co.uk is a privately operated online discussion forum. All content posted by members reflects their own views and opinions and does not necessarily represent those of the forum owners or administrators. While reasonable efforts are made to moderate content, no responsibility is accepted for user-generated material. By using this site, you agree to comply with UK law and the forum rules.