Theme editor

Scale Model Shop

Ryefield Models M1240A1 M-ATV

Mr Bowcat

SMF Supporter
Joined
Dec 29, 2016
Messages
4,736
Reaction score
225
Points
63
Location
London
1/3
Thread owner
Afternoon guys. :)

I've been having a bit of a break from modelling since June whilst I got to grips with figuring out how a lathe works. As the evenings are now starting to draw in I thought it's a good time to get back to fiddling with plastic instead of metal. :)

So I decided to ease my way back in with something simple then thought sod it, lets build something really complicated instead. With that in mind I pulled this from the stash.

1.jpg

It's going to be OOB other than the new 3D printed radio set that should be in stock with John fairly soon. Until then there is plenty of other bits that can be built up and painted.

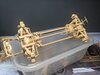
I made a small start yesterday with the chassis and running gear. It's my first RFM model and so far seems to be on par with Meng, everything fits well with little flash or seams.

2.jpg3.jpg
 
Hi Bob
The box art is nice although it seems to show this will be a very detailed, fiddly kit. Looks a neat start.
Jim
 
Thread owner
Cheers gents. :)

This seems to be on par with the Meng Bradley with full interior, which is still the kit that took me longest to build (100 days). I'm really looking forward to it. :)
 
Thread owner
Morning all. :)

I finished off the chassis last night with the addition of the suspension arms, shocks, springs, bump stops, etc. There are a surprisingly large number of parts in this finished piece, the suspension alone is something like 15 parts per corner.

4.jpg4.jpg

With that done I made a start on the engine which will be built in sub assemblies, painted in the various colours and then assembled.

6.jpg7.jpg

I'm intending to detail this a bit further with lead wire and aluminium tape for hose clamps. I just need to try and find some detailed pics of the real thing for reference.
 

Attachments

  • 5.jpg
    5.jpg
    3.3 KB · Views: 0
Thread owner
Cheers Ian. :)

Not really, some seam lines here and there but they come off easily with a few swipes of the sander. To be honest most would be mostly hidden anyway as are any EPM's, but I like to clean up every part. No flash so far.
 
Thread owner
Morning guys. :)

Progress has been slow on this, purely because I am very limited in when I can airbrush. I have switched over completely to lacquer and enamel paints, and as Mrs B has asthma I only like to spray these when she is at work. This means spraying is limited to Saturdays only at the moment.

So last Saturday I painted all the engine components and spent the last couple of evenings putting it together and adding weathering.

I still intend to add some additional hoses and wires, but will wait until its installed in the chassis and some more of the bodywork is on.

8.jpg9.jpg10.jpg11.jpg12.jpg
 
Engine looks nasty and wicked at the same time. Good paint job.

Cheers,
Richard
 
Hi Bob
That chassis has come together well. Looks to have fine detail. The engine is really nice. Will you be having it on show in the finished model?
Jim
 
Thread owner
Cheers Jim. :)

I hope to. From what I can tell the kit can be built with the doors and bonnet either open or closed. I'm hoping to see if I can modify it with added hinges so it's all workable.
 
Bob

That engine is almost a work of art in itself, let alone the rest of the kit.

Very well done indeed.

Andrew
 
Thread owner
Morning all. :)

Small update on this, I installed the engine, transmission and prop shaft into the chassis. This was a tricky endeavour and involved some time and swearing, but I managed to get it all together without breaking anything off.

The chassis has had a first pass with Tamiya panel liner to highlight the various bolts and parts, it will later have dust and sand added, and I may apply some scratching and chipping to the underside, bumpers and ladder.

13.jpg14.jpg15.jpg
 
Back
Top