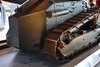
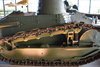
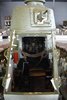
Hi Si I'm afraid I to have only just caught up as well, you have made a great start, the over all tooling looks really sharp the engine and transmission are very well detailed, how much of it can you see when the closed up ?.
Good luck with the rest of your build.
Pete :thumb2:
Hi Pete,
I’m leaning towards leaving the hatches opened so a reasonable amount can be viewed.
I know quite a few modellers feel an unseen interior is a waste, but i always take pictures of my builds and can always refer back if the need takes me.
Thanks for your positive post:thumb2:


 ️ Thanks ever so much:thumb2: