Theme editor

Scale Model Shop

Si-B’s Zvezda 1/35 Tiger II (AAGB)

Thread owner
Evening ladies and gents,


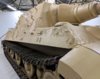
A tiny bit of progress. Fitted the spare track brackets on the turret side, added the skirt mount points and bolt heads on the hull sides.
Cleaned Up the axe and made up another set of tool clasps.


F73651F2-0B23-4773-A6A8-E3E4B6729A0F.jpeg

id like some info on the fenders over the drive sprockets.....specifically relating to the way they where hinged. Any info or pictures would be muc appreciated.
And I believe that there may of been a lock pin to hold the fender up or down?

thanks fo looking
 
Si, I hope this is what you are looking for. Clear originals I don't have but the artists rendition shows a continuous or piano hinge at the hull and a pin boss on top of the shackle structure on the glacis side. (images for reference only) Cheers, Rick H.P1010996.JPGP1010997.JPG
 
Thread owner
Good morning,
Wow I’m blown away with all the help.
Rick, Steven & of course comrade Jones :thumb2::thumb2::thumb2: With that lot under my belt I’ll get on and make up the hull part of the hinge....looks pretty straightforward, I hope :smiling5:

Just before the sleep pixies took me away I found this build of an 1/6th Armortek Tiger II Here. Which included this picture of the hinge. An impressive bit of kit but at a price of over £4K....I’ll have to wait until my lottery numbers come up :smiling4:
EF4D65D0-921B-4B52-99C5-55F119A11C36.jpeg

and this of the lock pin...
DBFDD8ED-5EB1-4341-9960-B59729C0BB8B.jpeg

Obviously this is just a model so not exact reference material.

Just found the walk a round on prime portal, looks to be stills of the video Steven posted, with close up of both parts :thumb2:.

Top stuff guys...thanks again for coming through for me :smiling4:
 
Thread owner
Evening to anyone watching, that isn’t bored to death with my attempt to jazz up this tiggy :upside:


Hardly any bench time over the weekend, just grabbed a bit here and there. the worst bit was that the bulb blew in my magnifying lamp, so I had to squint through It just on the daylight. Now I’ve taken pictures I can see a fair few squiffy bit that need sorting, but here you go anyway...


So been working on all the various clamps and holders etc for the opposite side.

50A56133-B646-4685-BCC4-C15D19EF58B2.jpeg


Quite pleased with how the track cable mounting clamp turned out. I even managed to cut the slot that the tension adjuster slides in :smiling4:
86DFEEEF-FA13-48D9-B195-76B06677C99C.jpeg


As well as the mud guard mounting positions, I added the handle for the guard locking pin with a piece of flattened copper wire....
21936311-A755-4771-800A-166335E728B1.jpeg


Added a small section of missing weld, just Under the MG position and to the left. I used filler, let it set a little then pocked at to simulate weld runs. Hopefully will look ok once primed.
59A66305-F326-48D0-89E8-0D24259DD07D.jpeg

Well if you made it this far then well done to you :smiling5:

Thats all she wrote.....G’night
 
Twon't be long now and you will be mucking about with the wet stuff. She's looking good!
Cheers, Rick H.
 
It ain't over till the fat lady sings...:smiling6: Add as much as you need to Si, this particular tank has a lot of flat surfaces devoid of any detail to work on save for zimmerit(which you will not be adding for this version) and those nice additions you're working on.

Cheers,
Richard
 
Thread owner
Scottie, Steven, Rick and Richard,
Thanks chaps, glad I’ve not bored everyone yet....it’s early days still as another pic from tonight’s tweaks.


The right side hull is finally done. Seems they had a fair few bits on them!
C798A03E-8E84-4FAB-B4A0-BB04B3EE691A.jpeg


The left side is pretty much done too....just going to see what I might of missed, then a clean up and a coat of primer
 
It's a 7 from me Si.
Glad your not expecting this level of work from me, I'm relying upon the diorama to bewilder most viewers into not looking at the tank .
 
Hi Si
The more you look at references the more you see that you could add. Difficult to know when to stop. You have taken this Tiger to another level. Looking forward to the paint which will really show off the extra detail.
Jim
 
HI Si im not into armour much but I like lookin at your guys threads an your builds to me what you are doin is that extra effort for detailing an I take my hat off to you very well done an im like the others cant wait to see it being painted :thumb2:
chris
 
Sorry mate. Didn't realise you had done a weekend update. It's very satisfying when you get all the details done correctly. All you have to worry about now is that it stays stuck on during the paint process LOL
 
Back
Top