Theme editor

Scale Model Shop

Silver Spitfire 1/32

Bigfoot57

Well-known member
Joined
Jun 24, 2015
Messages
1,179
Reaction score
301
Points
83
Age
68
1/3
Thread owner
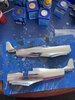
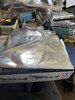
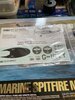
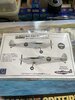
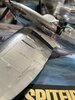
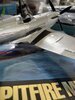
So here’s my next project a1/32 scale model of the the Silver Spitfire that flew around the world a couple of years ago
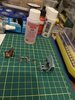
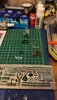
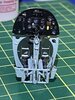
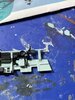
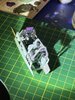
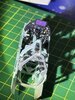
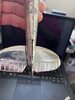
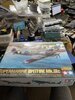
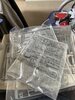
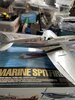
1st off are the obligatory box and spru shots there’s a lot of pieces to this Tamiya kit which from various reviews was the best Spitfire kit on the market then the foil I’m going to cover the model with this is a highly reflective foil used the keep the sunshine out of office windows note the piece shown here is just to illustrate what it looks like I have a roll of the stuff in my stash that’s pristine
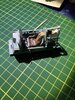
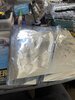
And finally we have the Silver Spitfire Decals specially ordered for the purpose so I will be starting this thread in the next week or so once I have finished the U96 1/48 Uboat

Regards

ColinView attachment 425752View attachment 425753View attachment 425754View attachment 425755View attachment 425756View attachment 425757View attachment 425758
 

Attachments

  • BD199E28-0D22-4C2B-BD37-423AF86C0E57.jpeg
    BD199E28-0D22-4C2B-BD37-423AF86C0E57.jpeg
    4.1 KB · Views: 0
  • 697EB8ED-FED8-4914-8852-244C98946D67.jpeg
    697EB8ED-FED8-4914-8852-244C98946D67.jpeg
    4.1 KB · Views: 0
  • B819530B-1BE2-4799-9378-8853B5FE42BA.jpeg
    B819530B-1BE2-4799-9378-8853B5FE42BA.jpeg
    3.9 KB · Views: 0
  • B00C5E8F-D590-4E1E-AE3B-244D490608F7.jpeg
    B00C5E8F-D590-4E1E-AE3B-244D490608F7.jpeg
    3.5 KB · Views: 0
  • 2A7E762E-D497-427A-8E7D-5B54AEF1842D.jpeg
    2A7E762E-D497-427A-8E7D-5B54AEF1842D.jpeg
    3.7 KB · Views: 0
  • 5BB9D7CB-1FC2-4018-8D72-09923671B88C.jpeg
    5BB9D7CB-1FC2-4018-8D72-09923671B88C.jpeg
    3.9 KB · Views: 0
  • 7B81211F-F417-4338-A048-4DA2664091BB.jpeg
    7B81211F-F417-4338-A048-4DA2664091BB.jpeg
    3.8 KB · Views: 0
Thread owner
The foil has its own adhesive on the back which you pull off but I’ve also tested foil glue which also works if the sticky back surface fails to stick down properly
Here’s the test run done on an old spitfire which was used to try out various foils the port side was done in the window foil and the starboard in sweet wrapping foil bear in mind the port side had already been sweet wrapper foiled previously so that’s why the window foil looks rough on the new model it will be used exclusively so you will see all the rivet detail as on the starboard side View attachment 425759View attachment 425760View attachment 425761View attachment 425762
 

Attachments

  • F94188A8-E9AA-41EE-8708-09805BB454A5.jpeg
    F94188A8-E9AA-41EE-8708-09805BB454A5.jpeg
    4.3 KB · Views: 0
  • 1CB462D5-5853-481D-B8DA-82B1FA47AC32.jpeg
    1CB462D5-5853-481D-B8DA-82B1FA47AC32.jpeg
    4 KB · Views: 0
  • 461CDB66-17D9-4E47-880C-51B47E99A8AB.jpeg
    461CDB66-17D9-4E47-880C-51B47E99A8AB.jpeg
    3.9 KB · Views: 0
  • C57F1BED-FF03-4D2A-96D3-2ED11A12782D.jpeg
    C57F1BED-FF03-4D2A-96D3-2ED11A12782D.jpeg
    4.2 KB · Views: 0
Wow! That is a really difficult finish to achieve, I admire your bravery giving it a go.

I've built several of the Tamiya Spitfires in this scale and they are superb, so you are definitely giving yourself the best chance.

I'll be cheering you on from the cheap seats :)
 
I followed on the net the Silver Spitfire round the world flight, so, to my utmost displeasure ;), I "have to" follow this build too! :smiling:
 
Colin, brave man. Using foil isn't something I ever see myself doing,
Colin.

Not often I get to start and finish a sentence like that.
 
Colin

You might enjoy this painting done by my nephew who is a professional artist in England. Arriving back at Goodwood with some Red Arrows.

chris.jpg

John
 
Colin

You might enjoy this painting done by my nephew who is a professional artist in England. Arriving back at Goodwood with some Red Arrows.


John
That is better than brilliant. The reflections are quite amazing.
 
Firstly Colin, you're a brave man using foil.

That is a beautifull painting by your nephew John, but I can't help but notice the reflection on the fuselage shows it on the ground with a row of buildings or it could just be sheet metal ripple.

Cheers,
Richard
 
Thread owner
Silver Spitfire Part 1

Well my original plan to use the window foil has been abandoned as it totally obscured all the surface detail so now it’s silver foil leaf which is a different ball game altogether and very awkward to work with so we will see how it pens out

Regards

Colin
 
Thread owner
Silver Spitfire Part 1 Sprue mounted parts painting

Well after 3 days of painting here’s what I have any unpainted parts will be foiled as per the 2 fuselage halves seen here there not perfect by any means but look better to the eye than the camera anyway I vowed never to return to paint to represent bare / polished metal surfaces again and I intend to adhere to that statement so next off will be the construction as per instructions sequence

Regards

ColinView attachment 427702View attachment 427703View attachment 427704View attachment 427705View attachment 427706View attachment 427707
 

Attachments

  • 05BEC4DB-3819-438E-8887-1D43DF1010DC.png
    05BEC4DB-3819-438E-8887-1D43DF1010DC.png
    10.4 KB · Views: 0
  • D999D83E-1318-45CC-A94A-CEDDD3BE26CB.png
    D999D83E-1318-45CC-A94A-CEDDD3BE26CB.png
    10.3 KB · Views: 0
  • DBBA3877-1DC5-40E4-A98C-F595B9E8AE09.jpeg
    DBBA3877-1DC5-40E4-A98C-F595B9E8AE09.jpeg
    3.9 KB · Views: 0
  • 7156BB25-4BE5-49B2-BCCF-66947115F618.png
    7156BB25-4BE5-49B2-BCCF-66947115F618.png
    10.9 KB · Views: 0
  • 08D9C4CD-24BC-42A9-97C8-D8CE3A416722.png
    08D9C4CD-24BC-42A9-97C8-D8CE3A416722.png
    11.5 KB · Views: 0
  • 1AF4E0B4-A831-4381-AFED-E80A7EAD7B94.png
    1AF4E0B4-A831-4381-AFED-E80A7EAD7B94.png
    11.2 KB · Views: 0
Thread owner
View attachment 428078Silver Spitfire Part 2 Cockpit tub assembly

So here we go with the assembly of the cockpit tub which comprises of side walls various pieces of equipment the seat the harness a real pia still not happy with it and instrument panel
So 1st off as this is the Silver Spitfire there are no gunsights etc these are replaced by a LCD navigation panel next there are additional fuel tanks installed so I’ve added the 2 extra gauges on the lower right hand side of the instrument panel
After that it was a case of adding the seat and other pieces to make up the remainder of the cockpit which despite what I’ve read and seen written about this model as to how good it is to my opinion as a pretty lousy fit and no internal labels etc which I will make myself as to my way of thinking this kit cost £109.00 and the difference so far is the £30 Revell kit which I have built is just as good and includes all the internal decals missing from the Tamiya kit but unlike the Tamiya kit it doesn’t include an engine that being said the engine supplied in the Tamiya kit doesn’t have a lot of detail including missing the Rolls Royce logo on the top of the engine which again for its cost is not good
Anyway we are where we are so next stage will be buttoning up the fuselage and fitting the rudder and tailplane and more foiling

Regards

Colin

View attachment 428075View attachment 428076View attachment 428079View attachment 428080View attachment 428081View attachment 428082View attachment 428083View attachment 428084
 

Attachments

  • E43209E9-032D-418C-87DD-5D695FCB7B2A.jpeg
    E43209E9-032D-418C-87DD-5D695FCB7B2A.jpeg
    4.1 KB · Views: 0
  • C222351F-B4F8-4CCC-A22F-7DAA8845CE0D.jpeg
    C222351F-B4F8-4CCC-A22F-7DAA8845CE0D.jpeg
    3 KB · Views: 0
  • 318C4F8E-78F1-436B-8D16-3D3A63AC2DCE.jpeg
    318C4F8E-78F1-436B-8D16-3D3A63AC2DCE.jpeg
    4.7 KB · Views: 0
  • 138B8257-22FD-4623-986C-9B1098BFC79F.jpeg
    138B8257-22FD-4623-986C-9B1098BFC79F.jpeg
    3.8 KB · Views: 0
  • 07ED458E-A0EB-414E-B026-70899DE4FF54.jpeg
    07ED458E-A0EB-414E-B026-70899DE4FF54.jpeg
    4 KB · Views: 0
  • 09660CF7-1D06-4490-A7D7-ACA3247F1CCA.png
    09660CF7-1D06-4490-A7D7-ACA3247F1CCA.png
    10.6 KB · Views: 0
  • EE0EA698-AB16-4E44-8131-791DE929BD18.jpeg
    EE0EA698-AB16-4E44-8131-791DE929BD18.jpeg
    4.3 KB · Views: 0
  • 4286A2DB-67D3-4418-8AAD-593EDB99D576.jpeg
    4286A2DB-67D3-4418-8AAD-593EDB99D576.jpeg
    4.4 KB · Views: 0
  • D8747325-0799-46A9-9511-A1CAAE5B4120.jpeg
    D8747325-0799-46A9-9511-A1CAAE5B4120.jpeg
    4.5 KB · Views: 0
lousy fit
What doesn't fit Colin ? I've built one of these with no problems at all, in fact, I don't think I've seen anyone complain about this kit. I wonder what is up with this one.
 
Thread owner
What doesn't fit Colin ? I've built one of these with no problems at all, in fact, I don't think I've seen anyone complain about this kit. I wonder what is up with this one.

I had issues with wheel wells with gaps all round so I’ve used filler to close those gaps but it’s still not perfect and there’s a large gap underneath the fuselage where the tail wheel mounts as you can see from the enclosed photoView attachment 428386
 

Attachments

  • 9F96898B-12C4-4B8D-B17A-88868FD3F39C.jpeg
    9F96898B-12C4-4B8D-B17A-88868FD3F39C.jpeg
    3.3 KB · Views: 0
I am not sure what is happening there.

I have built three of these and had no real fit issues.

The only fit ‘criticism’ in build reviews was around engine panels. Often it has been said of this kit that if something does not fit then you need to ask what you did wrong and I have to concur with this.

In my case, my first build did have some minor engine panel fit issues, I adjusted my approach in the second build and it was almost perfect, another change and it was perfect in the third build.

It is interesting to see your approach using metal foil. Something I have never done myself, preferring to spray metalisers. Do you use different foils to get panel differentiation?
 
Back
Top