Theme editor

Scale Model Shop

SimonT - 1/24 Abandoned Mini

SimonT

New member
Joined
Apr 27, 2018
Messages
2,824
Reaction score
0
Points
0
1/3
Thread owner
I enjoyed building the rusty Range Rover so much I am going to do another wreck, this time of a classic Mini Cooper

This idea has been rattling around my head for years but I never thought I stood a chance of making it happen, until now

Whether I can make it happen remains to be seen

So, the basic idea is that someone started to restore it then it got abandoned and nature started to reclaim it, simples

View attachment 324754
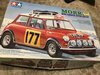
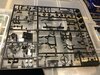
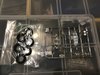
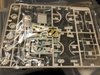
based on this Tamiya kit, without the rally parts but with a few tweaks

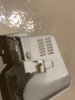
View attachment 324755
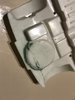
View attachment 324756
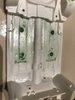
View attachment 324757
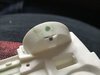
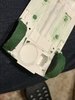
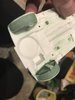
View attachment 324758
View attachment 324759
that's all the sprues so on with the fun

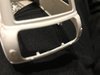
View attachment 324760
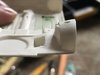
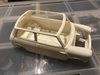
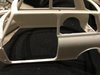
boot lid cut out of the shell

View attachment 324761
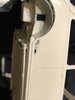
left side door and rear side window removed

View attachment 324762
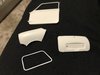
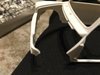
and front wing

View attachment 324763
the collection of parts removed so far

this could take some time so don't hold your breath :smiling:
 

Attachments

  • mini-001_2019-1-3.jpg
    mini-001_2019-1-3.jpg
    4.4 KB · Views: 0
  • mini-011_2019-1-3.jpg
    mini-011_2019-1-3.jpg
    3 KB · Views: 0
  • mini-002_2019-1-3.jpg
    mini-002_2019-1-3.jpg
    3.3 KB · Views: 0
  • mini-003_2019-1-3.jpg
    mini-003_2019-1-3.jpg
    4.5 KB · Views: 0
  • mini-004_2019-1-3.jpg
    mini-004_2019-1-3.jpg
    4.1 KB · Views: 0
  • mini-005_2019-1-3.jpg
    mini-005_2019-1-3.jpg
    3.5 KB · Views: 0
  • mini-006_2019-1-3.jpg
    mini-006_2019-1-3.jpg
    4.4 KB · Views: 0
  • mini-007_2019-1-3.jpg
    mini-007_2019-1-3.jpg
    3 KB · Views: 0
  • mini-009_2019-1-3.jpg
    mini-009_2019-1-3.jpg
    3.1 KB · Views: 0
  • mini-010_2019-1-3.jpg
    mini-010_2019-1-3.jpg
    3.4 KB · Views: 0
We will sit at the front please Simon.
Steve's got the kettle c/w Stove. I've got the biscuits.
John.
 
Hi Simon
I'll sit with John as he has biscuits. If this turns out half as good as the RR it will be a winner. Cutting out that window needed a steady hand. Have you a setting for the mini planned?
Jim
 
Did anyone bring coffee? After the Rusty Rover the Malignant Mini should be a snap!
I'm in with the rest of this lot. Cheers, Rick H.
 
Thread owner
John - you may need a sleeping bag as well, this could take a while

Jim - only half the size so should be at least half as good :thinking: or something

The window was actually one of the easier parts as it had a nice groove all round. The parts were removed using a sewing needle held in a pin vise - have used three needles so far. After a bit of use the ends tend to snap off and launch at high velocity. Venue - corner of an overgrown garden next to a shed (just a facade as a backdrop) if I can manage it

Hi Scottie - :thumb2:

Rick - malignant mini, like it :smiling:


There are quite a lot of incorrect details on this kit even though it generally looks like a mini and is actually a nice kit. They have skimped on the finer details so I shall endeavour to correct things where possible

The various holes left by removing doors/windows etc will need the edges rebuilding to depict panel flanges etc

So far I have only cleaned up the floor pan to remove incorrect rear seat mounts then cut in the strengthening channels and footwell pans - once the floor looks more accurate it can then be thinned out and the inevitable rust holes added

Now, the strengthening channels are actually aqueducts to take the water that leaks in (when rear quarter panels start to rot through) the full length of the interior and deposit it in the footwell pans so that they fill up and rot out fully as well - anyone that has owned a mini for any length of time will probably have experienced this

I was going to install the front seat crossmember but the seat brackets are wrong - new ones will be required

Photos will follow once there has been a bit more progress.....
 
I built a version of this as a straight Cooper for my first civilian vehicle a few years ago. I remember it as a pretty trouble free build, but that the fit and finish of the engine and some suspension parts wasn’t that great. Body was excellent though, even though the roof split was a bit annoying as the gutter should be body coloured and it would have been easier if that had been part of the body, not the roof. It should be a good canvas to work on though, and this is nice work so far....
 
Thread owner
Good to see you Ian

Morning Tim thanks for dropping in - as a mini fan I have built a few of these over the years. Converted one into a van and another into a stock car

As you say the engine fit is not the best and needs careful clean up

There are a few odd parts splits - the subframes for instance are in multiple parts with some bits moulded in the body - and yes that roof is a pain. The roof gutter is not really a channel either which makes it even trickier to paint as there is no distinct sharp edge - it will need some careful scraping to open it up
 
A bit of ivy growing out of the body work then??:smiling5:

Looking forward to seeing where your imagination takes you.

When I was a boy a few years back my school mate changed his Mini steering wheel to one that was about 12 inches across. You could nearly touch each of your knuckles when driving it. It didnt last long as we soon wrapped it around a tree one night:smiling5::smiling3::cool:
 
Hi Simon, I'll pull up a chair, first a Range Rover, now a Mini, your going through the cars I've owned!
 
Thread owner
Steve - that's the kind of thing if I can pull it off. There was a bit of a fad for small steering wheels. I preferred the large bus size wheels

Ken / Graeme - welcome aboard


View attachment 325040
this is the floor pan with the incorrect seat mounts removed and the floor channels and foot well pan ground in

View attachment 325041
this is the underside of the boot floor after I removed the moulded on section of rear sub frame and associated pipes

filled the resulting scrape marks

View attachment 325043
a not very clear photo showing the left side inner wing - this is moulded separately so I made sure it fitted well then stuck it in place

Once the glue was dry I trimmed off the large mounting blocks as they are not really there of course on the real thing

View attachment 325044
another bad photo (phone camera just didn't want to focus properly today) showing the section of removed rear sub frame

I used the Dremel with a milling bit to hollow out the frame

I intend to join all the various bits of sub frame together to actually create a separate sub frame which can then be attached to the car as per 1:1

View attachment 325042
made up a pair of more accurate hydrolastic fluid pipes for the underside to replace the faintly moulded on ones

they won't really be seen but at least they are there
 

Attachments

  • mini-014_2019-1-5.jpg
    mini-014_2019-1-5.jpg
    2.1 KB · Views: 0
  • mini-015_2019-1-5.jpg
    mini-015_2019-1-5.jpg
    2.6 KB · Views: 0
  • mini-016_2019-1-5.jpg
    mini-016_2019-1-5.jpg
    2 KB · Views: 0
  • mini-013_2019-1-5.jpg
    mini-013_2019-1-5.jpg
    3 KB · Views: 0
  • mini-012_2019-1-5.jpg
    mini-012_2019-1-5.jpg
    3.3 KB · Views: 0
Thread owner
View attachment 325130
View attachment 325132
because the boot lid is fixed in place Tamiya didn't bother to mould the rear arches correctly - they slope inwards but should be more level with a rounded top

the shock mounts are wrong as well so they were sliced off and a new inner plate was fashioned from a circle of plastic card

View attachment 325131
the whole arch top was then filled to build up the basic shape - a bit of sanding/filling/sanding should see the arches back to something like the correct shape

The battery box hole is too small due to the moulding - looks ok from under the car but is thickly moulded so the resulting hole inside is smaller than it should be

I have now carved the sides down to open the box out - it will need the box flanges adding to the boot floor

View attachment 325133
also made a start on adding the rust holes - lower rear quarter panels is always a popular rust spot
 

Attachments

  • mini-017_2019-1-6.jpg
    mini-017_2019-1-6.jpg
    2.9 KB · Views: 0
  • mini-018_2019-1-6.jpg
    mini-018_2019-1-6.jpg
    3.4 KB · Views: 0
  • mini-019_2019-1-6.jpg
    mini-019_2019-1-6.jpg
    3 KB · Views: 0
  • mini-020_2019-1-6.jpg
    mini-020_2019-1-6.jpg
    2.9 KB · Views: 0
Morning Simon,
Think your in your element with this build! I suppose restoring these things gives you intimate knowledge!

3 or 4 of my mates had minis when I was a lad, I had an mk3 escort, which I spazzed up with whatever I could afford to chuck at it...I lowered it so far that I had to avoid speed bumps and the sound system cost me more than the car did...oh to be 18 again:smiling5:
 
Nice to see you are out with the green stuff. It's all beyond me but you clearly know what you are doing:thumb2::cool:
 
Thread owner
Si - it helps, I know where the rust is

Steve - do I? :thinking:

Mick - welcome aboard

View attachment 325489View attachment 325490
wheel arches now more correct in profile and the battery box has been opened out and had the mounting flanges added around the edges
 

Attachments

  • mini-021_2019-1-9.jpg
    mini-021_2019-1-9.jpg
    3.4 KB · Views: 0
  • mini-022_2019-1-9.jpeg
    mini-022_2019-1-9.jpeg
    2.5 KB · Views: 0
Back
Top