Theme editor

Scale Model Shop

SimonT - 1/72 MasterBox Mk1 Male

Status
Not open for further replies.

SimonT

New member
Joined
Apr 27, 2018
Messages
2,824
Reaction score
0
Points
0
1/3
Thread owner
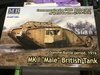
Well, I don't have a lot of spare time so what did I do, I started another one :rolling:

View attachment 310019
View attachment 310020
View attachment 310021
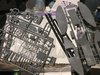
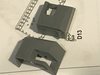
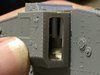
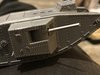
nicely moulded and complete with an etched anti grenade screen

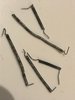
Pity that the tracks are chunky rubbery things and not more accurate length and link - may need to do something about them for what I have in mind

View attachment 310022
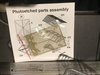
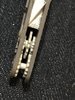
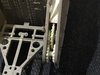
main hull parts were warped - the front joint missed by about 5mm front to back and 2mm sideways hence the bands and clips holding it all in place

View attachment 310023
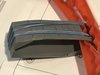
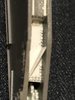
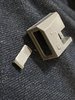
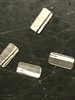
the side panels clamped due to warping

View attachment 310024
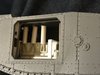
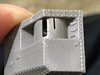
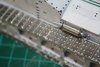
sponson cleanup underway

If this one makes it to completion I intend to have it abandoned in the middle of a muddy shell pocked landscape
 

Attachments

  • mk1-001_2018-7-31.jpg
    mk1-001_2018-7-31.jpg
    4.1 KB · Views: 0
  • mk1-003_2018-7-31.jpg
    mk1-003_2018-7-31.jpg
    4.4 KB · Views: 0
  • mk1-002_2018-7-31.jpg
    mk1-002_2018-7-31.jpg
    3.3 KB · Views: 0
  • mk1-004_2018-7-31.jpg
    mk1-004_2018-7-31.jpg
    3.1 KB · Views: 0
  • mk1-005_2018-7-31.jpg
    mk1-005_2018-7-31.jpg
    4.3 KB · Views: 0
  • mk1-006_2018-7-31.jpg
    mk1-006_2018-7-31.jpg
    2.9 KB · Views: 0
Great minds think alike. I will be doing the Airfix version in due course. Look forward to see how you get on with this version. Good luck:thumb2:
 
If this one makes it to completion I intend to have it abandoned in the middle of a muddy shell pocked landscape[/QUOTE said:
sounds great to me
 
Thread owner
Steve - is yours one of the later ones after they cleaned up the moulds? I have a few old ones but they suffer from horrible sink marks
 
I think its the later ones. I picked it up for a quid from a flea market. I hope to start the build sometime soon so you can have a look:thumb2:
 
Thread owner
a quid - can't argue with that Steve. Shall look out for it

Finally managed to get a little time on this last night so.....

View attachment 310483
cleaned up and assembled the wheels

gun mounts in progress but need work - sight slot needs cutting in next to the barrel slot

View attachment 310485
had to saw the main hull apart at the front to get a better fit of the cabin

View attachment 310484
View attachment 310486
sorry about the fuzzy pics :flushed:

It does look slightly better in 1:1 - this is many times larger than real life

I want give it a thrown track as well as being bogged down so that means adding some partial internals to the track unit

First I removed some of the perimeter plastic to open up the track unit

Punched out some disks of suitable size, filed in some teeth and added them inside the track unit - luckily all the bolts etc on the outside show where the internals mount

Started adding 0.25mm rivets but it needs more

I also want to open up one of the gun sponson doors - will need to replicate the kit door so that should be fun
 

Attachments

  • mk1-010_2018-8-5.jpg
    mk1-010_2018-8-5.jpg
    3.6 KB · Views: 0
  • mk1-007_2018-8-5.jpg
    mk1-007_2018-8-5.jpg
    3.5 KB · Views: 0
  • mk1-008_2018-8-5.jpg
    mk1-008_2018-8-5.jpg
    3.3 KB · Views: 0
  • mk1-009_2018-8-5.jpg
    mk1-009_2018-8-5.jpg
    3.3 KB · Views: 0
Thread owner
In between visiting my Dad in the nursing home and randomly falling asleep I managed to make some good progress on this one - been really enjoying itView attachment 310646
added the sighting slot to the gun mounts

View attachment 310647
since I am opening up the sponson door I thought I'd better put a basic interior inside so it doesn't look totally empty

I therefore opened up the side panel and then added a very basic representation of the engine

View attachment 310649
I then removed the kit door and sanded it down to around a third original thickness

View attachment 310648
the view through the open door - worth adding a bit of detail

View attachment 310650
used a length of Eduard etch chain for the bicycle chain drive

View attachment 310651
main hull now assembled
 

Attachments

  • mk1-012_2018-8-5.jpg
    mk1-012_2018-8-5.jpg
    3.2 KB · Views: 0
  • mk1-013_2018-8-5.jpg
    mk1-013_2018-8-5.jpg
    2.9 KB · Views: 0
  • mk1-016_2018-8-5.jpg
    mk1-016_2018-8-5.jpg
    3.6 KB · Views: 0
  • mk1-014_2018-8-5.jpg
    mk1-014_2018-8-5.jpg
    3.3 KB · Views: 0
  • mk1-015_2018-8-5.jpg
    mk1-015_2018-8-5.jpg
    3.3 KB · Views: 0
  • mk1-011_2018-8-5.jpg
    mk1-011_2018-8-5.jpg
    3 KB · Views: 0
Simon. Morning, afternoon, good evening.( Tick whatever applies )
Looking like a normal build for you, bit of cutting, few alterations and loads sanding, nice !:smiling:
Good idea on the thrown track,with the hatch open, will make an interesting feature.
John


idea with the thrown track
 
Thread owner
Hi John - much more like normal and I've been enjoying it more than the purely assembly job on the Whippet

View attachment 310742
right sponson now built and installed

aluminium gun barrel has been repurposed from a £1 Sherman 75mm aftermarket barrel - it needed to be thinner so I sanded it down along the entire length

had to make a new internal mount from a short length of cross drilled tubing but it looks ok now it is assembled

Need to repeat the process now for the other side
 

Attachments

  • mk1-017_2018-8-6.jpg
    mk1-017_2018-8-6.jpg
    3.3 KB · Views: 0
Some great work Simon, like John say's love the idea of a thrown track, and a great representation of the running gear and engine.
 
Good to see you in your element again Simon....moving along nicely with some excellent tweaks:thumb2:
Si
 
Hi Simon
I like your idea for displaying this. So many WW1 tanks ended up like that. Progress looks good. Typical Simon T attention to detail.
Jim
 
Outstanding work on the miniature details. The sprockets are awesome. Have you decided on a paint finish yet?
 
Thread owner
Ian - thanks. A bit simplified but good enough for what will be seen. I usually go over the top, like full interior on 1/76 Sdkfz222, and then it can't actually be seen :smiling4: Reigned it in a bit this time before I got carried away

Si - ta

Jim - it's something I have been thinking of doing for quite some time. I even started a scratch 1:285 MkIV so that I could show a relatively large area of surrounding ground. This will have to have a limited area but hopefully it will be enough to portray the general idea

Steve - cheers. Not considered the paint yet. I think the box suggestion is just plain brown. The sprockets are a bit of a cheat as they just need to portray the idea. Cut or punch a circle of card then use a triangular file to put a notch in the edge at N, S, E and W. It is then just a matter of cutting another notch halfway between each of the already cut notches followed by another halfway between those notches etc etc until you can't fit any more in
It is much more work to get the correct number of teeth for a truly accurate representation
 
Nice work. I never knew they were chain driven. That's my education for the day.
 
Thread owner
View attachment 311342View attachment 311343
Not got much done but have made a start on the springs - wire wrapped around a 0.6mm drill bit seems to give the right size

I also made a track link two part forming die to put the curved section into each link

The links are 6.5mm x 3mm sections of pewter with the corners rounded off

I pop them into the tray part then push in the top and press down to form the curve

Each link will require eight rivets adding so that could take some time
 

Attachments

  • IMG_1951.JPG
    IMG_1951.JPG
    2.1 KB · Views: 0
  • IMG_1952.JPG
    IMG_1952.JPG
    2.4 KB · Views: 0
HI Simon like the track links :thumb2: very clever how many have you got to make ? Goodluck with them.
Pete.
 
Thread owner
Lots Pete - haven't counted, but it will be lots

View attachment 311534
I used the same principle on my 1/48 Whippet but being larger I managed to make the punch incorporate the track rivets

I shall probably try again with a mark2 version of the 1/72 punch to see if I can do the same thing before committing to punching a lot of them - it will save a lot of time if I don't have to add eight rivets to each link so worth experimenting
 

Attachments

  • Whip-181_2013-05-04.JPG
    Whip-181_2013-05-04.JPG
    5.9 KB · Views: 0
Status
Not open for further replies.
Back
Top