Theme editor

Scale Model Shop

SimonT - RAM Kangaroo Mk1

Status
Not open for further replies.
Simon,
I see what you mean about the bubbles, even on the rear hull plate. How do you make your rivets, is it brass rod with a rounded end? And I do like the locker covers, very neat work.
Cheers, Mike.
 
Simon,
Sorry missed the beginning of this looks like an interesting build and I am in for the ride to watch you work your magic.
Scottie
 
Thread owner
Cheers Mick
Thanks Ian
John - used a small etch bender tool whatnot
Ross - :smiling: wonder why they called them kangaroos? As for the blood and androids - think Terminator.......
Bobby - :rolling: No, not much warping but plenty of air bubbles to fill
Mike - the rivets are punched from pewter sheet using the RPToolz domed rivet maker
Scottie - thanks for dropping by

Finally managed a little modelling time today so there has been some progress......

View attachment 307725
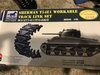
the tracks arrived from China - excellent service from Dawns Grocery Store and much faster than the predicted delivery date

View attachment 307726
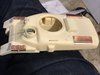
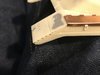
added 0.6mm punched rivets to the front track guards

View attachment 307727
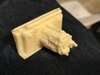
and finished adding the lower hull 0.7mm punched rivets - I also managed to then knock some of them off again because I didn't give the CA long enough to set. Had to make some more

View attachment 307728
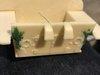
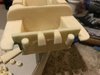
stuck the gearbox to the transmission housing plate

View attachment 307729
added the exhausts to the hull rear plate and filled in the side joins again

View attachment 307730
the air filter boxes both had air bubbles in them so out came the filler again

View attachment 307731
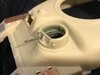
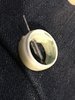
the small mg turret did not sit well on the hull so I used my compass cutter to knock up a new turret ring which was CA'd into place after sanding the lower face of the turret

View attachment 307732
the turret now sits much better (before anyone says, yes the Tamiya mg is upside down - it is not fixed in)

View attachment 307733
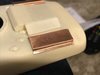
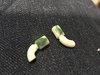
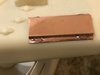
these platform thingies got replaced with copper sheet versions to more closely match the ones in photos - a bit longer and wider than the kit resin version (shown alongside for comparison)

not really sure what these things are but they seem to have tarps strapped on them in most photos - seems an odd detail if that is all they were for. Why not just weld tie down loops direct to hull?

View attachment 307734
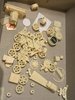
an overall view of the current state

Thanks for looking in
 

Attachments

  • ram-018_2018-7-8.jpg
    ram-018_2018-7-8.jpg
    4 KB · Views: 0
  • ram-025_2018-7-8.jpg
    ram-025_2018-7-8.jpg
    3.3 KB · Views: 0
  • ram-024_2018-7-8.jpg
    ram-024_2018-7-8.jpg
    2.9 KB · Views: 0
  • ram-022_2018-7-8.jpg
    ram-022_2018-7-8.jpg
    3.1 KB · Views: 0
  • ram-027_2018-7-8.jpg
    ram-027_2018-7-8.jpg
    3.1 KB · Views: 0
  • ram-021_2018-7-8.jpg
    ram-021_2018-7-8.jpg
    3.2 KB · Views: 0
  • ram-020_2018-7-8.jpg
    ram-020_2018-7-8.jpg
    2.8 KB · Views: 0
  • ram-026_2018-7-8.jpg
    ram-026_2018-7-8.jpg
    3 KB · Views: 0
  • ram-023_2018-7-8.jpg
    ram-023_2018-7-8.jpg
    2.8 KB · Views: 0
  • ram-019_2018-7-8.jpg
    ram-019_2018-7-8.jpg
    2.7 KB · Views: 0
Morning Simon
Great progress. A lot of work to bring this up to standard. I have used that Dawn Grocery Store and was also impressed with the service. Just love the name!!
Jim
 
Hi Simon,
I'm into this late and missed the strawberry jam with kush kush. So far progress looks quite smooth. Some parts really look like Swiss cheese.

....wait this is really 1/35 scale I'm looking at?:smiling2: The Ram being different caught me off guard....nice.:thumb2:

Cheers,
Richard
 
Wonderful update mate. I have used Bronco tracks before and was suitably impressed. Nice work on the rivets. Hopefully more bench time for you soon
 
Here we go !
Dawn's Grocery Store ? I could say something but won't.

Like the use of the pweter, I had some out last week but it's now in the waiting to be used as a wreak section :worried:
John
 
Thread owner
Jim - does need a bit of work as not cast quite as cleanly as it first appeared. Would probably have been better as a conversion kit using a donor Tamiya hull (looking at them I suspect a lot of parts started life as Tamiya anyway) and suspension for a cleaner finish. Might have reduced the not inconsiderable cost of £60 as well!
Dawns is such an odd name for a model supplier but can't fault the service

Gavin - thanks for dropping by :thumb2:

Richard - have managed to keep away from the strawberry jam, all digits currently intact. Needs a bit of work but it would take all the fun out of it if it just fell together :smiling:

Steve - sorry, not been around too much lately but trying to keep an eye on your truck. The Bronco tracks look very busy - five parts to a link I think. There are certainly a lot of sprues in the box anyway! Only used Broncos once, on a Leopard (another build sat in the unfinished pile) and they took ages, and lots of naughty words, to clean up and assemble. I vowed never to use them again but at less than half the price of Friuls..... :sad-face:

John - the pewter does make good rivets :thumb2: I have a plan to make an entire vehicle out of it at some point then totally destroy it based on photos in Panzerwrecks - may be a bit ambitious and will need a fair bit of time so may never come to fruition of course
 
Thread owner
(Early) morning all,

a little bit more done last night

View attachment 308692
air cleaners sanded and attached to the rear plate

View attachment 308693
some tie down loops added to the tarp platforms on the rear deck

View attachment 308694
all the suspension parts are now cleaned up and the various holes reamed out as they were all full of resin

The suspension is cause for concern - the castings are not the best. One of the main arms broke in two, one of the wheel hubs disintegrated when I drilled it out, a couple of holes went right through the arms and a couple of holes wandered off centre

I am not sure that the various parts will assemble into anything usable

I think the next task will be to have a go at assembling the various bits and see if I can get anything that looks like a complete VVSS suspension unit
 

Attachments

  • ram-030_2018-7-16.jpg
    ram-030_2018-7-16.jpg
    2.4 KB · Views: 0
  • ram-029_2018-7-16.jpg
    ram-029_2018-7-16.jpg
    3.3 KB · Views: 0
  • ram-028_2018-7-16.jpg
    ram-028_2018-7-16.jpg
    3.6 KB · Views: 0
Maybe one of these will make the task easier?

20121006_1aefb8.jpg
 
Hi Simon
A real box of problems. I have no doubt you have the skill to turn this into a nice model but are you stubborn enough to do so :tongue-out3: It will be interesting to see how you sort the problems.
Jim
 
They may serve as engine compartment vent covers also. Did I mention how much I dislike working w/resin? Seems every attempt of mine results in blood & bad words. Nice recovery on the turret. PaulE
 
In the middle photo, I would be interested to know if the handles are brought or made by your good self. If brought, where from please. If made, how to do them please. Thanks in advance.
 
Thread owner
Hi Jakko - I thought that as well until I saw how much they sell for!

Jim - unfortunately nowhere near as good as it first appeared and I now regret paying so much for it. It remains to be seen whether I can solve the problems

Paul - not seen any sign or mention of vents underneath but then again photos are not overly abundant and the books don't give much info. I don't have a problem with the resin, it is pretty much like plastic to work with. I do have a problem with poor castings though :sad-face:

Steve - handles are made not bought. I usually just use a pair of small smooth jaw square ended pliers to bend a piece of wire (rolled first to straighten it). In this case I cheated slightly and used a Trumpeter grab handle tool as it seemed to be an appropriate size (3mm). I then flattened the wire ends with the pliers
 
Simon .
You Sir admit to using a Trumpeter grab handle tool ! Have you no shame.

I thought only lesser mortals used such things .

Think it is pretty good considering how little it cost, I certainly need it .
John .
 
Hi Jakko - I thought that as well until I saw how much they sell for!
I hadn’t looked at the cost, but Asuka themselves sell them for ¥2400, which is about £16 at today’s exchange rates. Of course you’d get shipping from Japan on top of that … I can’t seem to find many for sale on this side of the world, though.

used a Trumpeter grab handle tool as it seemed to be an appropriate size (3mm).
I tried that tool and couldn’t get usable handles out of it. Apparently it can be done, so maybe I should give it another go.
 
Just caught up Simon some very nice work, I do hope you can sort the suspension out.
 
Thread owner
John - :sad-face: I plead temporary insanity. Since they are only in 3,4 or 5mm widths those tools are not overly useful most of the time. Using pliers like I normally do means you are not restricted on size

Jakko - seen a few at around £30-40 mark posted! Be better off buying another Dragon Alamein Sherman for £23 and robbing the parts - bit of a waste though. Given that the resin kit cost £60 and I have added Bronco tracks I'm not in a rush to throw more at it.
The Trumpeter tools work fine if you want 3,4,5mm handles but otherwise stick to pliers

Ian - thanks. I shall sort something.....
 
Status
Not open for further replies.
Back
Top