Theme editor

Scale Model Shop

Spanner's Revell 1/72 Dam Buster Lancaster. 1958 tooling.

spanner570

New member
Joined
May 26, 2009
Messages
15,599
Reaction score
613
Points
0
1/3
Thread owner
Time allowing, I hope to have ago at the various stages of the raid. Nothing fancy and long winded, just a couple of photos of each stage.

Departing.
The journey out
The Dams Raid.
The journey home.
The raid + 1 day.

All sounds a bit ambitious, and probably is, but I've long thought about having a crack at it. Particularly the actual night time attack.....

Here's the old kit. 1958 tooling. Note the original price tag!
I hate black plastic, so I'll brush on some other colour before i start.

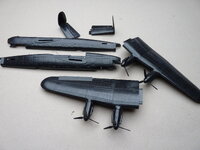
Anyway, here's the kit.
Click image for larger version  Name:	P1390707.jpg Views:	0 Size:	394.1 KB ID:	1256930


I'm not risking removing the sprues from the bag, as there are quite a few parts loose.
Click image for larger version  Name:	P1390708.jpg Views:	0 Size:	276.2 KB ID:	1256931

Click image for larger version  Name:	P1390709.jpg Views:	0 Size:	297.5 KB ID:	1256932

i don't know when I'll start, but I'm booked in!

Cheers.
Ron
 
Front and centre please Ron. Ambitious project but if you can manage five thousand Zulus this is probably not so daunting. Love that box art especilly the "Most secret" and the "Secret bomb"
 
Thread owner
Sorry boys. and thanks to Peter for drawing it to my attention.

I forgot it has to be Airfix...Senior moment!

Can the mods. please remove the build from this G.B. and place it in 'Dioramas Under Construction' ?

Thank you.

Biggles
 
Thread owner
Thanks chaps.

Senior moment for you too, Jim.
See you in the Poacher's Pocket in half an hour......Hang on, I can't remember how to get there!
 
This will be interesting. I built this in about 1970 as a ten year old. It lived on our fridge until the cat knocked it off…..
 
Pew pulled up if you please Ron.Awaiting your creating.Do carry on Carruthers.
Richard
 
A Lancaster buddy! Looking forward to seeing your rendition of another old kit Ron. At least you don't have so many turrets to deal with on this one
 
Thread owner
Thanks for the comments chaps.
Thanks to the generosity and ingenuity when it comes to lighting things up of our good buddy boatman (Chris), I am now able to proceed cautiously with this 'project'

Please understand, the aircraft build is secondary to my feeble attempts at trying to produce night time stuff. Therefore, the Lancaster will have basic paintwork....Just enough.

The focus will, hopefully, be on the darkness and lighting aspect of the diorama.


Chris's most excellent 12v wiring cluster. Battery box, mini switch and two sets of LED spotlights.


The kit ready for the rest of the lighting to be shoe horned into the fuselage
P1390790.jpg


Great bit of luck. How about that for a first time battery box fit?!
P1390792.jpg

P1390794.jpg

Next, I'll have a go at mounting the two angled spotlights into the fuselage. Then i can seal the wiring in and proceed with the aircraft construction.

Cheers.
Ron
 

Attachments

  • P1390790.jpg
    P1390790.jpg
    283.7 KB · Views: 0
Thread owner
Thanks Steve.

If you pardon the pun 'I'm winging this all the way'!

i simply haven't a clue how things will turn out.....So 'Interesting' it should be!

I've brushed on the green and matt black. I will complete painting the various large bits separately. Then glue the lot together at the last buttoning up of the wiring stage, thus avoiding disturbing the internal set up.....Hopefully, 'cos I don't want to have to rip the thing apart to repair 'owt!


Click image for larger version  Name:	P1390796.jpg Views:	0 Size:	278.5 KB ID:	1258161

Cheers all.
Ron
 
Thread owner
The green, applied earlier has dried just nice in hardly any time, so after marking the camo. lines with a pencil, I've pushed on and brushed on the brown.
Having been close up and personal to a Lancaster, I prefer a soft, rather than hard line to the two colours.

i haven't been too fussy when applying the paint as most of the action will obviously be at night, so I can get away with murder.......Ee sez!

P1390797.jpg

P1390798.jpg

I've decided to leave painting the fuselage camouflage until I've joined the two halves of the model together. This will make lining up the brown straight forward.

Cheers.
Ron
 
Good progress Ron. It will be interesting to see the night time lighting. Hope Mrs Ron has practiced her night time chucking. Don't want the kite landing in the drink 😀
 
Thread owner
Thanks boys...

Lighting rigged up and two holes drilled into the fuselage belly.
Bit of a jumble, but the set up is only of a temporary nature because once I've taken pictures of the night time stuff, I need to take the aircraft apart.

P1060490.jpg

The silicone blobs are the two LED spotlights. The tiny switch is hanging loose at the bottom. Once the lights are switched on, I will just tuck this up into the fuselage.
P1060491.jpg

Now I can button it all up and add the wings etc.

Cheers.
Ron
 
Back
Top