
You are using an out of date browser. It may not display this or other websites correctly.
You should upgrade or use an alternative browser.
You should upgrade or use an alternative browser.
Special Hobby 1/32 Tempest V
- Thread starter stona
- Start date
- Status
- Not open for further replies.
This is looking very good!
Steve, you'll have me reaching for my credit card and buying the kit if you're not careful!
Cheers
P
Well Paul, far be it from me to incite anybody to spend their hard earned cash, but if you want a 1/32 scale Tempest this is definitely the one to get
")
You can see from the way the entire area in front of the fire wall is a separate assembly, and from the 'unused' parts on the sprues, that there will be other Marks of Tempest coming along in the future too.
Cheers
Steve
")
G
Guest
Guest
The instructions do look to be a bit of a mess, but the finished cockpit looks exceptional.
Good job mate
Good job mate
Slow progress as I'm not getting much time at the moment.
The main construction is finished and I've primed the model. There are a couple of 'ghost' seams which have appeared, but once fixed I can start painting.

Cheers
Steve
The main construction is finished and I've primed the model. There are a couple of 'ghost' seams which have appeared, but once fixed I can start painting.

Cheers
Steve
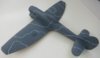
Underside is sprayed Medium Sea Grey and masked and the Ocean Grey is on the upper surfaces. As you can see I've laid my Blu-Tac worms along the upper camouflage demarcations.
View attachment 259669
I don't try to rigorously follow every curve and squiggle of the original pattern, but I do make sure that the demarcation runs through a selection of 'cardinal' points in order to get the overall shape and size correct.
All I have to do now is mask the Ocean Grey areas and spray the Dark Green
Cheers
Steve
Attachments
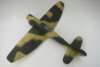
Always looks a bit of a mess with the Dark Green and masking on
View attachment 259693
I'm hoping to post shade this later today and unmask it before I set off for a couple of days away in the morning!
Cheers
Steve
View attachment 259693
I'm hoping to post shade this later today and unmask it before I set off for a couple of days away in the morning!
Cheers
Steve
Attachments
I've been too busy to get much done with this...but I have changed my mind about the eventual scheme, which means I have had to apply a Sky fuselage band After the camouflage, which is not my usual system.
I am getting ready to spray the markings, hopefully starting tomorrow. When applying the masks for roundels you obviously can't slide them about like a decal and it is very important to apply the masks in the correct place first time. How, I hear you ask, does one do that. Well, this is my method.
1)photocopy the decal sheet onto plain paper and cut out the markings, roundels in this case.
2) Make a small hole in the centre of the roundel.
3)Apply the paper roundel to the model and fiddle about until you have it where you want it.
4) Apply a spot of white paint through the hole you made earlier and remove the paper 'decal'
You will now have the centre of the markings marked like this.
View attachment 260252
I apply the masks with a needle pushed through the centre, which I can line up with this mark. You have to leave the centre just clear of the backing you use to transfer the mask, but it can be done, with care, even with quite large and complicated masks. All you must remember is to put a little bit of masking over the hole in the centre mask before you spray the next colour. In my case red of the roundel is masked and the white ring sprayed, so you don't want another white dot in the middle of the red centre.
This is easiest with something round (like a ....errrrr...roundel) but it will work for other markings too. With most others you just have to be careful with the orientation around that centre mark.
Cheers
Steve
I am getting ready to spray the markings, hopefully starting tomorrow. When applying the masks for roundels you obviously can't slide them about like a decal and it is very important to apply the masks in the correct place first time. How, I hear you ask, does one do that. Well, this is my method.
1)photocopy the decal sheet onto plain paper and cut out the markings, roundels in this case.
2) Make a small hole in the centre of the roundel.
3)Apply the paper roundel to the model and fiddle about until you have it where you want it.
4) Apply a spot of white paint through the hole you made earlier and remove the paper 'decal'
You will now have the centre of the markings marked like this.
View attachment 260252
I apply the masks with a needle pushed through the centre, which I can line up with this mark. You have to leave the centre just clear of the backing you use to transfer the mask, but it can be done, with care, even with quite large and complicated masks. All you must remember is to put a little bit of masking over the hole in the centre mask before you spray the next colour. In my case red of the roundel is masked and the white ring sprayed, so you don't want another white dot in the middle of the red centre
.This is easiest with something round (like a ....errrrr...roundel) but it will work for other markings too. With most others you just have to be careful with the orientation around that centre mark.
Cheers
Steve
Attachments
Spraying and masking the national markings takes a while, particularly if, like me, you use enamel paints. I started yesterday evening and this evening I have removed the final masks.
View attachment 260275
I will spray the codes, serials and walkways over the weekend, these need time to thoroughly dry before masking. At that point I need to look at all the 'dangly bits' !
Cheers
Steve
View attachment 260275
I will spray the codes, serials and walkways over the weekend, these need time to thoroughly dry before masking. At that point I need to look at all the 'dangly bits' !
Cheers
Steve
Attachments
G
Guest
Guest
Paint job looks so professional for me! Very good job! B|
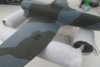
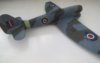
The markings that were to be sprayed are now all sprayed. I've just finished up with the 'black' serials and the wing root walkways. There are of course still some decals to be applied, but these will wait until I can put a gloss coat on the model, and that in turn will wait until the painted markings have had time to thoroughly dry.
The glossy blue of the roundels is because I had to mix my own roundel blue (someone hadn't put the lid back on the usual tinlet properly!) and I used an old tin of Humbrol 15 (gloss) as the base for this.
View attachment 260313
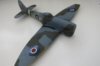
Spraying markings is not for everyone, certainly not the impatient! They are also an expensive addition when there are perfectly good decals in the box. However, they will always look better than decals, you can weather them and, as seen here, the Sky fuselage band will exactly match the code letters as the paint came out of the same tin. (and I've just noticed a little touch up is required, missed that with the Mk 1 eyeball). Though the Sky of the decals in this kit is a pretty good match for the White Ensign/Sovereign Hobbies paint I use, this is not always the case.
View attachment 260314
Cheers
Steve
The glossy blue of the roundels is because I had to mix my own roundel blue (someone hadn't put the lid back on the usual tinlet properly!) and I used an old tin of Humbrol 15 (gloss) as the base for this.
View attachment 260313
Spraying markings is not for everyone, certainly not the impatient! They are also an expensive addition when there are perfectly good decals in the box. However, they will always look better than decals, you can weather them and, as seen here, the Sky fuselage band will exactly match the code letters as the paint came out of the same tin. (and I've just noticed a little touch up is required, missed that with the Mk 1 eyeball). Though the Sky of the decals in this kit is a pretty good match for the White Ensign/Sovereign Hobbies paint I use, this is not always the case.
View attachment 260314
Cheers
Steve
Attachments
- Status
- Not open for further replies.
Legal Notice
scalemodelling.co.uk is a privately operated online discussion forum. All content posted by members reflects their own views and opinions and does not necessarily represent those of the forum owners or administrators. While reasonable efforts are made to moderate content, no responsibility is accepted for user-generated material. By using this site, you agree to comply with UK law and the forum rules.