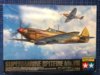
This is my third (and probably last) build of the Tamiya 1/32 Spit having previously built the Mk XVI and Mk IX.
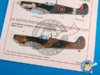
Boxtop:
View attachment 289670
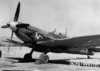
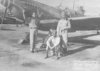
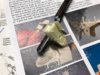
I am planning to build 'Pauline' based in Indiia January 1946 so she is a post war bird. I have found a couple of photos of her.
View attachment 289673
View attachment 289674
Photos are supposed to answer queries about an aircraft but these photos just provide more questions... Here is the art work on the Kits-World decals from which I will only use the nose art, I have some masks for the roundels and serial number simply because they look so much better and are easier to do than decals. I have to say that the Kits-World decals are the best I have found for two reasons: They are very thin and conform nicely while not tending to splinter holding together nicely when positioning and, secondly, they produce decals with such superb nose art.... I am surprised I dont see more builds with these as you cannot beat a nice nude laying along the nose of a P51/B25 or whatever.
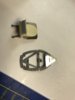
View attachment 289669
As you can see we have three spinner options!!! The aircraft at different points had at least two styles of spinner and Kits-World suggest a third. But what colour was used - not easy to tell from photos. But then I suppose that provides some artistic licence and my initial thoughts are to do the tip of the spinner only as in the second photo in blue.
It is a Dark Earth/Dark Green topside with Medium Sea Grey underside for which I will use MRP.
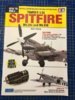
I also have the Brett Green 'How to Build' book. I forgot I had that tucked away inside this box for the previous two build so its a bit surplus now. Nevertheless it is a really nice book to have and I will be looking through as I go.
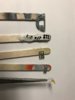
View attachment 289672
One thing an article claims in the book is that all Mk VIIIs had the larger pointed rudder. Surely that is not true? One of the three Tamiya options shows the smaller rudder and of course Kits-World show the same for Pauline. Both cannot be wrong surely? My plan is to use the smaller rudder as per Kits-World unless anyone on here knows better that is.... Sadly neither photo provides the answer.
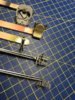
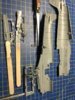
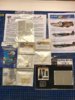
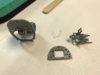
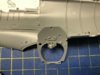
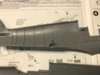
To differentiate this build I am using a lot of after-market, much more than I have ever used before.
View attachment 289671
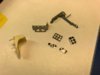
Yes - I am having another go at the fabric seatbelts. This set is labelled 'Basic Line' so maybe they will work for me this time!!!!
I will be brush detail painting with Vallejo Model Colour acrylics though all the main colours will be MRP. I have a set of MIG Oil Brushers that I have hardly used with more on order from John. So I will be experimenting with these using them for some of the weathering and trying them on some of the detail painting as well. they have such fine brushes I think they may work well for instrument panel detailing for instance. Most of the weathering will be AKI washes and pigments. Uschi metal powders will also be used where needed.
As per most of my builds I will depict her on the ground and 'buttoned up' except for an open canopy to show the 'pit detail.
I start cutting plastic tonight....
Boxtop:
View attachment 289670
I am planning to build 'Pauline' based in Indiia January 1946 so she is a post war bird. I have found a couple of photos of her.
View attachment 289673
View attachment 289674
Photos are supposed to answer queries about an aircraft but these photos just provide more questions... Here is the art work on the Kits-World decals from which I will only use the nose art, I have some masks for the roundels and serial number simply because they look so much better and are easier to do than decals. I have to say that the Kits-World decals are the best I have found for two reasons: They are very thin and conform nicely while not tending to splinter holding together nicely when positioning and, secondly, they produce decals with such superb nose art.... I am surprised I dont see more builds with these as you cannot beat a nice nude laying along the nose of a P51/B25 or whatever.
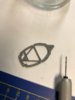
View attachment 289669
As you can see we have three spinner options!!! The aircraft at different points had at least two styles of spinner and Kits-World suggest a third. But what colour was used - not easy to tell from photos. But then I suppose that provides some artistic licence and my initial thoughts are to do the tip of the spinner only as in the second photo in blue.
It is a Dark Earth/Dark Green topside with Medium Sea Grey underside for which I will use MRP.
I also have the Brett Green 'How to Build' book. I forgot I had that tucked away inside this box for the previous two build so its a bit surplus now. Nevertheless it is a really nice book to have and I will be looking through as I go.
View attachment 289672
One thing an article claims in the book is that all Mk VIIIs had the larger pointed rudder. Surely that is not true? One of the three Tamiya options shows the smaller rudder and of course Kits-World show the same for Pauline. Both cannot be wrong surely? My plan is to use the smaller rudder as per Kits-World unless anyone on here knows better that is.... Sadly neither photo provides the answer.
To differentiate this build I am using a lot of after-market, much more than I have ever used before.
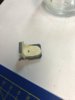
View attachment 289671
Yes - I am having another go at the fabric seatbelts. This set is labelled 'Basic Line' so maybe they will work for me this time!!!!
I will be brush detail painting with Vallejo Model Colour acrylics though all the main colours will be MRP. I have a set of MIG Oil Brushers that I have hardly used with more on order from John. So I will be experimenting with these using them for some of the weathering and trying them on some of the detail painting as well. they have such fine brushes I think they may work well for instrument panel detailing for instance. Most of the weathering will be AKI washes and pigments. Uschi metal powders will also be used where needed.
As per most of my builds I will depict her on the ground and 'buttoned up' except for an open canopy to show the 'pit detail.
I start cutting plastic tonight....
")