
You are using an out of date browser. It may not display this or other websites correctly.
You should upgrade or use an alternative browser.
You should upgrade or use an alternative browser.
Steady, wait 'til he's right on the bridge!" A 1/72 diorama
- Thread starter spanner570
- Start date
- Status
- Not open for further replies.
I was thinking the same thing Tony, I'm just stunned, it wasn't until I saw the 50p coin that I realised just how small scale this is...\ said:Sat here thinking what to write to say how great your dio is and I'm lost for words.Can't wait to see more.
Tony.
Mr Ron Sir, you are a Master...:respect1::respect1::respect1::respect1:
Thanks for the brilliant posts boys, I'm well chuffed you approve of the progress so far!
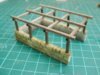
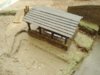
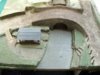
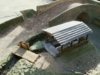
Just finished it, so here for the jury is one lavoir. These communal wash houses are, or were, apart from washing clothes, the meeting point to discuss the 'Goings on' around the village. As I wrote earlier, I've seen these in various states of repair, but lately the villagers are taking pride in their lavoirs and doing them up. Great places to sit and have a butty and good bolt holes when it rains!!
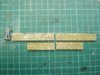
After scribbling some sketches and scaled next to our 1/72 airman friend, here is my stab at a bit of a simple, but tatty lavoir which has not been used for a while.....
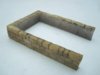
The walls are the usual polystyrene engraved with the stone work, mitred at the two corners. Note the return scribed stone work at the end of the wall. I usually forget this important bit....So don't you!
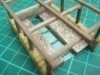
I've left the inside untouched as I wanted a rough render finish.
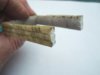
The wooden frame is about 1/16" square, cut from coffee stirrers. (still got some left Dave!)
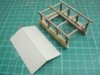
A piece of stiff card is used for the roof tiles to go on. I cut almost through the card on the ridge line, this makes it easy to bend the card nice and straight down the centre. Then it's tiled as described earlier in the build.....The apex boarding is done with thin plastic card, simply marked with vertical boards and painted.
The inside kneeling slabs are scrap styrene and the water in the central trough is a piece of plastic shirt stiffener glued to the underside. This is a great, easy way to obtain reflections in a small area, and costs 'nowt!
Might yet mess with it, but I'm happy with the overall outcome. I hope you boys are too!
I've also dug out a small stream, a bit of which I will divert through the lavoir.
One thing that has struck me, is now I've changed the roof colours to slate, the general stone work is too beige and I reckon could do with darkening down by quite some to blend in better with the darker roofs. This is what I find fascinating about dios.... It starts off with a basic idea, then as it progresses new ideas come along. Then when it starts to really come together, the obvious comes along and clouts you with a sweaty sock!...
Onwards and upward!!!
Here's the pictures of my diddy wash'ouse and thanks again for all your great comments during this build..
Ron
View attachment 56314
View attachment 56315
View attachment 56316
View attachment 56317
View attachment 56318
View attachment 56319
View attachment 56320
View attachment 169340
View attachment 169341
View attachment 169342
View attachment 169343
View attachment 169344
View attachment 169345
View attachment 169346
Just finished it, so here for the jury is one lavoir. These communal wash houses are, or were, apart from washing clothes, the meeting point to discuss the 'Goings on' around the village. As I wrote earlier, I've seen these in various states of repair, but lately the villagers are taking pride in their lavoirs and doing them up. Great places to sit and have a butty and good bolt holes when it rains!!
After scribbling some sketches and scaled next to our 1/72 airman friend, here is my stab at a bit of a simple, but tatty lavoir which has not been used for a while.....
The walls are the usual polystyrene engraved with the stone work, mitred at the two corners. Note the return scribed stone work at the end of the wall. I usually forget this important bit....So don't you!
I've left the inside untouched as I wanted a rough render finish.
The wooden frame is about 1/16" square, cut from coffee stirrers. (still got some left Dave!)
A piece of stiff card is used for the roof tiles to go on. I cut almost through the card on the ridge line, this makes it easy to bend the card nice and straight down the centre. Then it's tiled as described earlier in the build.....The apex boarding is done with thin plastic card, simply marked with vertical boards and painted.
The inside kneeling slabs are scrap styrene and the water in the central trough is a piece of plastic shirt stiffener glued to the underside. This is a great, easy way to obtain reflections in a small area, and costs 'nowt!
Might yet mess with it, but I'm happy with the overall outcome. I hope you boys are too!
I've also dug out a small stream, a bit of which I will divert through the lavoir.
One thing that has struck me, is now I've changed the roof colours to slate, the general stone work is too beige and I reckon could do with darkening down by quite some to blend in better with the darker roofs. This is what I find fascinating about dios.... It starts off with a basic idea, then as it progresses new ideas come along. Then when it starts to really come together, the obvious comes along and clouts you with a sweaty sock!...
Onwards and upward!!!
Here's the pictures of my diddy wash'ouse and thanks again for all your great comments during this build..
Ron
View attachment 56314
View attachment 56315
View attachment 56316
View attachment 56317
View attachment 56318
View attachment 56319
View attachment 56320
View attachment 169340
View attachment 169341
View attachment 169342
View attachment 169343
View attachment 169344
View attachment 169345
View attachment 169346
Attachments
-
 'Wait 'til he's on the bridge.' 054.jpg2.8 KB · Views: 0
 -
 'Wait 'til he's on the bridge.' 055.jpg2.6 KB · Views: 0
 -
 'Wait 'til he's on the bridge.' 056.jpg3.1 KB · Views: 0
 -
 'Wait 'til he's on the bridge.' 058.jpg2.7 KB · Views: 0
 -
 'Wait 'til he's on the bridge.' 059.jpg2.3 KB · Views: 0
 -
 'Wait 'til he's on the bridge.' 061.jpg1.7 KB · Views: 0
 -
 'Wait 'til he's on the bridge.' 062.jpg1.9 KB · Views: 0
G
Guest
Guest
spot on me auld mucker
G
Guest
Guest
okay now i`m seriously jealous,thats some of the best scratch building ever,what a way to end the year
mobear
mobear
G
Guest
Guest
I'm amusing myself only on having seen as you amuse yourself with this diorama Ron!!
Still fun my friend!!
Polux
Still fun my friend!!
Polux
G
Guest
Guest
OK, it is official, your buildings top MiniArt........ Not a lot I can say that has not been said Ron but I agree with everything, superb work mate. Not making it any easier for me to take some Bambi steps into diorama work though lol
G
Guest
Guest
I'm still trying to lift my jaw off the floor,simply amazing Ron!
G
Guest
Guest
Flippen heck Im gob smacked brilliant ")
Sent from my GT-S5670 using Tapatalk 2
Sent from my GT-S5670 using Tapatalk 2
hi ron\ said:Anyway, enough of my prattle, any news on your projected 'Street dio'?Cheers,
Ron
... well personally i think u should be knighted for services to this forum alone ....as far as my street dio goes it seems that i am on self imposed sabbatical ... the weather is good in this part of the universe so most of my spare time is being spent playing with the kids .... still finding the time to follow yr build here though ....cheers lindsey
Cheers fellas, I'm finding the contents of the replies a bit embarrassing, but very nice! Thank you.
Here is the latest update:-
I'm so glad I haven't done the water 'Proper' and here's why.....
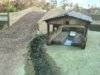
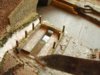
I've had a bit of sport positioning the lavoir. When I placed it on the model, I realised it was higher than the water level in the stream, so it would be impossible to divert the water to the building, so no washing up!! What a k**b.....
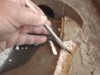
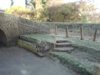
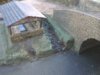
So major surgery was called for (Call in Colin's MASH unit) I marked out where the lavoir was to sit, then with an old modelling knife I hacked away the polystyrene base until it was about the correct level. It was then I came on the idea of a slope down to the 'cut' next to it, so more butchery and the initial shaping was done. But all the mess would have totally trashed the nice varnish finish on the canal surface water......One lucky break for Ron!
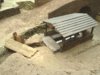
I then mixed a sloppy dollop of tile adhesive and spread this roughly over the base and then squashed the building into it. After the stuff was nearly set. I sculpted some steps and generally had a play using a small pointing trowel and an old kitchen knife......
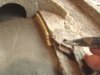
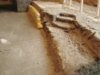
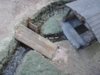
Next up I did the water course. I reasoned I needed some sort of rudimentary dam to divert the water into the lavoir, so I scratch built a simple diddy guillotine affair and also made a basic plank bridge, both made from coffee stirres and then glued together.
When I was in hacking mode, I came up with an idea to do some steps on the opposite side of the canal, then make a path along the edge....More butchery! This gave a bit more interest on an otherwise plain bit of the model. I have also shoved some fence posts in prior to adding the fence proper.
Finally I've given the stream it's first coat of varnish and added some green shed paint here and there......
It's starting to get to look like a part of village now, so next I'll have a go at a bit more detail on the buildings and see what else comes into my nut!
Here's some pictures to illustrate the above progress and thanks again for the terrific posts.
Cheers,
Ron
View attachment 56397
View attachment 56398
View attachment 56399
View attachment 56400
View attachment 56401
View attachment 56402
View attachment 56403
View attachment 56404
View attachment 56405
View attachment 56406
View attachment 56407
View attachment 56408
View attachment 56409
View attachment 56410
View attachment 56411
View attachment 169423
View attachment 169424
View attachment 169425
View attachment 169426
View attachment 169427
View attachment 169428
View attachment 169429
View attachment 169430
View attachment 169431
View attachment 169432
View attachment 169433
View attachment 169434
View attachment 169435
View attachment 169436
View attachment 169437
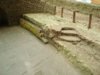
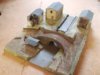
Here is the latest update:-
I'm so glad I haven't done the water 'Proper' and here's why.....
I've had a bit of sport positioning the lavoir. When I placed it on the model, I realised it was higher than the water level in the stream, so it would be impossible to divert the water to the building, so no washing up!! What a k**b.....
So major surgery was called for (Call in Colin's MASH unit) I marked out where the lavoir was to sit, then with an old modelling knife I hacked away the polystyrene base until it was about the correct level. It was then I came on the idea of a slope down to the 'cut' next to it, so more butchery and the initial shaping was done. But all the mess would have totally trashed the nice varnish finish on the canal surface water......One lucky break for Ron!
I then mixed a sloppy dollop of tile adhesive and spread this roughly over the base and then squashed the building into it. After the stuff was nearly set. I sculpted some steps and generally had a play using a small pointing trowel and an old kitchen knife......
Next up I did the water course. I reasoned I needed some sort of rudimentary dam to divert the water into the lavoir, so I scratch built a simple diddy guillotine affair and also made a basic plank bridge, both made from coffee stirres and then glued together.
When I was in hacking mode, I came up with an idea to do some steps on the opposite side of the canal, then make a path along the edge....More butchery! This gave a bit more interest on an otherwise plain bit of the model. I have also shoved some fence posts in prior to adding the fence proper.
Finally I've given the stream it's first coat of varnish and added some green shed paint here and there......
It's starting to get to look like a part of village now, so next I'll have a go at a bit more detail on the buildings and see what else comes into my nut!
Here's some pictures to illustrate the above progress and thanks again for the terrific posts.
Cheers,
Ron
View attachment 56397
View attachment 56398
View attachment 56399
View attachment 56400
View attachment 56401
View attachment 56402
View attachment 56403
View attachment 56404
View attachment 56405
View attachment 56406
View attachment 56407
View attachment 56408
View attachment 56409
View attachment 56410
View attachment 56411
View attachment 169423
View attachment 169424
View attachment 169425
View attachment 169426
View attachment 169427
View attachment 169428
View attachment 169429
View attachment 169430
View attachment 169431
View attachment 169432
View attachment 169433
View attachment 169434
View attachment 169435
View attachment 169436
View attachment 169437
Attachments
-
 'Wait 'til he's on the bridge.' 075.jpg2.6 KB · Views: 0
 -
 'Wait 'til he's on the bridge.' 076.jpg2.7 KB · Views: 0
 -
 'Wait 'til he's on the bridge.' 077.jpg2.5 KB · Views: 0
 -
 'Wait 'til he's on the bridge.' 078.jpg3.1 KB · Views: 0
 -
 'Wait 'til he's on the bridge.' 079.jpg2.4 KB · Views: 0
 -
 'Wait 'til he's on the bridge.' 083.jpg2.8 KB · Views: 0
 -
 'Wait 'til he's on the bridge.' 084.jpg2.6 KB · Views: 0
 -
 'Wait 'til he's on the bridge.' 086.jpg2.3 KB · Views: 0
 -
 'Wait 'til he's on the bridge.' 087.jpg2.5 KB · Views: 0
 -
 'Wait 'til he's on the bridge.' 074.jpg2.7 KB · Views: 0
 -
 'Wait 'til he's on the bridge.' 071.jpg2.6 KB · Views: 0
 -
 'Wait 'til he's on the bridge.' 070.jpg2.9 KB · Views: 0
 -
 'Wait 'til he's on the bridge.' 065.jpg2.5 KB · Views: 0
 -
 'Wait 'til he's on the bridge.' 068.jpg2.3 KB · Views: 0
 -
 'Wait 'til he's on the bridge.' 069.jpg2.6 KB · Views: 0
It just gets better and better ron , it looks superb , and nice to see someone else getting the big tools out!! , cheers mate tony
Good Grief Ron, you are a miracle worker.
You sure this is just expanded polystyrene, tile adhesive and coffee stirrers, he asked suspiciously, :smile10:and not photos of a real village, like you did with the farm house, LOL
Masterful work Sir, :respect1::emo1:
tony.
You sure this is just expanded polystyrene, tile adhesive and coffee stirrers, he asked suspiciously, :smile10:and not photos of a real village, like you did with the farm house, LOL
Masterful work Sir, :respect1::emo1:
tony.
Fantastic Dio Ron!
Love the detail so far and the great thing about working in 72nd scale is the amount of material subjects you can include in a realtively small footprint. Making this in 35th scale would make for one hell of big dio. I'm looking forward to seeing the water added.
Cheers
Love the detail so far and the great thing about working in 72nd scale is the amount of material subjects you can include in a realtively small footprint. Making this in 35th scale would make for one hell of big dio. I'm looking forward to seeing the water added.
Cheers
G
Guest
Guest
i aint watchin no more,you remember `tracy island`on blue peter?well that was a nightmare and i failed at that,looked more like a nuked island lol,and now the nightmares start again arghhhhhhh lol,stunning work Ron
mobear
mobear
G
Guest
Guest
This is a scratch built model in its own right!!! It could have anything added to it now from a family of walkers, a horse, towpath cyclists just about anything and it would fit, including developers looking at the ruined building for a possible 'barn conversion' opportunity with modern vehicles and maybe a JCB. It is just a timeless scene.
Thanks for the feedback chaps, I appreciate them.....
Tony (Yak face) yep' it was good to get the 'Big tool' out......bit cold today so I put it back in!!....I wish!
Ty, another bonus about 1/72 is you can get away with murder when it comes to detail, whereas 1/35 needs every last bit included to be convincing, something I doubt I would have the patience for, which is what makes Colin's dioramas so brilliant....
Right on Mobear, Blue Peter....I remember making a life size replica of Mt. Everest out of washing up bottles....Now that was big!!!
Graham, thanks for your input. Timeless scene, I like it. It never occured to me that it could be used for any era. Nice one.
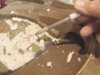
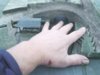
And finally, Tony (Mossiepilot) 'specially for you! lol
Cheers,
Ron
View attachment 56413
View attachment 169439
Tony (Yak face) yep' it was good to get the 'Big tool' out......bit cold today so I put it back in!!....I wish!
Ty, another bonus about 1/72 is you can get away with murder when it comes to detail, whereas 1/35 needs every last bit included to be convincing, something I doubt I would have the patience for, which is what makes Colin's dioramas so brilliant....
Right on Mobear, Blue Peter....I remember making a life size replica of Mt. Everest out of washing up bottles....Now that was big!!!
Graham, thanks for your input. Timeless scene, I like it. It never occured to me that it could be used for any era. Nice one.
And finally, Tony (Mossiepilot) 'specially for you! lol
Cheers,
Ron
View attachment 56413
View attachment 169439
Attachments
G
Guest
Guest
I just think Ron's getting better at photoshop
Nice one John, 'tis a bit oversize, and wounded too I see.....
Colin, I can't even load pictures on here right, let alone photoshop....Whatever that is!
Ron
Colin, I can't even load pictures on here right, let alone photoshop....Whatever that is!
Ron
- Status
- Not open for further replies.
Legal Notice
scalemodelling.co.uk is a privately operated online discussion forum. All content posted by members reflects their own views and opinions and does not necessarily represent those of the forum owners or administrators. While reasonable efforts are made to moderate content, no responsibility is accepted for user-generated material. By using this site, you agree to comply with UK law and the forum rules.
Currently on our website
Threads
37,392
Messages
707,807
Members
2,652
Latest member
Waffenträger Auf E-100