Great stuff Barry , and excellent tip for the spinner band, always a tricky job (in fact ive just had to mask up the nose cone on my boeing 737 and it was a bugger to get right!) cheers tony

You are using an out of date browser. It may not display this or other websites correctly.
You should upgrade or use an alternative browser.
You should upgrade or use an alternative browser.
Tamiya 1/32 P51D Mustang - Passion Wagon
- Thread starter BarryW
- Start date
- Status
- Not open for further replies.
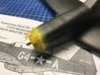
I have been pushing on with the detail work.
Decals applied to the prop
View attachment 285368
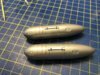
After a fourth attempt I found the joins on the drop tanks still show. But then they are paper tanks so I don't think they are a problem and won't look wrong.
View attachment 285369
Decal applied after painting the metal bands and filler caps with AK Matt aluminium.
View attachment 285370
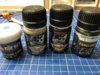
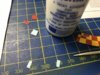
Above are the weathering products I will be using shortly
View attachment 285371
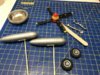
Parts ready for weathering
View attachment 285372
These will be ready after a sealing coat once the decal solution has dried.
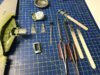
For where you need a glossy metal finish these chrome pens are brilliant. You may be able to see the glossy oleo part of the legs in the pic giving a nice contrast. Also good for mirrors and inside lights.
View attachment 285373
Monday or Tuesday I will start weathering.
Decals applied to the prop
View attachment 285368
After a fourth attempt I found the joins on the drop tanks still show. But then they are paper tanks so I don't think they are a problem and won't look wrong.
View attachment 285369
Decal applied after painting the metal bands and filler caps with AK Matt aluminium.
View attachment 285370
Above are the weathering products I will be using shortly
View attachment 285371
Parts ready for weathering
View attachment 285372
These will be ready after a sealing coat once the decal solution has dried.
For where you need a glossy metal finish these chrome pens are brilliant. You may be able to see the glossy oleo part of the legs in the pic giving a nice contrast. Also good for mirrors and inside lights.
View attachment 285373
Monday or Tuesday I will start weathering.
Attachments

Another update.
Steadily working through sub-assemblies and will soon be atta ching the wing to the fuselage.
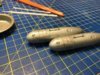
The paper fuel tanks have now been weathered with washes and some fuel spills. I place a drop of AKI Kerosene Leaks wash on the filler cap and use the airbrush to blow it in a random pattern in the direction of the airflow. A quick downward 'blow' to start with as I would expect some to drip down initially.
View attachment 285675
The wheel wells have received a wash with AKI Undercarraige wash, a semi-matt varnish, then dry brushed with Ushi metal power and dark earth pigment applied. I also used some dust effect wash as well.
View attachment 285676
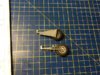
The wheels and wheel leg assemblies have received washes and pigments.
View attachment 285677
here is the tail wheel assembly also with the same washes and pigment treatments.
View attachment 285678
Steadily working through sub-assemblies and will soon be atta ching the wing to the fuselage.
The paper fuel tanks have now been weathered with washes and some fuel spills. I place a drop of AKI Kerosene Leaks wash on the filler cap and use the airbrush to blow it in a random pattern in the direction of the airflow. A quick downward 'blow' to start with as I would expect some to drip down initially.
View attachment 285675
The wheel wells have received a wash with AKI Undercarraige wash, a semi-matt varnish, then dry brushed with Ushi metal power and dark earth pigment applied. I also used some dust effect wash as well.
View attachment 285676
The wheels and wheel leg assemblies have received washes and pigments.
View attachment 285677
here is the tail wheel assembly also with the same washes and pigment treatments.
View attachment 285678
Attachments
Not a lot of progress this weekend.
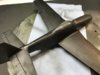
Started to fix engine panels in place and wings to fuselage. A little bit of treatment of the joins was needed.
View attachment 285882
As I am closing up the engine I am fixing them in place. Fit is excellent but I don't consider it convincing if the panels are attached only by the magnets.
View attachment 285881
I will need to use a spot of filler with the surplus removed by ipa dipped cotton bud.
Attachments
For those who do not know much about this kit Tamiya have been very innovative enabling you to produce a model with what I consider to be toy like features. This applies not just to the P51 but also the Spitfire and Zero in this series of 1/32s and to a lesser extent the Corsair and Mossie as well. Not just posable control surfaces but movable control surfaces, a sliding canopy, removable engine panels held by magnets and a swappable undercarriage held with a mix of screws and magnets enabling you to interchange sub-assemblies between wheels up and wheels down.
As you may guess I not a fan of this system as I build static models not toys. The engine panels, for instance, are great in theory but I have not found, in practise, that they work as well as theory IF your preference is for a 'buttoned up' appearance. While if swapping undercarriage you run the risk of weakening the components and having breakage. The Spitty on my view is more problematical that the P51 in this respect.
This is my third Tammy 1/32 Mustang having built two of the Spitties and two Zeros as well. All my models have been built wheels down and engine buttoned up. It is how I like to display them.
This results, with the P51, in a very easy way of masking the wheel wells. I use the u/c doors for the wheels up configuration as a mask. Plus one of the spare canopies for masking the cockpit (I prefer to paint the canopy used off the model). This means that the wheels legs get screwed on as a final fitting along with the central wheel well assembly.
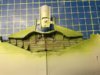
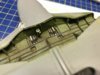
If you decide to build this kit, as I do, buttoned up on a wheels down configuration make sure you do not Cement the front of the wheel well to the forward underside engine panel. The front of the wheel well needs to flex as if it doesn't not you will have a lot of sanding, scraping and filing to do to fit the centre part. You can seen in the photo what I mean.
View attachment 285900
Down the middle a bulkhead fits with the centre wheel well doors attached. It pushes in, fitting into the slot you see in the middle. There is visible a guide to the front that fits inside a groove. There is one out of view in the rear as well.
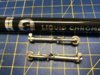
I use the Microscale Liquid Tape to temporarily fix the parts I am using as masks into place.
View attachment 285901
Someone once said with these kits that if something does not fit work out what you did wrong, it will not be Tamiya San's fault. This is very true, I wondered why I had all that sanding to do on my last build in the final fittings. Now I know and have not made that mistake again.....
As you may guess I not a fan of this system as I build static models not toys. The engine panels, for instance, are great in theory but I have not found, in practise, that they work as well as theory IF your preference is for a 'buttoned up' appearance. While if swapping undercarriage you run the risk of weakening the components and having breakage. The Spitty on my view is more problematical that the P51 in this respect.
This is my third Tammy 1/32 Mustang having built two of the Spitties and two Zeros as well. All my models have been built wheels down and engine buttoned up. It is how I like to display them.
This results, with the P51, in a very easy way of masking the wheel wells. I use the u/c doors for the wheels up configuration as a mask. Plus one of the spare canopies for masking the cockpit (I prefer to paint the canopy used off the model). This means that the wheels legs get screwed on as a final fitting along with the central wheel well assembly.
If you decide to build this kit, as I do, buttoned up on a wheels down configuration make sure you do not Cement the front of the wheel well to the forward underside engine panel. The front of the wheel well needs to flex as if it doesn't not you will have a lot of sanding, scraping and filing to do to fit the centre part. You can seen in the photo what I mean.
View attachment 285900
Down the middle a bulkhead fits with the centre wheel well doors attached. It pushes in, fitting into the slot you see in the middle. There is visible a guide to the front that fits inside a groove. There is one out of view in the rear as well.
I use the Microscale Liquid Tape to temporarily fix the parts I am using as masks into place.
View attachment 285901
Someone once said with these kits that if something does not fit work out what you did wrong, it will not be Tamiya San's fault. This is very true, I wondered why I had all that sanding to do on my last build in the final fittings. Now I know and have not made that mistake again.....
Attachments
I have been using them for some time now and I love them. I particularly like the panel line washes and kerosene leaks but all the Air Series washes and pigments have their place in a build.As mentioned above by Paul; this is indeed some high quality work! +1 for your work bench! How do you like the AK product range of washes and pigments? I instantly fell in love with them!
G
Guest
Guest
Superb work, amazing
Yes, I really like the Paneliner. I found it very easy to use with nice results. Next up for me will be the landing gear wash. Again, superb work you are doing. I would definitely like to build a 1/32 Tamiya 'stang myself one day.I have been using them for some time now and I love them. I particularly like the panel line washes and kerosene leaks but all the Air Series washes and pigments have their place in a build.
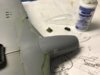
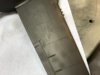
Tonight I have applied a coat of MRP Black fine surface primer over the whole airframe. I am going to try my usual black basing method though I will be modifying it somewhat with these very different paints.
I found the primer went down well, good coverage and as usual with MRP it provides an exceptionally thin opaque coat. I applied it at about 10-12 psi working quite slowly building it up.
This primer so far seems to have done exactly what you want it to do. It has helped me identify the flaws in the build so I can treat them.
You can see below where I have used Mr Disolved Putty to treat the seams. I will sand them tomorrow, rescribe and repaint with the primer.
View attachment 285990
View attachment 285992
You can see that the surface is not showing an 'even' finish. This is because the paint is so fine it really does not hide anything! Areas of glossy plastic, where I ran some Mr Cement S along a seam for instance shows through glossier than other areas and even moulding marks on the surface from the way the plastic flowed into the mold, usually almost imperceptible, show up. Is this a problem? No, not really. I expect none of these issues will show through the base coat and if it does it definitely will not show through subsequent varnishes and weathering.
What I will do with my next build is to run a very fine sanding sponge all over the model before wiping it down with ipa
prior to painting the primer. That is probably a good practise anyway as part of surface prep. I did say before that you should proceed with a build as it it is going to be a NMF after all. Here is a close up of a wing and hopefullly you can make out what I mean.
View attachment 285991
I do also believe that some of the tonal variation may arise from spraying from different distances as I move over the model with the airbrush. I think this will be reduced as I get practise in keeping the same spraying distance. This was never an issue with Vallejo, up to a point anyway. This is just a matter of my adapting my habits to suit the paint. Easy enough.
To summarise. Some of the qualities that help make his such a superb paint in many respects, cause some minor issues that need to be addressed. But none of the issues I have found are such that it detracts from just how brilliant this paint is to use.
Attachments

Marius - I use 'black basing' method for laying down a modulated base coat. This will be my first time doing this with MRP, having always used Vallejo Model Air or AKI acrylics before.
If you have not 'black based' before there are a whole load of Youtube videos showing how to do it. Here is a link to one for camo schemes using MRP:
I have never used the Tamiya primer, only Vallejo and Stynylrez before. The MRP does the job well in showing up flaws but what it does not do is act as a micro-filler as some primers do. Hence my suggesting preparing the surface as if doing a NMF finish.
Apparently they are releasing 50 new colours in September, including WW2 Italian camo colours, a bit of a gap in the market for those. I am wondering if they might release a micro-filler primer as well.
That is an interresting technique that I might consider applying for my future builds. The Tamiya fine primer (gray, canned) also serves well as a "flaw detector", and was perfectly suited for my Foxbat-build (A LOT of sanding and cutting...).
Now that you mention it, I can't remember having seen any dedicated WW2 Italian camo colors, so I'm sure their addition to that segment will be a very welcome one.
Now that you mention it, I can't remember having seen any dedicated WW2 Italian camo colors, so I'm sure their addition to that segment will be a very welcome one.
I sanded the seams and resprayed i will make what I hope to be a final check for flaws tomorrow.
I can report that the primer sanded beautifully and I really feel I can handle it with confidence even 20 mins after spraying. It takes hours for even Stynylrez to get to that stage.
Before painting and after sanding the seams I ran a very fine sanding stick over the whole model. It was the 'rougher' side, relatively speaking of a polishing stick. It seems to have reduced but not eliminated some of the uneven appearance. Not that it will really matter ultimately.
View attachment 286085
If I am happy that there are no residual flaws I will be addressing the red/yellow chequer pattern on the nose first before masking it off ready for the rest.
Attachments
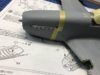
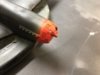
Well I am happy with how the seams and joins look so I am getting on with the red/yellow cheque on the nose.
I would rank this as one of the most complex paint jobs I have tried. Yes there are decals for this but:
......I find decals over uneven surfaces harder than to paint using masks. Mess up the decals and I would have an even more difficult masking job.
......Also, I had to paint the spinner and getting a good and exact colour match to the decals would have been something of a challenge.
So here I am needing to paint this cheque pattern ...
So - I want a vibrant yellow and red so I have started with the sand yellow MRP primer. There was no need to wait for it to dry as these paint are dry almost instantly said I then proceeded to spray with RAF Marking Yellow.
This is the result.
View attachment 286110
Next I must paint the red. Having sized up the decals and compared it with the various sizes of masking tape that I have, my conclusion is that the easiest way to approach this is to carefully cut out the yellow segments and use them as a mask. Well that is the theory. Will it work? Well you will have to wait, hopefully not too long, as I am going to take my time over this and will not make a start until Friday evening. I will post progress.
Attachments
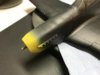
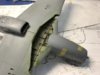
Quick update
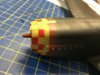
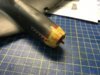
I cut out the yellow squares from the decal and masked off the yellow.
View attachment 286147
How it looked when done
View attachment 286148
I then sprayed red
View attachment 286149
Removed the masking and found it somewhat messy. Not a problem as I expected it. What I did have was a basis for a second masking job.
View attachment 286150
You can see that I started the next round of masking using Tammy tape and the red squares as a guide.
View attachment 286151
When done a spray of yellow and then.
View attachment 286152
Just a little touch up needed. I will protect it with a thin gloss coat before masking the nose band off.
Attachments

Good work with the check nose Barry. I've got a FW190 A-6 with a check nose scheme and I'm definitely spraying mine.
The P51 is coming on really well and I'm impressed with those paints (I think the solvent makes all the difference).
Looking forward to the progress.
Paul
The P51 is coming on really well and I'm impressed with those paints (I think the solvent makes all the difference).
Looking forward to the progress.
Paul
- Status
- Not open for further replies.
Legal Notice
scalemodelling.co.uk is a privately operated online discussion forum. All content posted by members reflects their own views and opinions and does not necessarily represent those of the forum owners or administrators. While reasonable efforts are made to moderate content, no responsibility is accepted for user-generated material. By using this site, you agree to comply with UK law and the forum rules.