
You are using an out of date browser. It may not display this or other websites correctly.
You should upgrade or use an alternative browser.
You should upgrade or use an alternative browser.
Tamiya 1:48 Lancaster
- Thread starter Ancientmariner
- Start date
- Joined
- Apr 27, 2018
- Messages
- 15,043
1/3
That's a fine looking beastie
Finally looking almost completed.
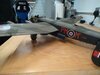
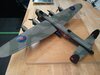
Did the decals today, as a 103 squadron variant as this was the one a family member was tail ginner in completing 54 missions before the end of the war which from what I have read is good for a rear gunner.
I have to apply Matt varnish still to fully fix decals and once done put on the clear bits (canopy, turrets, front bubble for bomb aimer and nav and landing lights).
Lastly, the board it's sat on I am considering making into a base (concrete apron section) but am undecided. Was planning to sand and then apply poly filler to the top, scoring once dry to make sections and then spraying. Any thoughts? It isn't something I have done before.
JRFB
View attachment 426707View attachment 426708View attachment 426709View attachment 426710
Attachments


1/3
 ,as simple as that!
I look forward to seeing some of your 1/32’s then. I am sure you will love the scale.Thanks Barry, I am moving onto the 1/32 kits next, really enjoyed the larger scale of this.
So the Lancaster is finally done (will pop photos in completed section when base is also done) and I am doing the base.
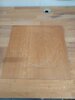
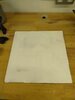
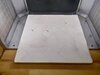
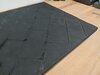
Found a piece of scrap wood and covered with poly filler, left to 80% dry and sanded roughly and scribed lines into it. As it's not completely dry some corners have broken which I quite like as it's a bit like concrete.
Given it 1 coat of black and I think will need one more before infilling centres grey and then dry brushing, varnish and then pop some static grass in the cracks.
View attachment 426849View attachment 426850View attachment 426851View attachment 426852
Attachments
- Joined
- Apr 27, 2018
- Messages
- 15,043
1/3
James that is a great result the base will set it off perfectly.
Thanks for the positive comments chaps!
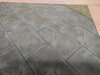
Base completed. Happy enough for 2 hours and a bit of scrap wood I had it doesn't look too bad.
Will post a completed thread when I have a proper camera to hand.
View attachment 426887View attachment 426888
Base completed. Happy enough for 2 hours and a bit of scrap wood I had it doesn't look too bad.
Will post a completed thread when I have a proper camera to hand.
View attachment 426887View attachment 426888
Attachments
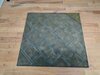
Model and base look great. Might sound a daft question, but how did you sand the filler on the base so level?
To be honest Jack I barely sanded it, just put it on levelish with a trowel and then gave a very quick once-over. It is not level completely but I wanted that effect really. Has come out pretty well really I think.
It looks fantastically level and smooth! Really spot on!To be honest Jack I barely sanded it, just put it on levelish with a trowel and then gave a very quick once-over. It is not level completely but I wanted that effect really. Has come out pretty well really I think.
Legal Notice
scalemodelling.co.uk is a privately operated online discussion forum. All content posted by members reflects their own views and opinions and does not necessarily represent those of the forum owners or administrators. While reasonable efforts are made to moderate content, no responsibility is accepted for user-generated material. By using this site, you agree to comply with UK law and the forum rules.