Theme editor

Scale Model Shop

Tamiya 1:48 Swordfish Mk 1 float plane

Status
Not open for further replies.

colin m

Moderator
Staff member
Moderator
Joined
Dec 26, 2008
Messages
9,113
Reaction score
381
Points
83
Location
Stafford, UK
1/3
Thread owner
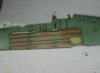
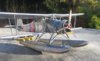
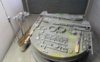
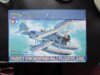
Well I've had a week or two off, so here we go again. The Tamiya Swordfish Mk1 floatplane.
View attachment 287600

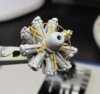
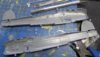
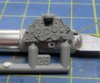
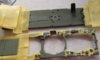
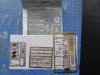
And a fair bit of PE. The Swordfish has quite a large open cockpit, so a bit more detail wouldn't hurt.
View attachment 287601

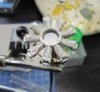
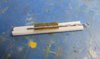
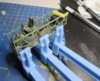
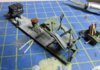
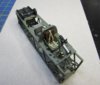
Let the fun commence. OK, it doesn't look much for an evenings work, but the wife did invite me to the pub. Plastic or beer ? I'm only human.
View attachment 287602

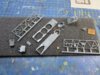
Quality so far, well typical Tamiya.
 

Attachments

  • 1.JPG
    1.JPG
    2.5 KB · Views: 0
  • 3.JPG
    3.JPG
    2.9 KB · Views: 0
  • 2.JPG
    2.JPG
    2.5 KB · Views: 0
Nice one Colin, as a fabric teck I have always liked this aerie :-)
I have the 1/32 Mk1 Trumpeter in the stach but have not yet had the time to start it yet, tuned into your build
Interestingly I recovered a DH 82 a few months back and the same red coloured dope that we see on WW2 Raf aircraft was on the aileron sprocket box inside the wing. I was amazed just how vivad the brick red color actually was.

Theuns
 
That looking a really nice kit Colin.
Knowing your skills, it will turn a pearl once build ;)
 
Thread owner
Nice one Colin, as a fabric teck I have always liked this aerie :)
I have the 1/32 Mk1 Trumpeter in the stach but have not yet had the time to start it yet, tuned into your build
Interestingly I recovered a DH 82 a few months back and the same red coloured dope that we see on WW2 Raf aircraft was on the aileron sprocket box inside the wing. I was amazed just how vivad the brick red color actually was.

Theuns
Thanks Theuns, good stuff. I was aware of the dope but didn't realise it was so dark. The pic below is from my 1:72 build. So would you say this is too light ?
View attachment 287606
 

Attachments

  • Dope.jpg
    Dope.jpg
    1.7 KB · Views: 0
Colin, I should have snapped some pix of the 70 odd year old cotton and dope but never got round to doing it :-(
What I saw was more of a red/brown than a tan. Basically a little lighter than the red that they slapped over the gun ports in WW2.
I must however compliment you on the eneven "blotchy" look you have on the inside of the fabric there, that is exactly what it looked like,
We must remember that the dope was initially applied to the cottln with a brush and this would lead to an en even covridge where more dope would soat through the fabric in some areas than in other areas, well done.

Theuns
 
a dark pink, like this almost.
2f0f20e6ea41804998003511cb5306cd--fairey-swordfish-cockpit.jpg
 
Thread owner
Wow, is this a new kit or an oldie?
The picture is from a new tool Airfix 1:72 Swordfish. A great kit. Which builds into this.

View attachment 287608

What I saw was more of a red/brown than a tan
Great picture Theuns, thanks for that. I'll aim for that colour. Although Tamiya talk about something completely different, buff or something ! I think I'll ignore Tamiya's suggestion.
 

Attachments

  • 7.JPG
    7.JPG
    2.5 KB · Views: 0
I also have one of those 1/72 stringbags I need to build still, The 1/32 Trump is rather interesting that it has full folding wing details ect, even flat section PE landing and flying wires....just not sure how I will work with them yet.

In my oic, did you see the patch look? try to rplicate that, it will look really cool. It , in full scale would usually be about 2 foot appart, just nicely the distance one moves a brush when applying the dope.
The red tinted dope is easier to apply than the modern clear copes. I was spraying a PT-13b Kadet's tailplanes in clear non taughtning Buterate dope today and if the light is not perfect it is really difficult to see where you are getting a good overlap.

I think the " buff" tamiya refers to is because the Irish linnen or grade A cotton in it's natural state had a light beidge colour to it like on the bottom of RFC camels , SE5 ect.
When a red dope is applied to it, it would make a brouwny, pink heu , but mre "red" than the buff/tan they recomend.

Theuns
 
Thread owner
Thanks again Theuns, I'll certainly take on board your advice.
So, skipping around the instructions as well all do, a bit more PE has been added. This little excellent gun didn't escape a slight upgrade.
View attachment 287637

Followed by the engine. However, a bit of a problem surfaced here. The ignition wiring harness seems to be too small at the centre, where it makes a circle. This would not allow the next component to fit correctly. So, I cut it up into 3 pieces, seems to have worked.
View attachment 287641
After the CA glue had dried, the ignition leads were bent into shape. Not left flying in thin air as they are here.

Then, the completed engine looks like this (actually it doesn't. There's more to add to the back, but to make painting easier, I'm keeping the two halves separate for now) As a stand alone unit, it would be absolutely fine. The PE just adds a bit more interest.
View attachment 287644
 

Attachments

  • 5.JPG
    5.JPG
    3.1 KB · Views: 0
  • 4.JPG
    4.JPG
    3.2 KB · Views: 0
  • 6.JPG
    6.JPG
    2.8 KB · Views: 0
Thread owner
And more. The cockpit machine gun is already quite nice. But Eduard want me to cut the barrel off and replace it with theirs. Except theirs is flat. Time to invent the DIY PE rolling machine. Ok, it's a drill bit and two cotton buds (with the buds removed) but it worked.
View attachment 287650

Ending up looking like this.
View attachment 287651

If you are a bit familiar with the swordfish, you might remember this is the gun that sticks out from the cockpit then sits in a recess of the fuselage. This can make painting the fuselage a bit difficult, do by adding the new barrel later on in the build, I can avoid all that trouble - we'll see.

Tamiya tolerances can be quite tight with even a layer of paint upsetting things. So, as I prepare for priming, I've masked the cockpit mating surfaces to avoid having to scrape paint of later. It might help, it might not, again, we'll see later.
View attachment 287652

And finally, all primed. With a bit of luck (and after three fish tanks, two lawns and a bit of dead heading) I might get some colour on and maybe even a bit of building.
View attachment 287653

Right, next job, lawn mower.
 

Attachments

  • 10.JPG
    10.JPG
    2.2 KB · Views: 0
  • 9.JPG
    9.JPG
    2.4 KB · Views: 0
  • 8.JPG
    8.JPG
    2.3 KB · Views: 0
  • 7.JPG
    7.JPG
    1.8 KB · Views: 0
Great progress colin, wise move masking the mating faces- as you say Tamiya tolerances are very precise and a thin layer of primer could well cause the dreaded recurring phantom seam later on. Excellent solution to the pe rolling problem , necessity is the mother of invention! Keep it up ( but keep that grass short too !!) cheers tony
 
Thread owner
dreaded recurring phantom seam
Sure thing, that's really what I'm trying to avoid.

The interior green is done. This is an AK paint I've used, not my normal H78, but it's a nice colour. However, now it's time for lots of masking ready for the satin black detail. I'm all out of satin black, but I have found an old tin (looks unused) of Humbrol satin black, so I'll be ignoring the rule of not applying enamel over acrylic.
View attachment 287730

And this is the rather nice instrument panel. Which I will now completely destroy and remove all detail.
View attachment 287731

But here's the strange thing. Eduard want me to use a natural metal finish instrument panel (part no. 11) not a black one, as my machine will be pre war. Is this right ? I'll have to look into this further.
View attachment 287732
 

Attachments

  • 12.JPG
    12.JPG
    3 KB · Views: 0
  • 11.JPG
    11.JPG
    2.9 KB · Views: 0
  • 13.JPG
    13.JPG
    2.2 KB · Views: 0
Thread owner
Thanks again gentlemen for stopping by.

Well, I seem to have been working for a while now on this build, but without really sticking anything substantial together. However, I've finally done something.
The lower deck of the cockpit, nearly complete.
View attachment 288027

Now with pilot seat and belts in place. Nice radio provided by Tamiya, no PE there.
View attachment 288028

I knew I bought these clamps for a reason.
View attachment 288029

And the top deck loosely fitted. The other two seats also have belts. But the top deck has one seat attached to it, and forms part of the other seat, this is going to be fun trying to fit the belts inside this 'cage'.
View attachment 288030

Oops. I've just realised, that pilot's seat looks brand new. It clearly escaped my dry brushing phase.

Colin M..
 

Attachments

  • 16.JPG
    16.JPG
    3.5 KB · Views: 0
  • 15.JPG
    15.JPG
    3.7 KB · Views: 0
  • 14.JPG
    14.JPG
    3.2 KB · Views: 0
  • 17.JPG
    17.JPG
    2.5 KB · Views: 0
Grreat stuff colin , beautifully done and luckily very visible in the finished kit , cheers tony
 
Status
Not open for further replies.
Back
Top