Theme editor

Scale Model Shop

Tamiya British 3/4 Ton Ambulance Rover 7.

Thread owner
I haven't been idle these last few days!! Been in & out of the paint shop, the roof panel and part of the
bonnet came out in an allergic reaction!!! :flushed: :flushed:;)
Probably something to do with the primer and top coat not being compatible - eventually found it was
the Tamiya Flat Black - which had over sprayed at some point. :sick:

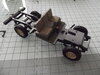
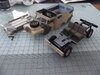
Well finally finished the chassis and managed to get the round bits on!
View attachment 400686
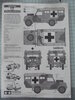
Decided on a finish and gone with something along the lines of Graeme C's BATUS idea, I reversed the colors on the camouflage instructions - replaced the green area with a sand color. Then replaced the
black with the dark green!!
View attachment 400705

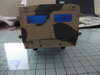
Managed to finish most of the internal bits that need paint on them & glued windows in place.
View attachment 400687

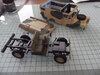
Fastened the front bonnet to the rear section of body work. This is where I had problems last time.
Tamiya has you fasten the bonnet to the chassis in section 8 - then assemble the rear bodywork and
maneuver this assembled piece into place and fasten the two small pins on each side into the locating holes on the bonnet. But trust me its easier to assemble these two off the chassis - then simply place the completed bodywork over the cab. :thumb2:
View attachment 400700

Whilst rummaging through the spares box I came across some old etch mesh and decided to "bling" it up a bit!! ;)
View attachment 400701
(You'll hardly notice it when it's painted!!:flushed:)

Ready for final assembly:-

View attachment 400706 View attachment 400707

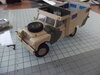
And hey presto - assembled!!
View attachment 400708 View attachment 400710
Landy5.JPG

C & C's welcome, on a £5 please.

Given the top, sides & rear a coat of gloss ready for stickers!! ;):smiling2::smiling5:

Paul.
:smiling2:
 

Attachments

  • Landychassispaint.JPG
    Landychassispaint.JPG
    2.9 KB · Views: 0
  • LandyRear.JPG
    LandyRear.JPG
    2.7 KB · Views: 0
  • Landy4.JPG
    Landy4.JPG
    3 KB · Views: 0
  • Landybits1.JPG
    Landybits1.JPG
    3.3 KB · Views: 0
  • Landybits.JPG
    Landybits.JPG
    3.1 KB · Views: 0
  • Paintinstr.JPG
    Paintinstr.JPG
    2.9 KB · Views: 0
  • Landystep.JPG
    Landystep.JPG
    2.7 KB · Views: 0
  • Bonneton.JPG
    Bonneton.JPG
    3 KB · Views: 0
  • Landyinternal.JPG
    Landyinternal.JPG
    2.9 KB · Views: 0
Hi Paul
That's come together a treat. The stickers will be the icing on the cake.
Jim
 
Thread owner
The stickers will be the icing on the cake.

Thanks for the comments - put the stickers on last night & left them to dry overnight,
most of them seemed to stick well, no problems, spent this morning "filling-in" the cracked bits!!!! :face-with-head-bandage:
Hopefully a lot bit of weathering will cover some of them!! :flushed:

Paul.
:smiling2:
 
Paul.
Funny how we find better ways of assembly than the people that have never built one do ! Meaning the kit makers.:smiling3:

Great build, I'm always in awe of anyone who can get all 4 wheel or more to touch the ground.Well done on that chassis.
 
Thread owner
Thanks John, never had the problem of a "warped" chassis - only my sense of humour!! :flushed: ;)

I always try to work a couple of steps ahead - so it helps to focus on what I'm currently doing and how it fits into the build - if that makes sense??
Last time I built this kit I remember building it as per the destructions - then tried to force the back body onto/under the front bit - resulting in the back piece splitting :flushed::smiling2: and the bonnet falling off the chassis - followed by so many four letter words !!!!;):smiling2:

Paul.
:smiling2:
 
Good idea Paul, I'm the type that sees it afterwards , but begining to try to think ahead .
 
It's looking really good in that camo Paul, a bit different to the normal black & green, I'll have to try it on a kit sometime!
 
Thread owner
Graeme - you mentioned the BATUS scheme earlier - so it's your fault!!!! :flushed::smiling2:

Took it one step further and swapped the intended colours around!
Didn't think it would work - but it's grown on me since Friday.

Been "dirtying" her up today - don't like "clean" Landys. ;):smiling2:

Hopefully post some "finished" pics tomorrow.

Paul.
:smiling2:
 
Thread owner
Muddied up a bit, given a clear matt coat - now finished.
Landy1.JPG

More pictures in completed section.

Land Rover

Paul.
:smiling2:
 
Back
Top