A masterpiece of model engineering and fit is what it certainly is and well deserves its reputation as the best aircraft kit ever produced.
Here is the box:

When you open the box the way it is packed alone tells you that you are in for a treat. Then there is the documentation....
Not just the instructions, in the usual Tamiya style taking you through the complex but not complicated build sequence, a kit made for building it certainly is. But also it includes an excellent colour booklet about the Mossie with plenty of reference photos.

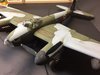
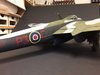
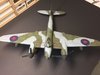
There are three pages of photos like this one

My first job was to unpack and label the sprues to help identify them during the build. This is really sexy plastic that you just want to caress, clean and crisp molds with no flash what-so-ever. Beautiful to behold. Plenty of close-ups of the plastic will follow in the build so, for now, just a pick of the sprues lined up labelled and ready on the bench.

You can see some p.e. and other metal parts included.
I have not posted a bench shot for a while, so here it is, all cleaned up from my last build and ready to cut plastic...

MY BUILD PLAN.
This will be out-of-the-box apart from the use of Montex Masks instead of the decals (Tamiya's one weakeness). Masks are easier to use than decals and look so much better in this scale. I expect that I will only use the instrument panel decal and, perhaps, the Polish red & white cheque symbols and some stencilling decals.
I also plan to get some Eduard steel seatbelts that I know are available. I did have some of the fabric ones for this build that I got a while ago but I have put those to one side as I find them impossible to put together and they look no more buildable than the previous failures and I just cannot be bothered to even try, life is too short for that frustration.

I will adopt my usual approach, building up the interior detail and engines but I am not one for using the removable panels etc and will only have the bomb bay open and on display, otherwise the aircraft will all be 'buttoned up'.
I will start cutting plastic tonight.
Here is the box:
When you open the box the way it is packed alone tells you that you are in for a treat. Then there is the documentation....
Not just the instructions, in the usual Tamiya style taking you through the complex but not complicated build sequence, a kit made for building it certainly is. But also it includes an excellent colour booklet about the Mossie with plenty of reference photos.
There are three pages of photos like this one
My first job was to unpack and label the sprues to help identify them during the build. This is really sexy plastic that you just want to caress, clean and crisp molds with no flash what-so-ever. Beautiful to behold. Plenty of close-ups of the plastic will follow in the build so, for now, just a pick of the sprues lined up labelled and ready on the bench.
You can see some p.e. and other metal parts included.
I have not posted a bench shot for a while, so here it is, all cleaned up from my last build and ready to cut plastic...
MY BUILD PLAN.
This will be out-of-the-box apart from the use of Montex Masks instead of the decals (Tamiya's one weakeness). Masks are easier to use than decals and look so much better in this scale. I expect that I will only use the instrument panel decal and, perhaps, the Polish red & white cheque symbols and some stencilling decals.
I also plan to get some Eduard steel seatbelts that I know are available. I did have some of the fabric ones for this build that I got a while ago but I have put those to one side as I find them impossible to put together and they look no more buildable than the previous failures and I just cannot be bothered to even try, life is too short for that frustration.
I will adopt my usual approach, building up the interior detail and engines but I am not one for using the removable panels etc and will only have the bomb bay open and on display, otherwise the aircraft will all be 'buttoned up'.
I will start cutting plastic tonight.