Theme editor

Scale Model Shop

They didn't expect this - Marines at Peleliu

Hi Richard,
Great to see you at this again and even better from the beginning!!! Top drawer work Sir...As usual!!!
Prost
Allen
 
Thread owner
Hi Richard,
Great to see you at this again and even better from the beginning!!! Top drawer work Sir...As usual!!!
Prost
Allen

I've got to keep you company...you and your V-2, me and my Peleliu. :smiling3:

Cheers,
Richard
 
Hi Richard, good to see you here too and top work on the Amtrac.:thumb2:
Total admiration for your patience building this dio esp. the track work.

Fernando
 
Richard
Great to see you have brought this masterpiece over to here. It was nice to have another look back at your stunning work
Steve
 
Thread owner
Hi Guys...my usual 7 hours behind time replies or is it ahead? :smiling6:

Can't wait to see more... by the way are you doing some water.?

Gregory, unfortunately no. This would be further inland just before the airfield.

Hi Richard, good to see you here too and top work on the Amtrac.:thumb2:
Total admiration for your patience building this dio esp. the track work.

Fernando

Fernando, thanks. I think my slowness works in tandem with patience. It gives me time to ponder a solution.

Richard
Great to see you have brought this masterpiece over to here. It was nice to have another look back at your stunning work
Steve

Steve, glad you like it and a pleasure to show it again. While I was preparing the next set of photos I worked on the figures...the next time it won't be a tease, they would be ready for painting.

Cheers,
Richard
 
Thread owner
More on the progress of the LVT. After being satisfied with the corrections and details to the hull I sprayed the base coat of Olive drab. This acted as a primer, then I sprayed successive layers of highlights and dark tones of the same color mixed with either white or black. For the large side panels I sprayed in a vertical streaked pattern...

View attachment 299609View attachment 299610View attachment 299611View attachment 299612View attachment 299613View attachment 299614

I painted the tracks and added them to the body...

View attachment 299619View attachment 299620View attachment 299621View attachment 299622View attachment 299623

At this point I tested it out on a base and planed the composition. Initially it was to be next to a shell hole with casualties being attended but I have since changed it...

View attachment 299624View attachment 299625View attachment 299626View attachment 299627

Back on the work table I added rust stains...which will be in the next post...
 

Attachments

  • l0042.jpg
    l0042.jpg
    2.3 KB · Views: 0
  • l0041.jpg
    l0041.jpg
    2.2 KB · Views: 0
  • l0040.jpg
    l0040.jpg
    2.5 KB · Views: 0
  • l0048.jpg
    l0048.jpg
    2.6 KB · Views: 0
  • l0047.jpg
    l0047.jpg
    3 KB · Views: 0
  • l0046.jpg
    l0046.jpg
    2.6 KB · Views: 0
  • l0045.jpg
    l0045.jpg
    2.4 KB · Views: 0
  • l0044.jpg
    l0044.jpg
    2.3 KB · Views: 0
  • l0048.jpg
    l0048.jpg
    2.6 KB · Views: 0
  • l0047.jpg
    l0047.jpg
    3 KB · Views: 0
  • l0046.jpg
    l0046.jpg
    2.6 KB · Views: 0
  • l0045.jpg
    l0045.jpg
    2.4 KB · Views: 0
  • l0031.jpg
    l0031.jpg
    2.6 KB · Views: 0
  • l0030.jpg
    l0030.jpg
    2.5 KB · Views: 0
  • l0029.jpg
    l0029.jpg
    2.9 KB · Views: 0
  • l0028.jpg
    l0028.jpg
    2.5 KB · Views: 0
  • l0027.jpg
    l0027.jpg
    2.8 KB · Views: 0
  • l0043.jpg
    l0043.jpg
    2.3 KB · Views: 0
  • l0026.jpg
    l0026.jpg
    2.5 KB · Views: 0
Thread owner
Continuation of the build... more rust streaks and mottling...

View attachment 299629View attachment 299630View attachment 299631View attachment 299632View attachment 299633View attachment 299634View attachment 299635View attachment 299636View attachment 299637

Then I scratch built the 50 Cal and 30 Cal gun cradles and shields. The kit didn't have any. The guns came from my spares.

View attachment 299638View attachment 299639View attachment 299640View attachment 299641View attachment 299642
View attachment 299644

That's for now until the next painting of the guns. C & C welcomed.

Cheers,
Richard
 

Attachments

  • l0049.jpg
    l0049.jpg
    2.2 KB · Views: 0
  • l0065.jpg
    l0065.jpg
    2.5 KB · Views: 0
  • l0063.jpg
    l0063.jpg
    3 KB · Views: 0
  • l0062.jpg
    l0062.jpg
    3 KB · Views: 0
  • l0061.jpg
    l0061.jpg
    2.4 KB · Views: 0
  • l0060.jpg
    l0060.jpg
    2.4 KB · Views: 0
  • l0059.jpg
    l0059.jpg
    2.6 KB · Views: 0
  • l0057.jpg
    l0057.jpg
    2.1 KB · Views: 0
  • l0056.jpg
    l0056.jpg
    2.4 KB · Views: 0
  • l0055.jpg
    l0055.jpg
    2.5 KB · Views: 0
  • l0054.jpg
    l0054.jpg
    2.6 KB · Views: 0
  • l0053.jpg
    l0053.jpg
    2.5 KB · Views: 0
  • l0052.jpg
    l0052.jpg
    2.8 KB · Views: 0
  • l0051.jpg
    l0051.jpg
    2.7 KB · Views: 0
  • l0050.jpg
    l0050.jpg
    2.6 KB · Views: 0
Thread owner
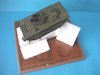
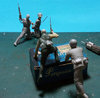
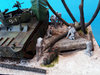
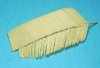
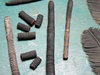
Hi...before I continue with the build blog, I'd like to post up the latest the figures for this diorama. It's safe to say they're up and ready for priming but before that here's a snippet of the composition...

View attachment 300017

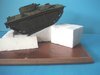
Actually not the final composition as I have relocated the some of the figures but its roughly like that. Basically the pose is supposed to be like this roughly...

View attachment 300031

The latest figures will be shown in before and after configuration:

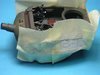
View attachment 300018 Before, the Panzer Grenadier and spare hands.
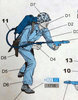
View attachment 300019 After, basically he has a new head from Hornet, reworked hald of a Tamiya back pack...
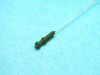
View attachment 300020 The spade is typical marine tropical style.

Next
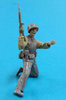
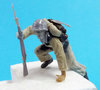
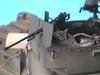
View attachment 300021 Before, standing figure ready to baynet charge.
View attachment 300022 After, added resin head turned to the right, readjusted arms and hands and made him kneel.

Next
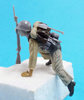
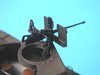
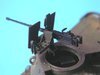
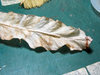
View attachment 300023 Before, flame thrower man.
View attachment 300024 After, repositioned his legs, Hornet head, and added the other half of the reworked Tamiya back pack.
View attachment 300025 May have to redo his left hans to grip the rifle better. This is a classic pose from an Iwo Jima image.

Next
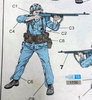
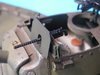
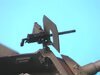
View attachment 300026 Before, shot gun man.
View attachment 300027 After, calling out to his buddy. Added Hornet head, reworked arms and change of weapon.

Next
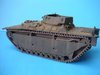
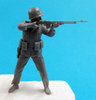
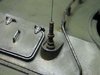
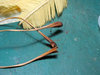
View attachment 300028 Before, BAR Man.
View attachment 300029 After, no change...his pose is just right only drilled out the sleeve cuffs.

That was my weekend progress. Little things like the helmet straps and gun slings will be added.

C & C welcomed.

Cheers,
Richard
 

Attachments

  • LO179.jpg
    LO179.jpg
    4 KB · Views: 0
  • LO190.jpg
    LO190.jpg
    3.3 KB · Views: 0
  • LO189.jpg
    LO189.jpg
    4.5 KB · Views: 0
  • LO183.jpg
    LO183.jpg
    2.4 KB · Views: 0
  • LO182.jpg
    LO182.jpg
    4.6 KB · Views: 0
  • LO188.jpg
    LO188.jpg
    3 KB · Views: 0
  • LO185.jpg
    LO185.jpg
    3 KB · Views: 0
  • LO184.jpg
    LO184.jpg
    4 KB · Views: 0
  • LO181.jpg
    LO181.jpg
    2.5 KB · Views: 0
  • LO180.jpg
    LO180.jpg
    3.3 KB · Views: 0
  • LO187.jpg
    LO187.jpg
    3.3 KB · Views: 0
  • LO186.jpg
    LO186.jpg
    3.5 KB · Views: 0
  • LO158.jpg
    LO158.jpg
    3.2 KB · Views: 0
  • LO155.jpg
    LO155.jpg
    4.7 KB · Views: 0
Thread owner
Back to the regular programming channel...continuation of the LVT secondary armement.

View attachment 300159 View attachment 300160View attachment 300161 View attachment 300162View attachment 300163 I painted the sheilds and guns seperately in Olive drab and flat black. The guns later were treated with graphite and highlighted further with steel.
I chucked a piece of rod onto my power drill and carved out the aerial supports while it spun. The attached guitar string as the antenna.

View attachment 300164 View attachment 300165

I created my own markings with masking tape tracing and cutting the insignias and unit numbers...

View attachment 300166 View attachment 300167View attachment 300168 View attachment 300169

The chip marks were done with salt and water deposits removed after the white was sprayed.
And these were the results...

View attachment 300177 View attachment 300178View attachment 300179 View attachment 300180

At this point critics will notice that this Amtrac is an A5 with features that were found probably at the end of the war. Like the side periscopes on the turret, turret guard rails front and back and the extra aerial mounts. Also the staggard top front hatches. But I'm not into revit counting and use what I have.

Cheers,
Richard
 

Attachments

  • l0072.jpg
    l0072.jpg
    2.5 KB · Views: 0
  • l0075.jpg
    l0075.jpg
    2.6 KB · Views: 0
  • l0071.jpg
    l0071.jpg
    1.4 KB · Views: 0
  • l0070.jpg
    l0070.jpg
    2.2 KB · Views: 0
  • l0069.jpg
    l0069.jpg
    2.9 KB · Views: 0
  • l0068.jpg
    l0068.jpg
    2.4 KB · Views: 0
  • l0067.jpg
    l0067.jpg
    2.2 KB · Views: 0
  • l0066.jpg
    l0066.jpg
    2.8 KB · Views: 0
  • l0073.jpg
    l0073.jpg
    2.1 KB · Views: 0
  • l0074.jpg
    l0074.jpg
    2.6 KB · Views: 0
  • l0080.jpg
    l0080.jpg
    3.4 KB · Views: 0
  • l0079.jpg
    l0079.jpg
    3 KB · Views: 0
  • l0078.jpg
    l0078.jpg
    3 KB · Views: 0
  • l0077.jpg
    l0077.jpg
    3 KB · Views: 0
  • l0076.jpg
    l0076.jpg
    2.2 KB · Views: 0
Ooooh, nice! I love the use of graphite - really gives the feeling of metal under the paint. Superb detailing as well Richard.

Peter.
 
Thread owner
Hi Peter, thanks...hmmm you have a thing for graphite don't you.:tongue-out: Metal revealed under chipped paint is normally dull greyish until it shines under constant wear and rubbing against.

Did you get to see the latest on the figures. I may have over puttyied and will need to whittle down on the clothing. I meant to bulk it and not over bulk it.

Cheers,
Richard
 
The figures look fine to me Richard. As someone who can't sculpt I feel I can't comment on your excellent work.
 
A terrific update. I suffer from paint ridges when using stencils. Am I using too much paint or is there something else I am doing wrong? Thanks in advance
Steve
 
Hi Richard
Your work on the figures is great. They will really fit the scene.
Jim
 
Thread owner
Thanks Guys for your replies. I didn't want to get into this thread yet as I was distracted by our countries elections...such drama but we did it. No blood spilt, just like our independence we now have a new government after 61 years. Really proud. Ok that's that...back to regular programming...

Peter, thanks. Your comments are heard even if it's for symmetry and scale.
Steve, much obliged. A good masking tape and burnishing the edges just before a pass of the airbrush at 90 degrees to the surface will stop any crippage.
Jimbo, I'll be seeing after painting if the puttying and sculpting worked.

Thanks for looking in guys.

Cheers,
Richard
 
Thread owner
Hi,
We're now where we're supposed to be which is the actual process for the dio. I've always wanted to do the right palm leaves of the coconut tree having seen some not too convincing after market ones.
After analysing I came up with a way (not necessarily the best) of coming up with one.
View attachment 301242 View attachment 301243

Using copper wire sandwiched between two layers of masking tape I got the perfect material to work with without tearing easily. I cut the fronds individually and tweezed the ends near the branch.

View attachment 301244 .

For the floor debris I used dried fern leaves and cut them the same as the masked palm leaves. They would be crushed and strewn about with the following ends from some dried air plants that surprisingly look like the palm branch ends.

View attachment 301245View attachment 301246View attachment 301247

Primed and ready for paint.

View attachment 301248

Cheers,
Richard
 

Attachments

  • LO139.jpg
    LO139.jpg
    6.4 KB · Views: 0
  • LO138.jpg
    LO138.jpg
    8 KB · Views: 0
  • LO137.jpg
    LO137.jpg
    6.4 KB · Views: 0
  • LO136.jpg
    LO136.jpg
    6.7 KB · Views: 0
  • LO128.jpg
    LO128.jpg
    7.1 KB · Views: 0
  • LO127.jpg
    LO127.jpg
    7.7 KB · Views: 0
  • L0126.jpg
    L0126.jpg
    1.9 KB · Views: 0
Thread owner
Hi,
I had to find the easiest way to create coconut tree trunks without the hassle of carving each trunk. I don't know if it's done before but I came up with coating a selected curved twig with two part putty, scored lengthwise with the edge of a hacksaw blade and then twinning thread roughly 2mm width for the entire length of the twig. Then quickly remove the thread and set aside for the putty to cure.

View attachment 301275View attachment 301276

I bulked up the base ends and sculpted the texture.

View attachment 301251

I cut some as bunker reinforcements...

View attachment 301252

Primed and the left trunk has been painted with heavy dry brushing. Later I'll add in little specs of moss and lichen and some damage from shrapnel and bullets.

View attachment 301253View attachment 301254

So far I've made more than the three palm fronds and trunks...next is the right colours for these palms. I'm lucky to have two trees in the front of the house as reference.

Cheers,
Richard
 

Attachments

  • LO133.jpg
    LO133.jpg
    7.4 KB · Views: 0
  • LO132.jpg
    LO132.jpg
    7.2 KB · Views: 0
  • LO141.jpg
    LO141.jpg
    6.7 KB · Views: 0
  • LO140.jpg
    LO140.jpg
    6.8 KB · Views: 0
  • LO131.jpg
    LO131.jpg
    6.7 KB · Views: 0
  • LO130.jpg
    LO130.jpg
    6.3 KB · Views: 0
Back
Top