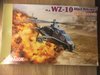
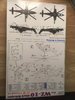
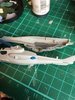
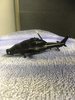
Well i thought it was time my tiny little chopper saw the light of day for Ians GB . The subject of my build is the chinese Changhe Aircraft corporation WZ10 ‘fierce thunderbolt’ attack helicopter. This is the dragon models 1/144 kit and looks very finely detailed but has no interior at all !?? Its not a kit of many parts only about 30 i think but should look quite nice when done and its not something we see everyday which is what never fails to attract me to a subject! anyhoo heres the box top and sprue shots, cheers tonyView attachment 296396View attachment 296397View attachment 296398

You are using an out of date browser. It may not display this or other websites correctly.
You should upgrade or use an alternative browser.
You should upgrade or use an alternative browser.
Tonys CAIC Wz10 ‘fierce thunderbolt’
- Thread starter yak face
- Start date
- Status
- Not open for further replies.
Cheers Ian ,I did have a couple of spare one piece cockpit tubs from the eduard 1/144 Me 262 dual combo kit (for some reason theres two for each kit , maybe for the nightfighter two seat version?) Trouble is theyre tiny so finding them in the spares box might be a problem! if not im sure a couple of strategically placed pieces of plastic card will add enough to give the impression, cheers tony
Nice to see something a little different, something this GB has brought out as there are so many diffrent types being built.
The name 'Fierce Thunderbolt' would be comical if it wasn't so serious. Lastly, great to see your little chopper on the bench Tony. :smirk:
The name 'Fierce Thunderbolt' would be comical if it wasn't so serious. Lastly, great to see your little chopper on the bench Tony. :smirk:
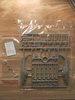
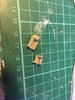
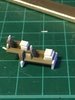
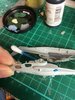
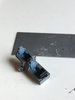
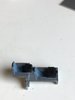
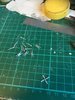
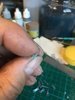
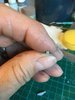
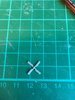
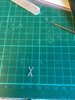
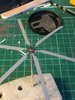
Finally started this yesterday. I managed to find the two spare cockpits from the Eduard 1/144 me262 in the spares box ! So here they are , stuck together and enhanced with a bit of plastic card . They'll be getting a paint job and thats it , the other thing ive done is to sort the transparencies. The side windows, windscreens and roof window are all in one piece one for the front and one the back .The kit instructions would have you trap this between the fuselage halves but its a bit too narrow and the side windows dont sit flush. To get round this ive cut off one side window on each piece and glued that in seperately. Heres some picsView attachment 297112View attachment 297113View attachment 297114
Attachments
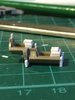
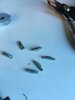
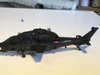
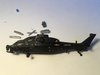
Cockpit done and fuselage together, ive also painted the roof windows tamiya clear green on the inside. The rotor assembly is a delicate thing consisting of a two part hub and six seperate blades . I carefully bent these down a bit before assembling and theyre now setting with hopefully the right amount of droop . Ive also cut off the wrongly shaped and solid exhaust outlets. The hole has been enlarged and new exhausts have been made from cotton bud stems , these will be added at the last stages.View attachment 297142View attachment 297143View attachment 297144View attachment 297145View attachment 297146View attachment 297147View attachment 297148View attachment 297149View attachment 297150View attachment 297151View attachment 297152
Attachments
-
 31A00B1D-F25A-43B8-8A55-F82FDDEF2742.jpeg2.9 KB · Views: 0
 -
 0EB35A21-4E04-49DF-82F9-FDBE4379CBA0.jpeg2.4 KB · Views: 0
 -
 9165E697-129E-431A-839D-D9351A28B1C9.jpeg3.6 KB · Views: 0
 -
 124F3092-B37C-4691-AF3F-226A5DFE4098.jpeg3.5 KB · Views: 0
 -
 DF2CF13D-3CB2-48D0-A92D-4DB21DB9A226.jpeg3.6 KB · Views: 0
 -
 3467A455-F74F-407E-8ABB-AC2263F7F451.jpeg3.5 KB · Views: 0
 -
 C336B747-C94B-480D-BDBE-93C490C27A06.jpeg3.4 KB · Views: 0
 -
 F0001BFA-7D97-481A-A65E-3140E7A864EA.jpeg3.5 KB · Views: 0
 -
 52FE08FB-F318-465E-8337-163E7020C2D9.jpeg1.6 KB · Views: 0
 -
 559138AC-6D01-4164-A51D-FCFFBE3A0739.jpeg1.3 KB · Views: 0
 -
 59B0B4C4-7C60-412A-891F-DE09240B6534.jpeg3.3 KB · Views: 0
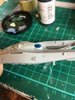
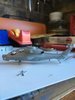
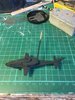
Seams sanded and filler applied where needed, ive also put on the stub wings and tail planes, at the moment it looks more like a little fish or Stingray than a helicopter !View attachment 297190
Attachments
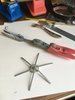
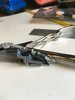
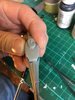
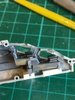
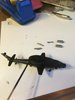
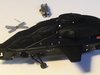
My little fish has gone all Darwin and evolved legs ( although only 3!) The tiny undercarriage legs are now on after being seperated from their huge sprue attachment points! The tiny pieces of this kit are superbly detailed with incredibly fine moulding , ie the rocket launchers have hollowed ends , but theyre attached by far too many large sprue gates. The gun under the nose being a casualty of this , breaking while being cleaned up . I can replace this later from some guitar string or something. The rockets and rails have been half assembled and ive cut the tail rotor and re glued it in the correct asymmetric way.
Next up is the paint job View attachment 297303View attachment 297304View attachment 297305View attachment 297306View attachment 297307View attachment 297308View attachment 297309
Next up is the paint job View attachment 297303View attachment 297304View attachment 297305View attachment 297306View attachment 297307View attachment 297308View attachment 297309
Attachments
-
 5E4F215B-260E-4106-BC79-4112EE40C741.jpeg2.9 KB · Views: 0
 -
 34EBF1EC-D986-4D20-8B5D-BCA2F4DE6AB7.jpeg2.9 KB · Views: 0
 -
 95503DC0-060E-4363-9F22-539CB14F841A.jpeg2.9 KB · Views: 0
 -
 E3812EA8-05C6-4B79-847C-C18A799C8736.jpeg1.9 KB · Views: 0
 -
 B19C0826-C0DC-4ECE-989A-63484C34C6FA.jpeg2.6 KB · Views: 0
 -
 3851A6C2-10A7-4E0C-A4EE-DA1262887977.jpeg2.8 KB · Views: 0
 -
 E93B4673-3158-4A21-8547-1331ECFBF523.jpeg2.8 KB · Views: 0
I decided to mask the tiny windows and spray the paint after all. I used a black primer which will serve as a base colour too - the actual colour is like a black green so i can mist a coat of dark green over the black to give it a green tinge. View attachment 297355View attachment 297356
Attachments
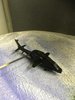
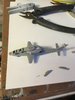
Its now had a misting of tamiya black green mixed with matt black to give the not quite black colour. Ive also painted and assembled the rocket pods and missiles and painted the rotor head and blades. Its had a coat of klear so next step is decals then final matt coat and assembly of the bits , cheers tonyView attachment 298488View attachment 298489View attachment 298490
Attachments
Hi Tony
What an amazing little thing - emphasis on little. Cracking job you are doing. The interior is spot on although I doubt much will be seen. You must have patience and a steady hand to clean up that undercarriage. Looks to have a fair few decals as well - they should be fun :smiling3:
Jim
What an amazing little thing - emphasis on little. Cracking job you are doing. The interior is spot on although I doubt much will be seen. You must have patience and a steady hand to clean up that undercarriage. Looks to have a fair few decals as well - they should be fun :smiling3:
Jim
Well it took me two hours to decal this tiny thing! The decal sheet was literally the size of a postage stamp yet still contained around 70 seperate tiny decals. Many of these were less than 1mm square so everything had to be done through the magnifying lamp. It still amazes me that Dragon can go to the trouble of supplying a superbly detailed decal sheet ( well cartograf printed it really) and ultra fine moulding like the hollowed out rocket tubes but cant be arsed to supply anything at all for the very visible interior. Next step is painting a few bitsView attachment 298882View attachment 298883View attachment 298884
Attachments
- Status
- Not open for further replies.
Legal Notice
scalemodelling.co.uk is a privately operated online discussion forum. All content posted by members reflects their own views and opinions and does not necessarily represent those of the forum owners or administrators. While reasonable efforts are made to moderate content, no responsibility is accepted for user-generated material. By using this site, you agree to comply with UK law and the forum rules.