Looking great. Interesting about the decals. How do you tell if the decals are the new peelable film? I'm definitely not looking forward to that spiral decal 

Looking great. Interesting about the decals. How do you tell if the decals are the new peelable film? I'm definitely not looking forward to that spiral decal
The decals Ive got have quite an excessive , shiny carrier film Jim , not like Eduard decals Ive had in the past . The instructions dont mention anything about the decals either so its probably just a case of looking at yours and seeing what they look like , or trying an unwanted decal first , let me know what you find , cheers tony
 The film came off but so did a lot of the decal , this put a temporary stop to the proceedings. After leaving the rest for a while it looked as though the ones that I didnt peel the film off were drying down quite nicely - the shiny carrier film seemed a lot thinner now it had dried.


 .
. 


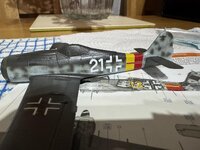
 Got the DF loop , whip aerial ( toothbrush bristle ) and Morane antenna fitted now . The step was made from wire bent to shape as I broke the plastic kit one cleaning it up . There was one supplied on the etched fret but like the antennae it just looked too flat . Next up fitting the canopy and aerial wire . The aerial wire on unblown canopies like this was held in tension whatever the position of the canopy - passing through the canopy on rollers .

scalemodelling.co.uk is a privately operated online discussion forum. All content posted by members reflects their own views and opinions and does not necessarily represent those of the forum owners or administrators. While reasonable efforts are made to moderate content, no responsibility is accepted for user-generated material. By using this site, you agree to comply with UK law and the forum rules.


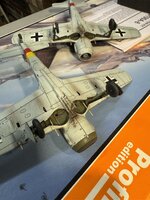
 changing the gun barrels and pitot tube really enhances them.