Theme editor

Scale Model Shop

Tornado IDS; Italeri, 1/48. Black panther.

Status
Not open for further replies.

Ian M

Administrator
Staff member
Joined
Dec 14, 2008
Messages
18,331
Reaction score
563
Points
113
1/3
Thread owner
Right you asked for it so no-one to blame other than yourselves!

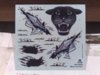
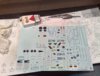
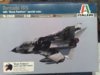
First off the box, prues and decals. And when they say large decal sheet they were not mucking about. Theres a pack of ciggies in the frame for size, for those that remember what a pack of smokes look like!!!

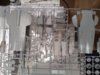
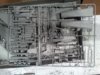
The sprues are large, well moulded with only the smallest of flash on a few bits.

View attachment 15937View attachment 15932View attachment 15936View attachment 15934View attachment 15933View attachment 15935

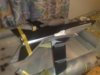
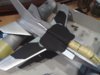
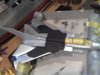
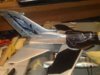
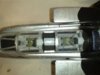
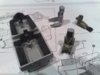
And this is what I have done thus far View attachment 15938

Although the canopy on this bird is like Ally Pally (so even I should be able to mask this one), I'm not going to town in the cock-pit.

This is going to be strictly OOB.

Ian M

View attachment 24132

View attachment 24133

View attachment 24134

View attachment 24135

View attachment 24136

View attachment 24137

View attachment 24138

View attachment 136658

View attachment 136659

View attachment 136660

View attachment 136661

View attachment 136662

View attachment 136663

View attachment 136664
 

Attachments

  • 07062010530.jpg
    07062010530.jpg
    2.9 KB · Views: 0
  • 07062010531.jpg
    07062010531.jpg
    2.9 KB · Views: 0
  • 07062010532.jpg
    07062010532.jpg
    2.7 KB · Views: 0
  • 07062010533.jpg
    07062010533.jpg
    3 KB · Views: 0
  • 07062010529.jpg
    07062010529.jpg
    2.7 KB · Views: 0
  • 07062010528.jpg
    07062010528.jpg
    2.5 KB · Views: 0
  • 07062010534.jpg
    07062010534.jpg
    2.6 KB · Views: 0
hi ian , this is in a totally different league to the airfix offering! it looks great and its going to look wicked with those panther decals on! cheers tony
 
Can you airbrush Microsol!!! That is a huge decal set for the Panther, going to be a stunner.
 
Thread owner
Graham. if its liquid it can spray!

Those panther markings are quite a selling point arn't they!!!

Right, First question. The paint calls for model masters 1401 Aluminiun metalizer!!! All the aircraft I have done up to now have been green/grey. Bare metal? Would this be shiny or flat? Should I just go for a painted colour or should it indeed look like bare metal.

What with the Panther markings I could be lead into beliving that the alu would be bright. Not knowing and never having used Model Masters I have no idea what the finnish is like.

I do have Humbrol Alu metal coat in both flat and polished finnish. So Should I spray it and leave it or spray it and buff it???

Ian M
 
And i thought my Me 109 had big decals, this takes the biscuit. Very nice looking kit Ian, can't wait to see how you get on with the build matey.

Have fun, John
 
Tricky one with the silver BMF colouring. Doing the Bike, I have learned so much about getting metallic finishes. The main thing I have learned is that you cannot easily get it to look like metal. I am not sure what the aircraft in question really should look like but there is a good tip posted here All I can advise you is to try it out on something else to get the effect that you want before committing it to the kit. Get the cheapest model you can get and us it as a test bed.
 
\ said:
Graham. if its liquid it can spray!Those panther markings are quite a selling point arn't they!!!

Right, First question. The paint calls for model masters 1401 Aluminiun metalizer!!! All the aircraft I have done up to now have been green/grey. Bare metal? Would this be shiny or flat? Should I just go for a painted colour or should it indeed look like bare metal.

What with the Panther markings I could be lead into beliving that the alu would be bright. Not knowing and never having used Model Masters I have no idea what the finnish is like.

I do have Humbrol Alu metal coat in both flat and polished finnish. So Should I spray it and leave it or spray it and buff it???

Ian M
Ian, Have a look at the link below. Looking forward to watching this one. Cheers Derek

Eastern Suburbs Scale Modelling Club

Tamiya AS12 Rattle Can looks good a well, see below.

P-51D Mustang "Sebastian Jr." by Brett Green (Tamiya 1/48)
 
Thread owner
thanks Derek I'll have a look at that one. However, I think the problem has solved it's self...

According to the web-site MILAVIA Military Aviation Specials - 50° Stormo Anniversary Black Panther Tornado the aircraft was painted silver. The photos on the site would seem to confirm this. Nice bright shinny silver (and every thing else for that matter!!! So my task has just gotten a lot easier :-)

Now I have not posted many pictures have I!

Well the thing is the kit is going together rather well, and quickly too. I would like to point out, for others contemplating doing this kit, a few watch out for's...

The symetry for the wings and the mounting of the pylons under the wings calls for a warm screwdriver to melt the ends of the stubs flat. Also the the tail planes are attached this way. Be wary wery carefuwl with this.

The lugs on the weapon pylons is silly short. I cut mine off drilled a hole and fitted thicker longer pins. I cant understand why the tail plains are fixed this way, and the joining beam can simply be glued in place.

The intake at the top front of the tail fin. be vary sparing with the glue. it's soooo thin that when you take the clamp off after having drank a cup of tea, the rear end of the intake melts into a guey mess. :-/ yep I did. Thank goodness for squadron putty.

Generally the fit of things is very good, just the main intakes for the jets where a bit of a pig to get to behave. One of the edges is very thin and there is not a lot of room for shaveing fileing or sanding so it needs to be as good a join as you can get!

The in flight refueling probe: There are no locators, lugs hole or any other form of helper fot the two parts that make this up. The profile and top veiw dont help either due to its absence in the painting diagrams!!!(the probe not the diagram).

Fortunatly a few good photos on the net helped get it in the right place.

Some of the more observant amoung you will no doubt notice that one of the contractors for this aircraft was indeed VW: they did the undercarridge.

View attachment 15944View attachment 15943View attachment 15941View attachment 15942

So just a few twiddly bits then its prime time!!

Ian M

View attachment 24141

View attachment 24142

View attachment 24143

View attachment 24144

View attachment 136667

View attachment 136668

View attachment 136669

View attachment 136670
 

Attachments

  • 08062010538.jpg
    08062010538.jpg
    3.1 KB · Views: 0
  • 08062010543.jpg
    08062010543.jpg
    2.7 KB · Views: 0
  • 08062010537.jpg
    08062010537.jpg
    2.8 KB · Views: 0
  • 08062010540.jpg
    08062010540.jpg
    2.1 KB · Views: 0
Hi Ian, coming along nicely. The Intakes are always a problem with Jets - always one of the hardest areas. When I did my F-15C the underside of the fuselage in front of the engines was very thin also, and these areas is where 'Plastic Weld' or equiv. comes in very handy. Look forward to seeing more. Cheers Derek
 
Thread owner
Well I'm up to my teeth in white squadron. There are some filets that go on the front ot the wings sheath at the fusalage. They just but together and were rather fiddly to get in the right place. So now its a case of waiting for the filler to cure so it can be rubbed down.

I'm off for a while to play with silver paint to see which I like the best.

Ian M
 
Thread owner
Can you say paint your self into a corner?

My first venture into the world of jet fighters, is proving to be rather a challenge!

After several tests with various silver paints, the one I like the best was in fact Vallejo!

A word of warning. Very good as a silver paint not to great at looking like metal, so no good for that!!! BUT as a paint finnish its rather nice. A bit metal flake like. However it does have to be pretty thin to spay well. This has resulted in almost every thing in the study, having a pretty glimmer effect. Including my lap top, Mobil phone, my Carina's pc screen, and worst of all my Corvette Bluebell. Fortunatly its dried before its landed on evey thing, so a soft brush takes care of that!

Over spray is a whole new kettle of fish! Add to that that it looks best when put on as a wet coat over several dust coats. You can imagin the over spray I have had on the 'plane!

Being Black and silver does not help one bit! I thing I have now sprayed the silver five times and the black three!!! :-(

Now I have the pylons painted silver, the underside of the 'plane is black....Bum!

Talking of pylons, If any one does this kit. choose if you want the wings open or back then attach the pylons to the weapons and glue them in place after they and the wings are painted! It will save a lot of hassle. I think I have knocked the outer most pylons off three or four times now.

Hey ho! live and learn!

Ian M
 
Thread owner
looking better now.

Right, I just painted the under sides. Only knocked one pylon off this time. Oh and the Tail planes sort of fell of when I was removing the masking tape! ( this explains the tape holding them in place while the glue dries!!

Would just like to add that clear plastic is a pain in the perverbial to paint with silver)!

View attachment 16160View attachment 16161View attachment 16162

So not to far from a few coats of clear gloss then the fun of putting those rather large decals on! Then a few bits and bobs to go on after that!

Ian M

View attachment 24330

View attachment 24331

View attachment 24332

View attachment 136856

View attachment 136857

View attachment 136858
 

Attachments

  • 15062010546.jpg
    15062010546.jpg
    2.6 KB · Views: 0
  • 13062010545.jpg
    13062010545.jpg
    2.9 KB · Views: 0
  • 13062010544.jpg
    13062010544.jpg
    2.8 KB · Views: 0
Thread owner
Pussycat pussycat...

Well we have six channels showing the world cup in football. (what the hell happend yesterday). Another five or six showing the Royal wedding in Stockholm.

Here the weather is totally stay indoors weather.

So only one thing left to do. OK two things but I'll stick to models at the moment.

Those rather large decals. Must say they went on like a dream and not the nighmare I was expecting. The face was a bit of a worry as the shape of the fuselage sort of has a taper along the spine, and that has given a few wrinckles but hopefully a good splattering of Micro sol should sort them out.

Here are a few piccies. Please note that they are not dry yet and will need a bit more sol to get them to sit right in to the pannels.

Time for a cup of tea I think.

Ian M

View attachment 24484

View attachment 24485

View attachment 24486

View attachment 137010

View attachment 137011

View attachment 137012
 

Attachments

  • 19062010553.jpg
    19062010553.jpg
    2.9 KB · Views: 0
  • 19062010555.jpg
    19062010555.jpg
    3.1 KB · Views: 0
  • 19062010554.jpg
    19062010554.jpg
    2.6 KB · Views: 0
Ian, should look spectacular on your shelf when finished, looks a really neat job you are doing. Looking forward to seeing the finished aircraft. Have just treated myself to the newly released Hobby Boss Tornado ADV today. Cheers Derek
 
Awsome...love the decals. Really looking forward to seeing the finished product...keep the pics coming, regards Martin.
 
Thread owner

Attachments

  • 19062010564.jpg
    19062010564.jpg
    3.1 KB · Views: 0
  • 19062010559.jpg
    19062010559.jpg
    2.7 KB · Views: 0
  • 19062010561.jpg
    19062010561.jpg
    2.4 KB · Views: 0
  • 19062010558.jpg
    19062010558.jpg
    3 KB · Views: 0
Ian mate this is looking positively the dogs, i have to say i dot build jet aircraft but i do like this the paint job is very nice and those decals.... well they just finish it don't they, well done ian on a very very fine looking kit.

scott
 
Thread owner
Thanks Scott. My first jet too, sounds odd but I still think an Airplane should have a prop at the pointy end. LOL.

There are a few others that could temp me, however trying to find them is proving a pain in the bum! BAC Jaguar in 1/48 and a good Electric Lightning in 1/48. Also a Harrier in 1/48 could find its way into the stash.

Right now the panther is sitting in the drying bin (!) waiting for the clear to dry. Spent the rainy morning puting all the knock off's on and painting them, together with a few touch ups and detail painting.

So this bird is out of here and will land in the planes section. Probably tomorrow after work.

Thanks for all the hints and tips.

By the way, If any one is considering this kit, there are a few things in the instructions that are, erm, wronge! Drop me a line and I'll fill you in on the bits that are misleading. thus avoiding the same pit falls I found.

Ian M
 
Status
Not open for further replies.
Back
Top