
You are using an out of date browser. It may not display this or other websites correctly.
You should upgrade or use an alternative browser.
You should upgrade or use an alternative browser.
Tristar Marder III Ausf H
- Thread starter Si Benson
- Start date
- Status
- Not open for further replies.
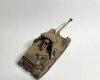
Good evening fellow mogglers,
Well I’m not entirely sure what happened but I managed to get quite a way into the painting/weathering over the last day or so....
View attachment 304810
View attachment 304811View attachment 304812View attachment 304813View attachment 304814
As it stands, I’m not far from the finish line.
Got more weathering to do yet...Still needs dusting up and I have some stowage to add and some other bits and bobs too.
All comments/questions welcome
Si
Attachments


That’s very sharp looking Si
1/3
Hi SiThis is a great build of an interesting vehicle, loving the finish.
Cheers
Tim
Cheers
Tim
G
Guest
Guest
You're a brave man Si, you're nailing this Tristar Marder ! Brave because the kit contains hundreds and hundreds of fragile parts.
Good afternoon all, Thank you all very much for looking in....glad that you all seem to like how it’s coming along:smiling4:
I’ve been waiting on some bits so I can carry on...so I should have some progress soon. Thanks again for your kind comments:thumb2:
Cheers
Si
I’ve been waiting on some bits so I can carry on...so I should have some progress soon. Thanks again for your kind comments:thumb2:
Cheers
Si
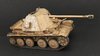
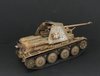
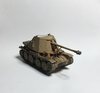
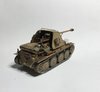
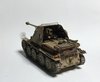
Good evening,
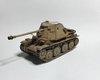
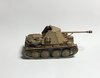
My enjoyment of this subject has now dwindled and I want to call the Marder done. It wasn’t the easiest build...... but I enjoyed it.
I’m gathering some bits to make up a base for it.....might be a while as I got a dio in progress already......anyway, here’s some picture
View attachment 306282View attachment 306283View attachment 306284View attachment 306285View attachment 306286View attachment 306289View attachment 306288View attachment 306287
Thanks for looking....all comments and abuse welcome :smiling3:
Cheers
Si
Attachments
-
 230E4E0F-39E2-4FA6-A1C5-088DFDF52CC6.jpeg2.3 KB · Views: 0
 -
 C1CB015B-4172-4E38-9BD7-A7074F7B6EDE.jpeg2.3 KB · Views: 0
 -
 D428C4E8-84C1-4C85-B77D-5060DFDA7CA8.jpeg2.2 KB · Views: 0
 -
 90437598-7F72-44A6-9AA6-6F362C602D9E.jpeg2.5 KB · Views: 0
 -
 7287B7BA-F2EC-4833-AB87-193D5B07034F.jpeg2.6 KB · Views: 0
 -
 DA8A70C0-44B3-41BE-B52F-2CF0691F4336.jpeg2.4 KB · Views: 0
 -
 256023B0-09C5-48B2-9ACA-BBDD8399DBB4.jpeg2.4 KB · Views: 0
 -
 2C6F6044-A788-49DF-8747-7941A55D6A51.jpeg2.2 KB · Views: 0
G
Guest
Guest
Ooh er missus , that's a nice un .:thumb2::thumb2::thumb2:.
Si, extremely well done .
John
Si, extremely well done .
John
Lovely Si.Can I ask what you used over the base dunkelgelb to get that finish?
Looks very effective.
Jon.
Looks very effective.
Jon.
Morning Si
A really great result. Love the little added details on the rear deck. Paint finish is excellent. As Guy says this is a real test of patience with so many tiny, fragile parts.
Jim
A really great result. Love the little added details on the rear deck. Paint finish is excellent. As Guy says this is a real test of patience with so many tiny, fragile parts.
Jim
Cheers Mr R....:thumb2:Ooh er missus , that's a nice un .:thumb2::thumb2::thumb2:.
Si, extremely well done .
John
Lovely Si.Can I ask what you used over the base dunkelgelb to get that finish?
Looks very effective.
Jon.
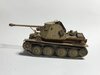
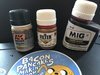
Hi Jon.....glad you like how it turned out. Was a first for me doing a Desert vehicle so a bit trial and error.
Over the base colour went a gloss varnish then the Mig dark wash...only a very thinned coat.
Once that dried I used the AK rainmarks for nato tanks...again only a thin application. This left it a little too pale so I used the middle filter to put some colour back.....hope that helps.
View attachment 306345
Morning Si
A really great result. Love the little added details on the rear deck. Paint finish is excellent. As Guy says this is a real test of patience with so many tiny, fragile parts.
Jim
Cheers Jim:thumb2:....I was hoping it would turn out as well as yours did. You no doubt remember this intricate kit from when you built yours.... Brilliant blog that was too.....and the main reason I brought one:smiling3:
Si
Attachments

Cheers Steve,
I’m relatively happy with it....but I lost focus with where I was going with the paint/weathering.
it was better to stop fiddling and box it up till I have time to make up a base.... it can be weathered more to blend in to the base at a later date then:thumb2:
Thanks for positive comment :smiling4:
Si
- Status
- Not open for further replies.
Legal Notice
scalemodelling.co.uk is a privately operated online discussion forum. All content posted by members reflects their own views and opinions and does not necessarily represent those of the forum owners or administrators. While reasonable efforts are made to moderate content, no responsibility is accepted for user-generated material. By using this site, you agree to comply with UK law and the forum rules.