
You are using an out of date browser. It may not display this or other websites correctly.
You should upgrade or use an alternative browser.
You should upgrade or use an alternative browser.
Trumpeter 1/32 Fairy Swordfish Mk 1
- Thread starter BarryW
- Start date
- Status
- Not open for further replies.
G
Guest
Guest
Coming along a treat Barry.
Masking up and preparing to paint and got the initial primer coat on.
View attachment 120160
The Badger primer went down well and has exposed some flaws that I am treating with Mr Dissolved Putty and tonight I will be sanding ready for a final coat of primer.
View attachment 120161
Sorry, I dont know why that pic is that way around!!!
I will be doing some pre-shading, hopefully Saturday.
View attachment 233182
View attachment 233183
Attachments
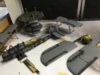
Here is a pic of the preshaded assemblies. I will post shade the ridges in the wing fabric.
View attachment 120272
Does anyone know the colour of the rigging? And whether the straps that are flush with the wing were over painted with camo? See pic
View attachment 120273
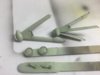
I have also primed the remaining pe on the frame. This will be painted on the frame before fitting and I am hoping, using this metal primer, will reduce the amount of touching up needed by reducing the amount of peel when manipulating the straps into position.
View attachment 120274
View attachment 233294
View attachment 233295
View attachment 233296
View attachment 120272
Does anyone know the colour of the rigging? And whether the straps that are flush with the wing were over painted with camo? See pic
View attachment 120273
I have also primed the remaining pe on the frame. This will be painted on the frame before fitting and I am hoping, using this metal primer, will reduce the amount of touching up needed by reducing the amount of peel when manipulating the straps into position.
View attachment 120274
View attachment 233294
View attachment 233295
View attachment 233296
Attachments
Not having found an authorative source and having looked at photos I have made a decision regarding the straps, unless someone can say otherwise I will paint them a dark grey, somewhat darker than EDSG and those flush with the wing will be painted that colour, not camo.
I will have some more pics tomorrow or Thursday of the painting progress.
I will have some more pics tomorrow or Thursday of the painting progress.
G
Guest
Guest
Take it Barry you mean rigging when you mention straps.
If that is so when I built my 1.48 Swordfish i wrote to the Fleet air arm Museum who are incidentally tops with their info.. The bars are about 1 and a half inch by about three quarters which is of no help really but interesting.
Any way a Lynx landed on the grass infront of our flats. A Fleet Air Lynsx. Chatted to one of the ground crew who gave me more info. The bars of the rigging are eliptical and not flat. They are made of steel and galvanised. So your colour is a mid grey. But having practised in architecture in Jersey a marine environment if ever there was one and owning a boat galvanizing grows darker in colour and has blacish speckled areas where the galvanising is rough and picks up dirt.
Not sure how the 1/32 is constructed .But on mine the wings after sitting into taxi position fractionally wilt. The PE rigging fixed at both points then either bowed or pinged. The result I let the top end free into the hole in the top wing.
Laurie
Pictures sent bu the Fleet Museum.
View attachment 120497
View attachment 120498
View attachment 120503
View attachment 233519
View attachment 233520
View attachment 233525
Thanks Laurie.
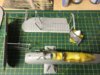
I have been getting on with the painting. Here are a few picture - more Saturday I expect...
Sky underside (AK Interactive air series acrylic)
View attachment 120658
I am quite pleased with the pre and post shading. I rarely manage to get the photos to properly show the effect but in this instance its quite close... No prizes to anyone who spots the silly mistake, one that is already corrected....
View attachment 120663
Above is the undercarraige. The AKI Sky with a wash, I used the Air Series undercarriage wash. I stille have more work to do on the above parts before fitting and weathering the tyres.
View attachment 120662
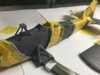
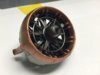
Clearly this is the prop with the tips sprayed yellow. I found that the unpronouncable Badger yellow primer really covers well so no more yellow coverage problems in future, using that as a base.
View attachment 120661
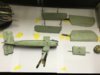
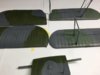
I sprayed the remaining pe with the grey unpronoucable primer after the Mr Metal Primer had dried. I will apply a base coat soon before removing from the fret. I will get some touching up to do of course.
View attachment 120660
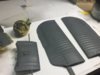
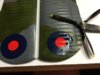
Above are the bottom wing tops onto which I have sprayed Dark Sea Grey for the 'shadow' scheme. Slate Grey next. I used Vallejo 71.097 for this. The pre-and post shading modulation does not show up much in the photo, just a hint of it. I tried to be fairly subtle with it. This is a land based aircraft, so no salt marks, a bit better looked after perhaps and the lower wings would suffer less sun bleaching.
View attachment 120659
Above the Extra Dark Sea Grey, duly pre and post shaded and in this pic you do get a slightly better feel of the modulation effect though the pic is still a bit muted compared to what it actuallty looks like. I use Vallejo MA 71.110 for this. In 'real life' these upper wings do look slightly darker than the lower wings when compared.
View attachment 120664
The fuselage. I will try to get a better pic of the painting effect than this one shows.
Tonight I will be spraying the Dark Slate Grey and Slate Grey camo.
As per the Vallejo guidance I am planning to use 71.092 for the Dark Slate Grey (FS34096) and 71.096 for the Slate Grey (FS34158) These seem to be the closest equivalents.
More pics Saturday or Monday....
View attachment 233680
View attachment 233681
View attachment 233682
View attachment 233683
View attachment 233684
View attachment 233685
View attachment 233686
I have been getting on with the painting. Here are a few picture - more Saturday I expect...
Sky underside (AK Interactive air series acrylic)
View attachment 120658
I am quite pleased with the pre and post shading. I rarely manage to get the photos to properly show the effect but in this instance its quite close... No prizes to anyone who spots the silly mistake, one that is already corrected....
View attachment 120663
Above is the undercarraige. The AKI Sky with a wash, I used the Air Series undercarriage wash. I stille have more work to do on the above parts before fitting and weathering the tyres.
View attachment 120662
Clearly this is the prop with the tips sprayed yellow. I found that the unpronouncable Badger yellow primer really covers well so no more yellow coverage problems in future, using that as a base.
View attachment 120661
I sprayed the remaining pe with the grey unpronoucable primer after the Mr Metal Primer had dried. I will apply a base coat soon before removing from the fret. I will get some touching up to do of course.
View attachment 120660
Above are the bottom wing tops onto which I have sprayed Dark Sea Grey for the 'shadow' scheme. Slate Grey next. I used Vallejo 71.097 for this. The pre-and post shading modulation does not show up much in the photo, just a hint of it. I tried to be fairly subtle with it. This is a land based aircraft, so no salt marks, a bit better looked after perhaps and the lower wings would suffer less sun bleaching.
View attachment 120659
Above the Extra Dark Sea Grey, duly pre and post shaded and in this pic you do get a slightly better feel of the modulation effect though the pic is still a bit muted compared to what it actuallty looks like. I use Vallejo MA 71.110 for this. In 'real life' these upper wings do look slightly darker than the lower wings when compared.
View attachment 120664
The fuselage. I will try to get a better pic of the painting effect than this one shows.
Tonight I will be spraying the Dark Slate Grey and Slate Grey camo.
As per the Vallejo guidance I am planning to use 71.092 for the Dark Slate Grey (FS34096) and 71.096 for the Slate Grey (FS34158) These seem to be the closest equivalents.
More pics Saturday or Monday....
View attachment 233680
View attachment 233681
View attachment 233682
View attachment 233683
View attachment 233684
View attachment 233685
View attachment 233686
Attachments


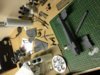
More progress.
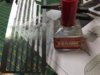
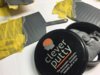
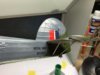
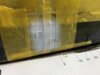
I used this stuff, pictured, to mask. It is superb. Easy to manipulate and does not leave any residue. Though I didn't do it you could use it to mask the whole area without resorting to masking tape.
View attachment 120956
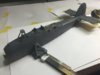
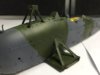
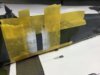
Here is the fuselage also masked up
View attachment 120957
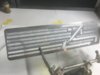
I finished painting the engine. Just need to do some weathering in due course.
View attachment 120958
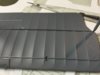
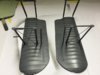
I them sprayed the final dark slate and and slate on the lower wings.
View attachment 120959
View attachment 120960
I will need next to apply a gloss coat ready for decals.
View attachment 233869
View attachment 233870
View attachment 233871
View attachment 233872
View attachment 233873
I used this stuff, pictured, to mask. It is superb. Easy to manipulate and does not leave any residue. Though I didn't do it you could use it to mask the whole area without resorting to masking tape.
View attachment 120956
Here is the fuselage also masked up
View attachment 120957
I finished painting the engine. Just need to do some weathering in due course.
View attachment 120958
I them sprayed the final dark slate and and slate on the lower wings.
View attachment 120959
View attachment 120960
I will need next to apply a gloss coat ready for decals.
View attachment 233869
View attachment 233870
View attachment 233871
View attachment 233872
View attachment 233873
Attachments
This is looking great Barry and I defiantly like the slate colours you have used ( really must get that panzer putty for my camo lines on a few upcoming builds of RNAS aircraft I'm doing ( Blackburn Roc/ Skua.
I like your subtle weathering and attention to details
Coming by along nicely.
Robert
I like your subtle weathering and attention to details
Coming by along nicely.
Robert
looking real good and im glad to see your using clever putty ive brought two tins of that stuff and it still cheaper than the panzer putty....did u find it works out all right from what i can see works a treat
Hi Vaughan - yes its reusable.
I dont remember where I got it from, I Googled it when I found out about it on Phil Flory's site.
The great thing is how it settles down into the detail if left a couple of hours before spraying resulting in no bleed through while also not being sticky it lifts away easily with no risk to the paintwork.
I should have known better than to use Trumpy decals. Only excuse is that there are not many.
Inevitably one of them splintered when applying and I need a white H code letter to sit on the port side of the fuselage. Can anybody please help? I have not found a source of white 32 scale codes letters.
Inevitably one of them splintered when applying and I need a white H code letter to sit on the port side of the fuselage. Can anybody please help? I have not found a source of white 32 scale codes letters.
Well after posting the above I had to rush out to a meeting and on the way I thought that it cannot be hard to mask up a capital H...
So I did....
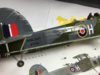
I used Alclad Aqua Gloss to lay down my gloss coat before decalling and here are the shots of the successfully applied decals. These went down very well, conformed nicely, but I still brushed some of the Mr Softer over them.....
View attachment 121419
View attachment 121417
View attachment 121418
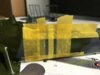
I the masked up to do the verticals of the H. For this I used some base points taken from the instructions which helped enormously. I also did some measurments against the successfully applied decal, using the Tammy tape and Mk 1 eyeball.
View attachment 121416
View attachment 121420
The paint I used was the Badger white primer as it covers so well.
View attachment 121421
I will do the 'crossbar' tonight..... fingers crossed - I think its going to work....
View attachment 234307
View attachment 234308
View attachment 234309
View attachment 234310
View attachment 234311
View attachment 234312
So I did....
I used Alclad Aqua Gloss to lay down my gloss coat before decalling and here are the shots of the successfully applied decals. These went down very well, conformed nicely, but I still brushed some of the Mr Softer over them.....
View attachment 121419
View attachment 121417
View attachment 121418
I the masked up to do the verticals of the H. For this I used some base points taken from the instructions which helped enormously. I also did some measurments against the successfully applied decal, using the Tammy tape and Mk 1 eyeball.
View attachment 121416
View attachment 121420
The paint I used was the Badger white primer as it covers so well.
View attachment 121421
I will do the 'crossbar' tonight..... fingers crossed - I think its going to work....
View attachment 234307
View attachment 234308
View attachment 234309
View attachment 234310
View attachment 234311
View attachment 234312
Attachments
- Status
- Not open for further replies.
Legal Notice
scalemodelling.co.uk is a privately operated online discussion forum. All content posted by members reflects their own views and opinions and does not necessarily represent those of the forum owners or administrators. While reasonable efforts are made to moderate content, no responsibility is accepted for user-generated material. By using this site, you agree to comply with UK law and the forum rules.