
You are using an out of date browser. It may not display this or other websites correctly.
You should upgrade or use an alternative browser.
You should upgrade or use an alternative browser.
Trumpeter 1/32 Fairy Swordfish Mk 1
- Thread starter BarryW
- Start date
- Status
- Not open for further replies.
G
Guest
Guest
The IP looks great Barry
Dave - looking at the model it looks as if there are metal plates along the fuse with the doped fabric areas being wings, tail and control surfaces which are camo'd. The inside of the fuse is painted as per the instructions in cockpit green.
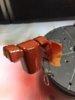
Anyway what with preparing for the holiday I did not get as long as I hoped last night and just sprayed the fuel tank red. It looks rather glossy only because it has only just been sprayed. As this will only be glimpsed through some holes/gaps (maybe!) I did not smooth the joints.
View attachment 117424
That is it now for a couple of weeks. I am on a flight to Stockholm early Friday morning to catch a ship for a Baltic cruise, my longest holiday for many years a whole 12 nights. Ian Muddle - we will be over your way in Copenhagen towards the end of the trip....any tips on what to see?
View attachment 230447
Attachments
rickoshea52
Active member
1/3
Copenhagen is very nice Barry, I visit for business often. The royal palaces and little mermaid are popular so is Tivoli gardens. Ian M gave me some model shop info a while back but I cannot find it right now.
If you are visiting Riga on your cruise you might want to pay a flying visit to the Latvian air museum at the airport, lots of soviet aircraft in the open air to view. The old town of Riga is nice in the summer.
If you are visiting Riga on your cruise you might want to pay a flying visit to the Latvian air museum at the airport, lots of soviet aircraft in the open air to view. The old town of Riga is nice in the summer.
AS Rick wrote, Tivoli gardens are well worth a visit. Copenhagen as it is is also OK to have a walk around in. loads of places to eat and drink. I assume that you will have the good lady with, so a walk down "Strøget" A walking street will be great for her and bad for your wallet! lol.\ said:Ian Muddle - we will be over your way in Copenhagen towards the end of the trip....any tips on what to see?
As for model shops, not to many in DK there is a great one on Frederiksberg. Stoppel Hobbies. http://www.stoppel.dk/shop/frontpage.html There is a shopping center nearby where you can park the misses...
")
Loving the build and would like to have a crack at the string bag in a large scale so am following the thread to see how she builds up.
Regarding the wing sag, a square section brass rod might get you over that issue. Has worked for me with other 'droopers'.
Ian M
Great work so far Barry
The IP turned out very nice and the interior is really coming together. With regards to the antenna fixing on the fin: I think you did the right thing by cutting it off. You will find the very same problem if you ever build the new-tool Revell 1/32 Spit. After building 3 (with 3 to go) I gave up on trying to save the fragile fitting and began cutting them off and reattaching them during the finishing phase of the build.
Enjoy your trip to Copenhagen.
Cheers
P
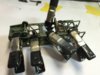
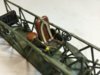
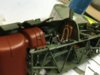
Well I have been back a couple of days and have so far been able to lay down a gloss coat, apply AK Brown pin wash, a matt coat and done some dry brushing. I have also been attaching Eduard seat harnesses. These are essential as the kit pe is totally inadequate. I have also started putting together the interior structure.
View attachment 118710
View attachment 118711
View attachment 118712
Below is how the cockpit interior now looks.
View attachment 118713
I have fitted some glass
Next I will finish the interior construction and will take some pics before I join the fuselage.
View attachment 231732
View attachment 231733
View attachment 231734
View attachment 231735
Attachments
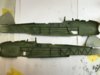
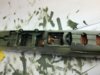
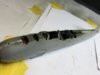
Finished the interior and joined the fuselage halves.
View attachment 118954
View attachment 118955
View attachment 118956
View attachment 118957
Tonight I will deal with the seams, probably with Mr Dissolved Putty and start on the stabs and engine.
View attachment 231976
View attachment 231977
View attachment 231978
View attachment 231979
View attachment 118954
View attachment 118955
View attachment 118956
View attachment 118957
Tonight I will deal with the seams, probably with Mr Dissolved Putty and start on the stabs and engine.
View attachment 231976
View attachment 231977
View attachment 231978
View attachment 231979
Attachments

Looking very good Barry. The detail looks awesome and I look forward to the day I finally start mine.
Just read back through the thread and your question regards the spent cartridge bag reminds me of my Trumpeter Stuka. I asked the very same question in that build too, must be peculiar to 1/32 Trumpeter 2 seaters!
This is going to look stunning once complete - fully rigged biplanes just are great looking models.
Cheers
Paul
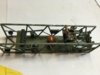
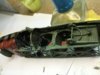
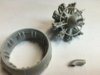
Thanks everyone... now for last night's progress. A few more sub-assemblies done, the stabs and engine with the latter awaiting painting. I have also run some Mr Dissolved Putty along the seams on the fuselage. The sanding sticks will come out tonight and hopefully I will have time to spray some Gunze buffable metaliser on the engine.
View attachment 119052
View attachment 119053
View attachment 119054
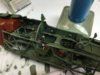
Enjoying this build, the fit is excellent so far.
It is a bit different to most aircraft builds, I am working slowly and deciding on the paint sequence as I progress. I expect I will have to paint the camo before the wings are attached.
One question.....
Some research I have done suggests the lower wings should be painted in lighter 'shadow' shades, Dark Sea Grey/Slate Grey rather than Extra Dark Sea Grey/Dark Slate Grey as per the rest of the plane. The instructions say the latter on the lower wings as well as the rest. Does anyone know what would be correct?
View attachment 232074
View attachment 232075
View attachment 232076
View attachment 119052
View attachment 119053
View attachment 119054
Enjoying this build, the fit is excellent so far.
It is a bit different to most aircraft builds, I am working slowly and deciding on the paint sequence as I progress. I expect I will have to paint the camo before the wings are attached.
One question.....
Some research I have done suggests the lower wings should be painted in lighter 'shadow' shades, Dark Sea Grey/Slate Grey rather than Extra Dark Sea Grey/Dark Slate Grey as per the rest of the plane. The instructions say the latter on the lower wings as well as the rest. Does anyone know what would be correct?
View attachment 232074
View attachment 232075
View attachment 232076
Attachments
")
G
Guest
Guest
Looking good, should be impressive once it's finished
G
Guest
Guest
This is looking excellent, very high quality work mate
- Status
- Not open for further replies.
Legal Notice
scalemodelling.co.uk is a privately operated online discussion forum. All content posted by members reflects their own views and opinions and does not necessarily represent those of the forum owners or administrators. While reasonable efforts are made to moderate content, no responsibility is accepted for user-generated material. By using this site, you agree to comply with UK law and the forum rules.