Theme editor

Scale Model Shop

Trumpeter 1/35 M1078 LMTV Standard Cargo Truck

Status
Not open for further replies.

Fernando N

New member
Joined
Apr 27, 2018
Messages
2,448
Reaction score
0
Points
0
1/3
Thread owner
View attachment 319489
Hi everyone,

With recent setbacks and mojo loss in my other projects, I'm having a crack at this simple truck.:smiling:
And this GB is a great way of finally getting it out of the stash and built up.:nerd:
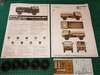
Firstly a little info on it from the box:

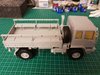
The M1078 Standard Cargo Truck is designed to transport cargo and soldiers.
The M1078 has a payload capacity of 5,000 pounds and to facilitate loading/unloading, the bed side rails are mounted on hinges and can be lowered.
The cargo bed can be equipped with an optional bench seat kit for transport of soldiers.
The bench seats are constructed of a non-wood material and attach to the cargo bed side rails.
The seats can be folded down and stowed when not in use.
Soldiers are assisted climbing in and out of the cargo bed area with the aid of a ladder stowed on the vehicle when not in use.
A canvas and bows kit available to keep soldiers and cargo protected from the elements.
The M1078 can be equipped with an optional self-recovery winch kit capable of fore and aft vehicle recovery operations.
The winch has 308 feet of line capacity and 10,000 pounds bare.

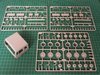
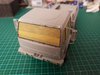
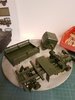
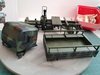
With that said here are the sprues of the little lorry:
View attachment 319490
View attachment 319491
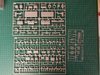
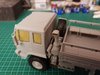
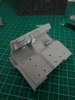
Single piece cab is handy, too bad of the closed doors:sad::
View attachment 319492
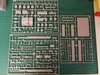
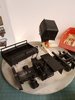
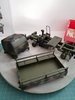
Instructions, pe, decals and the second option:
View attachment 319488

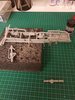
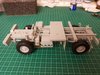
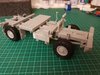
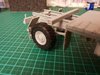
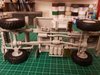
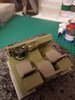
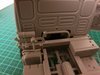
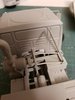
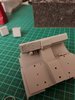
Made a start yesterday, apart from some filling, it was just cleaning up parts and gluing them together simples:smiling4::
View attachment 319495
Still contemplating what scheme to paint, desert and have a weathering experiment or three-tone NATO and have a free hand AB exercise?:thinking:

Thanks for looking in.
Fernando
 

Attachments

  • 20181110_081612_resized.jpg
    20181110_081612_resized.jpg
    3.3 KB · Views: 0
  • 20181110_081443_resized.jpg
    20181110_081443_resized.jpg
    3.4 KB · Views: 0
  • 20181110_081827_resized.jpg
    20181110_081827_resized.jpg
    3.3 KB · Views: 0
  • 20181110_082031_resized.jpg
    20181110_082031_resized.jpg
    3.5 KB · Views: 0
  • 20181110_082137_resized.jpg
    20181110_082137_resized.jpg
    3.7 KB · Views: 0
  • 20181111_195825_resized.jpg
    20181111_195825_resized.jpg
    3 KB · Views: 0
I'm with Scottie. This looks a very nice kit and camo as well!:smiling5:

Looking forward to seeing you work your magic. Nice to see you are off and running. Good luck
 
I'm in too Buddy as I like this truck even if it is modern. I know whichever scheme you choose, you will do a bang up job on it. Still can't figure out where you get the time to build all this fine stuff. Did you quit your job???

Prost
Allen
 
Another watcher here fernando. Not familiar with the truck but I’ve no doubt you’ll do it justice :thumb2:
 
I love the look of these new trucks .....I will be watching with interest!!
 
Thread owner
Evening all,

Scottie, Steve, Allen, Si, Polux and Lee thanks for joining in guys.:thumb2:

Steve, I've decided to go with the Nato tree-color tone:nerd: unless the Ammo paints don't work out then it'll be the desert sand one...
Allen, still have to work buddy no luck last lottery:smiling5:, as there is no Mrs.N. nor do I game or watch tv a lot there is plenty of bench time each week:tongue-out3: although the odd concert takes up an evening every now and then:
View attachment 320228
The Rumjacks in Amsterdam last Thursday.:cool:

Been a bit productive the last days and finished most of the chassis work:
View attachment 320229
Lost the pe ring for the front right indicator, good thing to have an appropriate sized punch set:
View attachment 320230
Two things that bothered me were the ejector pin marks on the rear splash guards and the not so good fitting of the fuel tank bits, it was only were 8 parts coming together...
Puttied it all for now, maybe give a third layer after the primer coat:
View attachment 320231
View attachment 320232
Good thing the bigger pe guards fit perfectly.:smiling:

Next step the cab and time to get some paint in the build.:smiling4:

Thanks for looking in and a great and hopefully not so cold week, we just had our first night of frost over here.
Fernando
 

Attachments

  • 20181115_212655_resized.jpg
    20181115_212655_resized.jpg
    3.4 KB · Views: 0
  • 20181118_202052_resized.jpg
    20181118_202052_resized.jpg
    3.2 KB · Views: 0
  • 20181118_202107_resized.jpg
    20181118_202107_resized.jpg
    3.2 KB · Views: 0
  • 20181118_202119_resized.jpg
    20181118_202119_resized.jpg
    3 KB · Views: 0
  • 20181118_202133_resized.jpg
    20181118_202133_resized.jpg
    3.6 KB · Views: 0
.... NIIIIIIIICE.... l'm really looking forward to this... reminds me of the Black Sunday in Iraq Sadr City(April 2004) : elements of 2nd Battalion, 5th Cavalry Regiment, 1st Brigade Combat Team, 1st Cavalry Division were on a routine escort mission, and were ambushed and a convoy with Bradley-Humvees and "your" Truck went to rescue a platoon of soldiers isolated in a civilian house.
I'm here 2nd row... Fernando... super curios
View attachment 320233
 

Attachments

  • 980x.jpg
    980x.jpg
    2.7 KB · Views: 0
Interesting subject, which could easily be made into a civilian vehicle. Especially for the construction business, I'd imagine.

How are the parts to work with?
 
Up to your high standards as usual Fernando. Looks like a very detailed kit. Looking forward to seeing the next update
 
Thread owner
Evening all,

Sorry for the lack of updates of late, progressed a couple of steps but forgot to show it due to a bit of flu and other stuff that took up the time...:thinking:
Warning pic heavy post coming up...:tongue-out3:

Gregory, thanks for dropping in and nice pic of the truck in action.:thumb2:
Christian, simply change the colour scheme and it's a civvie truck.:tongue-out3:
Parts are typical Trumpeter BTW, good detail, many small ones, not too soft or hard polystyreen and a bit of mold slip and flash on this one.
Overall pretty good.:thumb2:
Steve, thanks for the kind words mate.:thumb2::smiling4:

After the chassis was completed I had a crack at the cab, the interior is pretty sparse and more than a bit off too:
View attachment 321957
Looking around the net for some reference photo's I cobbled this together based on those with some strip, card and brass wire:
View attachment 321958
And all painted up with Revell enamels (still needed some weathering for shadows and such) and covered to give a look at the finished view:
View attachment 321959
View attachment 321960
When test fitting I discovered that at the back of the cab there is a big hole.....:
View attachment 321961
Covered that up with some 0.25mm card to stop any spray entering the cab, took 30 minutes simple fix and with all on not to be seen:smiling4::
View attachment 321962
Completed the rear and configured it for troops and then the assembly was finished.
Here it is with pretty much all parts on save the windscreen wipers and ready for primer:
View attachment 321963
View attachment 321964
View attachment 321965
Vallejo black primer on, ready for the NATO green base coat:
View attachment 321966
This was followed by 3 thin coats of Ammo's NATO green A.MIG 0084, with the last one on yesterday:
View attachment 321967
If it's dry enough tomorrow, it's time for the camo pattern to be free handed on.:smiling:

Thanks for looking in and have a great weekend.
 

Attachments

  • 20181129_171419_resized.jpg
    20181129_171419_resized.jpg
    3 KB · Views: 0
  • 20181129_171443_resized.jpg
    20181129_171443_resized.jpg
    2.8 KB · Views: 0
  • 20181129_185647_resized.jpg
    20181129_185647_resized.jpg
    2.7 KB · Views: 0
  • 20181202_180837_resized.jpg
    20181202_180837_resized.jpg
    2.6 KB · Views: 0
  • 20181202_154306_resized.jpg
    20181202_154306_resized.jpg
    3.3 KB · Views: 0
  • 20181202_154325_resized.jpg
    20181202_154325_resized.jpg
    3.1 KB · Views: 0
  • 20181202_154340_resized.jpg
    20181202_154340_resized.jpg
    2.8 KB · Views: 0
  • 20181203_202021_resized.jpg
    20181203_202021_resized.jpg
    2.9 KB · Views: 0
  • 20181207_210042_resized.jpg
    20181207_210042_resized.jpg
    2.7 KB · Views: 0
  • 20181125_084944_resized.jpg
    20181125_084944_resized.jpg
    2.6 KB · Views: 0
  • 20181124_174829_resized.jpg
    20181124_174829_resized.jpg
    2.9 KB · Views: 0
Nice job! Very clean & tight. To bad they didn't give you a MG kit for the roof. I did one in 1/87 w/NATO camo. There is a PE armor kit avail in 1/87 for these. I modified it for my 5 ton gun truck. They are cool trucks. PaulE
 
NIIIIIIICEE.... and you are very welcome.... Fernando:smiling2::smiling2::smiling2::smiling2:
So it will be a civil truck... it will be a diorama like post-apocalyptic? or just the truck.. .?:smiling:
 
Hi Fernando
I missed the start of this - sorry. For a simple small truck the parts count looks high. Despite the kits problems you have done a fine job. The dash looks excellent with your scratching.
Jim
 
Nice work Fernando, seems to have gone together well. Liking the cab tweaks:thumb2:
Paintwork looks super smooth...good luck with the camo.
 
Nice to see you fit and well again mate. The dash is the DB's and a wonderful addition to the build. The paintwork has come out well and you now you have a wonderful base to work from. Looking forward to seeing the next update
 
Thread owner
Evening all,

Colin, Lee, Si and Steve thanks guys.:thumb2:
Paul, thanks:thumb2: and although the roof looks ready for it sadly none, Trumpeter has an armored cab variant with MG ring.:smiling:
Greg, thank you :thumb2:,sorry to dampen your expectations but this one will simply be OOB with a little dusting for weathering, the end of the GB is getting near.:tongue-out3:
Jim, thank you too:thumb2: and don't worry about it I miss a lot of treads and updates too...
The kit is pretty easy BTW, although a bit complex for the novice, if you've built a couple of trucks this one won't give any serious problems.

Right, on with the painting: after the base coat it was time to start with the camo pattern, Ammo's black first followed by their Nato brown.
All mixed 50/50 (paint/thinner) and sprayed with a 0.15mm needle at 1 Bar pressure:
View attachment 323033
Then most of the pattern was covered by Nato light, Dark grey blue and Burnt umber from Vallejo's Nato Armour Colors set 78.413:
View attachment 323035
As I've seen similar colors on operational Dutch army vehicles with the standard CARC paints on and I like it, this set is my standard for a Nato 3 tone finish.:nerd:
A bit light in the photo, with two coats of gloss on for the wash it'll be toned down.:smiling:
Here're the used colors with their thinners:
View attachment 323036
Now just have to wait a couple of days more to give the VJ gloss a proper dry and then it's on to detail painting and decals.:smiling4:

Thanks for looking in and have a great week everyone.
Fernando
 

Attachments

  • 20181210_095350_resized.jpg
    20181210_095350_resized.jpg
    2.7 KB · Views: 0
  • 20181210_123951_resized.jpg
    20181210_123951_resized.jpg
    3 KB · Views: 0
  • 20181210_124047_resized.jpg
    20181210_124047_resized.jpg
    3.6 KB · Views: 0
Status
Not open for further replies.
Back
Top