Theme editor

Scale Model Shop

UH-34 in the Padi

Status
Not open for further replies.
Thread owner
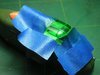
Richard, what size needle do you use for your preshading?

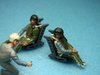
Scottie, I use a 0.3 needle and it literally can be airbrushed to about 1mm but it would mean the needle almost touching the surface, air pressure dead low and paint nearly transparent.

Thanks Mick.

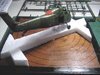
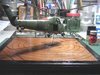
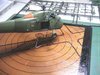
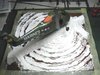
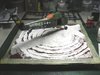
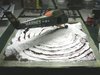
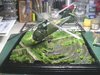
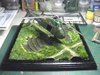
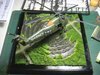
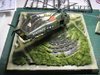
John, you're welcome...what you see is industrial scale for local consumsion, we still import rice from Thailand. The little villages still do it by hand and the their plots smaller. This area is very close to the coast and flat. I was surprised to with the direction of the blades.

Cheers,
Richard
 
Thread owner
Hi, masking and painting...the part of modelling I have a love hate relationship with. You will see why I came up with the tissue solution...using masking tape was unbearably painful.

View attachment 316415 View attachment 316416

I used a mixture of olive green and drab applied in light coats until the pre-shade was just subtle enough through the paint.

View attachment 316417 View attachment 316418

Some pure olive green was sporadically sprayed in certain areas to give that sun bleached paint look.

View attachment 316419 View attachment 316420View attachment 316421 View attachment 316422

When you attempt to paint the canopy shade I would advise you to do it from the inside, dilute the clear green and do a wash. Wicker away access with a clean brush or tip of a tissue. The windscreen wiper and rear view mirror were detached for painting. The wiring for the winch will be hand painted in.

View attachment 316423 All masking off...almost, the back window is still covered.

Cheers,
Richard
 

Attachments

  • h0101.jpg
    h0101.jpg
    3 KB · Views: 0
  • h0100.jpg
    h0100.jpg
    2.5 KB · Views: 0
  • h0099.jpg
    h0099.jpg
    2.6 KB · Views: 0
  • h0098.jpg
    h0098.jpg
    2.3 KB · Views: 0
  • h0097.jpg
    h0097.jpg
    3 KB · Views: 0
  • h0096.jpg
    h0096.jpg
    2.7 KB · Views: 0
  • h0095.jpg
    h0095.jpg
    2.7 KB · Views: 0
  • h0094.jpg
    h0094.jpg
    2.7 KB · Views: 0
  • h0093.jpg
    h0093.jpg
    3.1 KB · Views: 0
Thread owner
Thanks Ken...done eons ago. Nowadays I skip the interiors. :smiling6:

Cheers,
Richard
 
Thread owner
Okay Guys,
Here are the initial gruesome images of the pilots and crew chief. The pilots are salvaged Airfix figures from a twin seater jet that somebody discarded. I asked him for his figures. If you notice, helicopters don't fly high enough to require oxygen masks. I repositioned one of the figures head to turn right. Added new right arms to hold the joystick and removed their feet to fit the cockpit. I removed as much of the seam lines with a sharp blade.

View attachment 316593 View attachment 316594

The crew chief was from Preiser with a helmet made from epoxy putty. I gave him a thumbs up with stretched sprue.

View attachment 316595 View attachment 316596View attachment 316597

The seatbelt harness were from epoxy putty added just enough to show attachment to the seat.

View attachment 316598View attachment 316599

Reference showed Marine pilots donning green fatigues and dark green helmets and were painted as so with minimal highlights. I varnished the helmets remembering seeing them quite shiny.

View attachment 316600

That's it for the heli crew. Many people asked why I had the crew chief do a thumbs up, only years later when the dio was done did they finally see why. My planning sometimes can be concieved years ahead.

Cheers,
Richard
 

Attachments

  • h0104.jpg
    h0104.jpg
    2.6 KB · Views: 0
  • h0103.jpg
    h0103.jpg
    3.2 KB · Views: 0
  • h0102.jpg
    h0102.jpg
    2.6 KB · Views: 0
  • h0105.jpg
    h0105.jpg
    2.8 KB · Views: 0
  • h0106.jpg
    h0106.jpg
    2.3 KB · Views: 0
  • h0109.jpg
    h0109.jpg
    3.1 KB · Views: 0
  • h0108.jpg
    h0108.jpg
    2.6 KB · Views: 0
  • h0107.jpg
    h0107.jpg
    2.5 KB · Views: 0
Thread owner
Hi,
Now with the crew figures done we'll move onto the planning of the dio base...

First I had a piece of plywood measured and cut. I had to make sure while placing the heli that the rotors would stay within the dimensions of the base. I then marked and drew the positions of the helicopter, the raised paddy bunds and the diameter rings that would make the water ridges from the rotor splash.

View attachment 316709 View attachment 316710

After deciding the securing point on the heli and drilling a hole I fashioned a stand from stiff clothe hanger wire and fastened it down with nails...

View attachment 316711

I surrounded the edge of the plywood with timber bidding and painted it black with half an inch border edge. This would be where the water and paddy would stop where masking tape would be placed.

View attachment 316712

Checked that the heli hover height was adequate and angle satisfactory I moved onto adding the bund...

View attachment 316713View attachment 316714

The paddy bunds were cross sections cut from strips of polysterene foam glued on and later was carved.

View attachment 316715

More to come later. Comments are welcomed.

Cheers,
Richard
 

Attachments

  • h0125.jpg
    h0125.jpg
    3.3 KB · Views: 0
  • h0124.jpg
    h0124.jpg
    3.3 KB · Views: 0
  • h0123.jpg
    h0123.jpg
    3.3 KB · Views: 0
  • h0122.jpg
    h0122.jpg
    3.4 KB · Views: 0
  • h0121.jpg
    h0121.jpg
    3.2 KB · Views: 0
  • h0120.jpg
    h0120.jpg
    3.4 KB · Views: 0
  • h0119.jpg
    h0119.jpg
    3.1 KB · Views: 0
Thread owner
Hi,
I went back to the heli and did the decals after a couple of coats of Future laid on and cured. The other thing I did was to reverse the main rotor blade sag. The kit came with very nice blades that were bent with realistic sag mounted on the sprue. Unfortunately that was for a grounded heli...mine was in the air so I had to soak them in hot water and bend them the opposite direction just like the accompanying photo...

View attachment 316854

I mixed a batch of polyfilla and applied to the base. A large stiff brush was used to apply the filla and also create the wave pattern following the marked circles.

View attachment 316849

In between the waves I smoothed down with my fingers. Picking up bits of polyfilla on my index finger I built up some higher waves. All this was left to dry and cure. To avoid cracks was to mix the filla into a thick paste like bread dough.

View attachment 316850 View attachment 316851

Next painting the base and adding the paddy. I hope you guys are able to follow so far.

Cheers,
Richard
 

Attachments

  • h0129.jpg
    h0129.jpg
    1.4 KB · Views: 0
  • h0128.jpg
    h0128.jpg
    3.4 KB · Views: 0
  • h0127.jpg
    h0127.jpg
    3 KB · Views: 0
  • h0126.jpg
    h0126.jpg
    3.1 KB · Views: 0
Wow Richard, first of all, nice paintwork, love the subtle preshade. Work on the crew is cool as well. But the really eyecatcher will be the groundwork no doubt. Nice start, really looking forward to see how this one develops!

Cheers
 
Thread owner
Hey Wouter, thanks...ok, this is how we plant paddy...

View attachment 317142View attachment 317143

...it's literally the same as real paddy planting, stalk by stalk but in this case batch by batch. Before the laborious planting, the base was painted and foliage and grass was built up against the side of the bunds. Then a heavy coating of gloss varnish acted as the waves and waterlogged field. I used lacquer brush bristles for the paddy and initially sprayed them the appropriate green and stuck them in batched using a flat tweezer and gel superglue starting from the outer circle and directed away from the center of the prop wash. I later decided the paint the paddy bristles after attaching them as real base stems of paddy were the same colour as the original colour of the brush bristles.

I used up two brushes for this process.

Cheers,
Richard
 

Attachments

  • h0131.jpg
    h0131.jpg
    3.1 KB · Views: 0
  • h0130.jpg
    h0130.jpg
    3.4 KB · Views: 0
Thread owner
I guess nobody likes rugby on a rain soaked pitch. As for football, I once played on a pitch that was one half dry and the other with turf that looked perfectly cut and flat until we ploughed into it...we were knee deep in water. So you could say I have real experience in the dio I'm constructing. :smiling6:

After sticking all the bristles, I sprayed the tips with medium green and then the tops with light green.

View attachment 317522View attachment 317523

Itrimmed the edges and removed the masking tape protecting the base edges.

View attachment 317524 View attachment 317525

I obviously sprayed the green without the heli in place. The armeture made it easy to remove the heli and re-attaching.

View attachment 317526 View attachment 317527

I would later paint white caps onto the waves. Some vegetation I found and preserved from one of my hikes were attached sparingly along the edges of the bund and around the armeture to disguise it.

View attachment 317528

From here onwards the dio stayed this way for the next few years until I started on the figures. Lucky for you you will not have to wait that long...it's coming up next.

Cheers,
Richard
 

Attachments

  • hg0007.jpg
    hg0007.jpg
    3.8 KB · Views: 0
  • h0137.jpg
    h0137.jpg
    3.6 KB · Views: 0
  • h0136.jpg
    h0136.jpg
    3.5 KB · Views: 0
  • h0135.jpg
    h0135.jpg
    3.5 KB · Views: 0
  • h0134.jpg
    h0134.jpg
    3.7 KB · Views: 0
  • h0133.jpg
    h0133.jpg
    3.7 KB · Views: 0
  • h0132.jpg
    h0132.jpg
    3.7 KB · Views: 0
Thread owner
Thanks Paul(Scottie) and Steve, your comments are so kind.

The crew chief at the window has had his thumbs up for nearly more than two years, so it was about time the reason for showing it is about to be shown....they're the troop that the UH-34 had just dropped off. A squad of ARVN with a US officer in the lead.

I used figures from the Italeri Iwo Jima flag raising set with modifications and back packs made out of two part putty.

View attachment 317616 View attachment 317617

Extra arms came from the box of Preiser figures I had. The radio man's pack was just laminated plastic card cut into a box shape with cut pieces of rod and strips for knobs and buttons.

View attachment 317618 View attachment 317619

I found an M-60 from a set of modern Marines that someone gave to me as spares. I would be arming the ARVN with surplus WW2 arms apart from the M-60.

View attachment 317620 View attachment 317621

The fuselage you see in the last photo was the F-27 I was building at the time. The ARVN are not quite finished yet so stick around.

Cheers,
Richard
 

Attachments

  • hg0001.jpg
    hg0001.jpg
    2.3 KB · Views: 0
  • hg0002.jpg
    hg0002.jpg
    2.4 KB · Views: 0
  • hg0003.jpg
    hg0003.jpg
    2.2 KB · Views: 0
  • hg0006.jpg
    hg0006.jpg
    2.6 KB · Views: 0
  • hg0005.jpg
    hg0005.jpg
    2.5 KB · Views: 0
  • hg0004.jpg
    hg0004.jpg
    2.6 KB · Views: 0
Thread owner
Hi,

The machine gunner with the M60 or Pig looked a little plain no doubt he was modified to carrying it on his shoulders. So I got some tin foil, cut it into strips and engraved it with the back of a blade. This gave it a pattern that looked like a belt of M60 rounds.

View attachment 317940 View attachment 317941

I draped the engraved foil strips over the figure and also made some hang out of the M60 breech.

View attachment 317942

Cheers,
Richard
 

Attachments

  • hg0010.jpg
    hg0010.jpg
    2.4 KB · Views: 0
  • hg0009.jpg
    hg0009.jpg
    2.6 KB · Views: 0
  • hg0008.jpg
    hg0008.jpg
    2.6 KB · Views: 0
Richard.
Thanks for that explanation of the paddy fields. :thumb2:
Thought the step by step photos of the base and build up to the completed field showed just perfectly the planning needed to accomplish such a diorama. Brilliant.
John.
 
Thread owner
Thanks for commenting John, the dio was done so long ago that I have difficulty remembering the steps and the fact that all the photos from the past forum were jumbled up and not in sequence. Sorting them out again is quite nostalgic. Also reveals areas that I could have improved had I known how then.

Cheers,
Richard
 
Thread owner
Hi,
This is the pre-amputation images. They just remind me of the movie "Toy Story" where I can still hear R Lee Erney's voice soldiering his men (all plastic green GI's) on to save Woody and Buzz Lightyear.

View attachment 317977 View attachment 317978

The Marine advisor officer spots a soft cap or Utility Cover. He carries the early M-16 that he probably got from special forces or Airforce. The ARVN carry pre WW2 carbines and the M-60.

View attachment 317979 View attachment 317980

They all carry packs made from putty and have re-positioned arms and legs. See the guy that's waving...he's the long lost fella signalling the crew chief.

View attachment 317981 View attachment 317982

They'll be sent to the operating room to be amputated just below the knee so that they look like wading in knee deep water logged paddy fields.

Cheers,
Richard
 

Attachments

  • hg0016.jpg
    hg0016.jpg
    2.5 KB · Views: 0
  • hg0015.jpg
    hg0015.jpg
    2.9 KB · Views: 0
  • hg0014.jpg
    hg0014.jpg
    2.7 KB · Views: 0
  • hg0013.jpg
    hg0013.jpg
    3.1 KB · Views: 0
  • hg0012.jpg
    hg0012.jpg
    2.2 KB · Views: 0
  • hg0011.jpg
    hg0011.jpg
    2.4 KB · Views: 0
Ronald Lee Ermey's voice is truly distinctive and well practiced as he was a Marine Drill Instructor before being an actor. Semper Fi.
PaulE
 
Thread owner
Ronald Lee Ermey's voice is truly distinctive and well practiced as he was a Marine Drill Instructor before being an actor. Semper Fi.
PaulE

Paul, he'll be missed if there's another Toy Story movie.

Cheers,
Richard
 
Status
Not open for further replies.
Back
Top