Next installment...
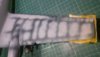
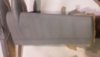
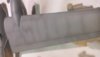
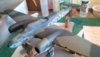
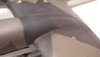
Stage 11 - This is when I apply a surface wash. Having dealt with colour modulation, scale effect and the play of light, we need to get away from the freshly painted look and start making the model look like a miniature of the real thing. A wash deposits a thin layer of 'dirt' over the aircraft and you can leave a thicker deposit in places where dirt with gather and show. For this I like to have a controllable process as I do not like to overdo things. This is why I use the Flory clay based wash. I use a wide large brush to apply it over all the aircraft making sure it gets into detail and panel lines. I leave it to dry for a couple of hours or overnight and then start removing the surplus. For this I use an old hankerchief wrapped around my finger wetted with saliva (you can use a pot of water!). The wetter it is the more wash you remove. I use a circular movement to wipe the wash off in small sections, finishing always with a wipe in the direction of the airflow. Make sure the wash gathers in the panel lines and other areas where it would happen. You can use a cotton bud in areas hard to reach with a finger.
Remember - in weathering there is a 'scale effect' too and less is often more. This goes for every stage of weathering. I have seen many models where the weathering effects look overdone and the aircraft is just too dirty. It is worth remembering that pilots and aircrew have their own share of vanity wanting to keep their aircraft reasonably clean even in a high tempo of operations. This is specially true if the aircraft belongs to the squadron leader or an ace.... Consider also where the aircraft is being operated. Is it off a concrete strip? A desert airfield? A muddy jungle clearing? In wet, dry, or sunny conditions. All of these factors will have a bearing on how much you will want to weather the aircraft. In some conditions despite the best efforts of the ground crew they will not be able to keep a clean aircraft. Always though I recommend, as I said, less is more. Better not to overdo it.
Stage 12 - Once you are happy with the wash you will need to seal it. I use a matt coat. Again I thin Vallejo Matt varnish 15-20% and apply a single all over thin coat at this stage.
- leave 24 hours to cure
Stage 13 - Now is the time to apply some more targeted weathering effects
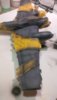
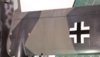
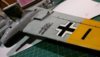
- paint chipping. Refer to your references. Around hatches and where crew clamber onto the aircraft are all targets for this. Use a fine pointed brush with a silver or aluminium paint in some places, be careful placing your chipping carefully. The silver pencil should also be used in places to compliment the brushwork.
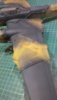
- gun burn and exhaust smoke marks. I use pigment or ground pastels for this. Look at your references as you need to take account of airflow and some quite strange patterns can arise. I brush on the pigments with a dry brush for which a matted surface is needed for the pigment to take to. Blow off excess.
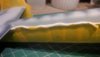
- Oil streaks and leaks. Again use references. I use oil paint for this. A tiny amount on the end of a cocktail stick dabbed by a filler cap, for instance, then a cotton bud swiped over it in the direction of the airflow is a favourite of mine. Mostly I use burnt umber and black oil paint.
Stage 14 - Apply a final coat of matt varnish to seal the weathering and ensure an even matt finish all over the model. This will help blend all the effects into the model as well and two coats might be necessary.
- leave 24 hours to cure
Stage 15 - You will have a nicely weathered model with an even matt 'sheen' but it still wont look right....It will lack some depth as real aircraft do not have that even sheen.... So we need to give it depth.
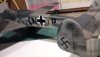
Firstly I get out the silver pencil again. I will use this sparingly around the areas where you have applied chipping effects. This will add a 'freshly chipped' to parts of the chipping and will give a slightly different level of sheen to the rest of the model. Do not overdo it.
Then I use Satin Varnish - thinned about 40% in the airbrush. Again this needs to be done very sparingly with a thin coat sprayed only in areas of the model that will catch the light adding a different sheen. This is all about tricking the eye and supplements the other measures we have taken to provide some lighter colour modulation to these areas. It can really help create that multi-dimensional finish we need but it must be very subtle, again less is more. If you do not like the effect then a simple thin matt coat can cover it.
Stage 16 - Final fittings - canopy, aerials etc..... do not forget many of these parts will need some of the treatments mentioned above.
.......
I hope the above helps. You will note that there are a lot of 'wait 24 hours to cure', patience is important in these stages as I have found the hard way. Acrylics are great and in many ways ideal but touch dry is not the same as being cured, ready and hard enough for the next process. You will note that my priming and preshading procedure is different to what most advocates suggest using the black over grey. I find it easier and more effective using grey over black in the way I described.
I should also say that what I describe really only works well with an airbrush because the paint and varnish applied is much thinner than with a hairy stick.
For the interior I do not use the whole process. I prime, spray the base colour, add pin washes, black in highly detailed areas and burnt umber overall then drybrush to highlight detail first the lightened base colour, then a light grey, then a metalic where appropriate.
For rubber tyres I use the Vallejo Panzer Aces Dark Rubber paint which initially looks too light and grey but is very effective when a black wash is added and pigment brushed onto it, sealed by a fixing agent.
For guns I simply paint them with buffable metaliser paint then buff them to highlight detail. This works for engines as well.
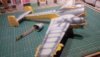
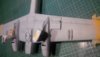
I am applying all the processes above on my Bf110 currently. I am restricted next week as I am spending a couple of days in the City at a conference and will not get any bench time those days, but it should be finished within a couple of weeks and I will post the pics so you can see how it looks.

")
")