Theme editor

Scale Model Shop

Wendall's 1/48 Airfix Harrier GR3

Status
Not open for further replies.

Wendall

New member
Joined
Jun 3, 2013
Messages
918
Reaction score
0
Points
0
1/3
Thread owner
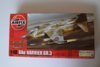
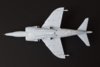
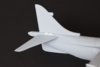
Here's my contribution. Bargain from the Airfix website for £7.99.

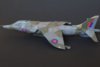
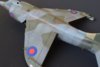
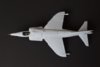
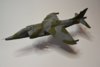
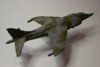
Hopefully a quick build to help me get my mojo back, l shall be building it wheels up in the corporate scheme.

View attachment 95360

View attachment 95361

View attachment 95362

View attachment 95363

View attachment 95364

View attachment 95365

View attachment 95366

View attachment 95367


Now I just need it to be new years day.

View attachment 208383

View attachment 208384

View attachment 208385

View attachment 208386

View attachment 208387

View attachment 208388

View attachment 208389

View attachment 208390
 

Attachments

  • DSC_0663.JPG
    DSC_0663.JPG
    2.2 KB · Views: 0
  • DSC_0664.JPG
    DSC_0664.JPG
    2.2 KB · Views: 0
  • DSC_0665.JPG
    DSC_0665.JPG
    2.2 KB · Views: 0
  • DSC_0666.JPG
    DSC_0666.JPG
    2.4 KB · Views: 0
  • DSC_0667.JPG
    DSC_0667.JPG
    2.3 KB · Views: 0
  • DSC_0668.JPG
    DSC_0668.JPG
    1.5 KB · Views: 0
  • DSC_0669.JPG
    DSC_0669.JPG
    1.9 KB · Views: 0
  • DSC_0670.JPG
    DSC_0670.JPG
    2.3 KB · Views: 0
Thread owner
Cheers Polux, it seems to be working;)

Happy new year everyone! I locked myself in the mancave with a bit of a hangover and got a lot done on the GR3 yesterday.

I think the kit is a pretty old tool with raised panel lines, limited cockpit detail and a few inaccuracies but its fairly simply engineered and should provide a good starting point.

The plan is to pose this one in flight so Jeff needed a bit of cosmetic surgery. His visor was carefully carved from his helmet and moved down to cover his eyes and the oxygen mask was moved up to cover his face, a little bit of liquid filler and he's ready to fly. The headbox decals are included in the kit and will add a bit of interest through the canopy.

View attachment 95699

View attachment 95700


I drilled out the exhaust outlet and detailed it with a few scraps of plasticard and added the missing fuel dump pipes.

View attachment 95701


View attachment 95702


The nose gear doors were a poor fit and required a bit of filling. Main undercarriage doors fit better. The airbrake was extended by about 5mm with plasticard.

View attachment 95703


View attachment 95704


So far it's a charming kit to work with. A little bit of filler and sanding was needed on the wing roots but the fuselage halves were a lovely fit and just needed a coat of Mr Surfacer.

Now to begin the re-scribing!

Jason

View attachment 208722

View attachment 208723

View attachment 208724

View attachment 208725

View attachment 208726

View attachment 208727
 

Attachments

  • DSC_0013.JPG
    DSC_0013.JPG
    1.5 KB · Views: 0
  • DSC_0012.JPG
    DSC_0012.JPG
    1.3 KB · Views: 0
  • DSC_0008.JPG
    DSC_0008.JPG
    1.4 KB · Views: 0
  • DSC_0009.JPG
    DSC_0009.JPG
    1.6 KB · Views: 0
  • DSC_0010.JPG
    DSC_0010.JPG
    1.1 KB · Views: 0
  • DSC_0011.JPG
    DSC_0011.JPG
    1.2 KB · Views: 0
Lovely looking kit seems to be going together very nicely!

Jambo
 
Off to a good start, I'll keep an eye on this one as I have the same kit to build.
 
Thread owner
\ said:
Will you be opening the engine vents?
Hi Joe, if you mean the drop in doors in the intakes, this one will be on the move so all drop in doors are closed.

If you mean Airfix's chunky exhaust outlets? Then nope, they're just too chunky! Could've got some resin ones but then its not really in the 'Under a tenner' spirit so I shall muddle on with what was in the box and a few bits of scrap plastic.

Right! Quick update, nearly ready for primer.

The whole airframe has been re-scribed. Be gentle, there are a few mistakes but its my first attempt at re-scribing a whole model.

View attachment 95846

View attachment 95847

View attachment 95848


I used Bare Metal Foil to detail some of the panels and the heat shields.

View attachment 95849


One of the Aden gun pods has been modified to represent a 'Blue Eric ECM' fitment which the aircraft I'm modelling was equipped with. Not many reference images available so it's pretty basic.

View attachment 95850


I believe these are called bacon slicers!!!

View attachment 95851


Now to mask up the cockpit and intakes, fit all the ariels, oh and make a hole in the bottom for a stand.

Thanks for looking

Jason

View attachment 208869

View attachment 208870

View attachment 208871

View attachment 208872

View attachment 208873

View attachment 208874
 

Attachments

  • DSC_0020.JPG
    DSC_0020.JPG
    1.7 KB · Views: 0
  • DSC_0022.JPG
    DSC_0022.JPG
    1.6 KB · Views: 0
  • DSC_0024.JPG
    DSC_0024.JPG
    1.4 KB · Views: 0
  • DSC_0025.JPG
    DSC_0025.JPG
    1.3 KB · Views: 0
  • DSC_0026.JPG
    DSC_0026.JPG
    1.7 KB · Views: 0
  • DSC_0027.JPG
    DSC_0027.JPG
    1.5 KB · Views: 0
Hey Jason, yep I meant the intake 'drop doors'. Great that it will be flying, a nice change. If that is your first go at re-scribing then you have a future in that if all else fails, awesome work!
 
I have the 1/72 of this with the new tooling but I'm sure I paid more than a tenner so nice deal there and looking good so far. I'm still waiting for paint.. well that's my excuse, got to start mine soon or I'll end up trying to get it all done in a week!
 
Thread owner
Thanks Chaps,

The trouble with being back at work is not being able to get much mancave time, I find it difficult to work by artificial light so my time is limited. An hour a night has gotten me to this stage.

I primed the whole thing with Tamiya extra fine grey from a rattle can. It looked pretty good, only a few areas needed attention before an overall coat of Dark Sea Grey. Then I discovered what a giant pain in the proverbial masking a wraparound scheme is! Perseverance prevailed in the end but I discovered it was much easier to leave the taileron thingys off for this stage.

View attachment 96421


Then on with the RAF green. I wanted to try something different so this has been post shaded instead of my usual preshade. I lightened both colours by adding 20% matt white and lightly airbrushed the centres of the upper surface panels.

This is how she looks freshly unmasked, I quite like it!

View attachment 96422


View attachment 96424


Filter next then a coat of Klear and the decals. Hopefully I'll get those on this weekend.

Thanks for looking in!

Jason

View attachment 209444

View attachment 209445

View attachment 209447
 

Attachments

  • DSC_0035.JPG
    DSC_0035.JPG
    1.4 KB · Views: 0
  • DSC_0037.JPG
    DSC_0037.JPG
    1.6 KB · Views: 0
  • DSC_0038.JPG
    DSC_0038.JPG
    1.7 KB · Views: 0
I like the post shading you've done.Looks good.I will try this out on my 1/24 Spitfire as I can't get on with preshading.
 
Thread owner
Cheers Dave, I found post shading a more enjoyable process that the preshade. I had much more control over the end result, the preshade is sometimes a bit hit and miss. I'll be using this technique on my Typhoon for sure.
 
Thread owner
Got all the decaling done over the weekend. Despite 2 coats of Klear they silvered really bad, unusual for Cartograph. Luckily with the careful use of a pin and lots more micro sol I managed to get them to settle properly second time around:).

Now I want this to look like a proper Falklands GR3 and looking at he pictures in Jerry Pooks book, these things got hammered. I have been trying the oil dot weathering technique on top of the post shade to try and fade the colours and give the impression of salt water streaking. I've not finished yet but would be interested to know what you guys think.

View attachment 96723


View attachment 96724


View attachment 96725


Just noticed my droopy pitot tube :oops:

Jason

View attachment 209746

View attachment 209747

View attachment 209748
 

Attachments

  • DSC_0060.JPG
    DSC_0060.JPG
    1.4 KB · Views: 0
  • DSC_0061.JPG
    DSC_0061.JPG
    1.6 KB · Views: 0
  • DSC_0062.JPG
    DSC_0062.JPG
    2 KB · Views: 0
\ said:
Cheers Dave, I found post shading a more enjoyable process that the preshade. I had much more control over the end result, the preshade is sometimes a bit hit and miss. I'll be using this technique on my Typhoon for sure.
The post shading looks a lot better then pre-shading in this case. I wonder sometimes if it's the execution of the technique that makes or breaks the finished look on some builds.
 
Status
Not open for further replies.
Back
Top