Andy, you should have seen me letting it all hang out at my surprise birthday party last Saturday....I was dancing on the tables......Trouble was, I got confused and tables were in the pub next door from the bash and I got kicked out!

You are using an out of date browser. It may not display this or other websites correctly.
You should upgrade or use an alternative browser.
You should upgrade or use an alternative browser.
"Which way did they go, tracker?"
- Thread starter spanner570
- Start date
- Status
- Not open for further replies.
G
Guest
Guest
Lol, you should stick to rocking that van mate hehe. Save you getting locked up you animal.
Andy
Andy
Thanks Andy-Andy! Glad you both approve of the progress.....
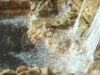
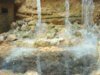
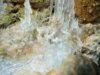
OK, I am slowly working my way down stream with the silicone.....
This is a toughy....Trying to get onto a model summat that's in your mind's eye, but is coming out of a tube, is hard going!!!!!
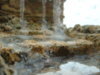
I've had a re-think with the pool and decided it would look better deeper, so I painted the base darker, this gives the illusion of deep water - The darker the paint the deeper the water. It also gives a bit of contrast from the surrounding stone - also I've livened up the waterfall impact area. Also I've started to do ripples across the pool.
The edges of the pool I've filled in with crunched up weetabix sprinkled onto diluted PVA......Here's a tip for anyone doing plastic sheet water. When sealing the edge, always leave a bit of hidden ventilation. If the plastic is sealed up completely, condensation will occur under the surface and takes forever to dry, so be warned!
Here are are three up to date pictures for you. I hope you like this latest stage.
Cheers,
Ron
View attachment 61917
View attachment 61918
View attachment 61919
View attachment 174943
View attachment 174944
View attachment 174945
OK, I am slowly working my way down stream with the silicone.....
This is a toughy....Trying to get onto a model summat that's in your mind's eye, but is coming out of a tube, is hard going!!!!!
I've had a re-think with the pool and decided it would look better deeper, so I painted the base darker, this gives the illusion of deep water - The darker the paint the deeper the water. It also gives a bit of contrast from the surrounding stone - also I've livened up the waterfall impact area. Also I've started to do ripples across the pool.
The edges of the pool I've filled in with crunched up weetabix sprinkled onto diluted PVA......Here's a tip for anyone doing plastic sheet water. When sealing the edge, always leave a bit of hidden ventilation. If the plastic is sealed up completely, condensation will occur under the surface and takes forever to dry, so be warned!
Here are are three up to date pictures for you. I hope you like this latest stage.
Cheers,
Ron
View attachment 61917
View attachment 61918
View attachment 61919
View attachment 174943
View attachment 174944
View attachment 174945
Attachments
G
Guest
Guest
That water looks superb, Ron.
How do you do it?
Malc.
How do you do it?
Malc.
G
Guest
Guest
The weather is cold yet...but I could wish to bath in this crystal water!!
Perfect effect, Ron!!!
Cheers
Polux
Perfect effect, Ron!!!
Cheers
Polux
Great comments boys, makes for very nice reading, I appreciate them. Thanks....
Malc, it's just a matter of squeezing the stuff out and then messing with it using a nail, safety pin or similar and kind of flicking the silicone about 'till your happy with it....It's very hard to put it in writing, so it might be an idea to explain with some pictures how I do this sort of thing in a 'How to.' once I've finished this dio.
If you fancy some ideas, take a look at my PT 109 and also Ian's (Papa 695) excellent water dios for some examples of 'flicking' silicone.lol!
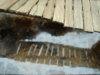
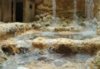
I've had a slight change of plan, I was going to work from the top, down, but I'm finding it difficult to keep the same volume of water constant throughout the model, so I've moved down and started the lower 'fall' which is just a small drop really. Now I've got the basic flow I have a much better idea how much water I need to add to this bit to make it look something like realistic. In other words, the volume you see at the top must be the same at the bottom of the model.......I need a drink!!!
Here's the pictures of the bottom bit initial layer of silicone running between my weetabix thingys, plus I couldn't resist including one of the rickety bridge reflection.....Don't you just luuurve plastic collar stiffeners? lol
I hope you like the build so far and any feedback /suggestions /alterations are more than welcome.
Ron
View attachment 61932
View attachment 61933
View attachment 61934
View attachment 61935
View attachment 174958
View attachment 174959
View attachment 174960
View attachment 174961
Malc, it's just a matter of squeezing the stuff out and then messing with it using a nail, safety pin or similar and kind of flicking the silicone about 'till your happy with it....It's very hard to put it in writing, so it might be an idea to explain with some pictures how I do this sort of thing in a 'How to.' once I've finished this dio.
If you fancy some ideas, take a look at my PT 109 and also Ian's (Papa 695) excellent water dios for some examples of 'flicking' silicone.lol!
I've had a slight change of plan, I was going to work from the top, down, but I'm finding it difficult to keep the same volume of water constant throughout the model, so I've moved down and started the lower 'fall' which is just a small drop really. Now I've got the basic flow I have a much better idea how much water I need to add to this bit to make it look something like realistic. In other words, the volume you see at the top must be the same at the bottom of the model.......I need a drink!!!
Here's the pictures of the bottom bit initial layer of silicone running between my weetabix thingys, plus I couldn't resist including one of the rickety bridge reflection.....Don't you just luuurve plastic collar stiffeners? lol
I hope you like the build so far and any feedback /suggestions /alterations are more than welcome.
Ron
View attachment 61932
View attachment 61933
View attachment 61934
View attachment 61935
View attachment 174958
View attachment 174959
View attachment 174960
View attachment 174961
Attachments
G
Guest
Guest
only you could think of using weetabix in a dio ron, top job once again,will try this method very soon, unfortunatly i am building a 1:1 scale kitchen and have not touched a model in weeks since finding pesky woodworm in the floor and having to strip it all out whilst there are six of us living this small house...not easy.
G
Guest
Guest
Wow Ron that is looking incredible,truly amazing skills ! Really enjoy watching you breathe life into your dios ,cheers Trey
Thanks for the positive post boys, all good stuff....
Andrew, you will get plenty of practice with the silicone during your kitchen re-fit, won't you?!!
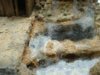
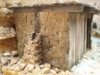
I've finished making a snowman and have come indoors and added a second lot of silicone to the 'bottom fall'...Again, just flicking the stuff about with a nail to try and simulate lively water. That's just about it for the liquid, I'll come back to it later and have me a look at it and see if it needs anything else adding.
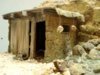
Also, I decided every respectful shack should have a chimberly, so I stuck two pieces of styrene together, then carved out the stonework, stuck this to the shack, then I rooted about on the drive for some suitable small stones and crushed them with a hammer and placed them around the base of the stack, then added some smoke staining.....so here it is - broken!
Nearly finished the dio. now, so I'll have a look with everything in place, then see if I can add bits to it.
Two pictures of this stage for you to have a blimp at, and I hope you approve.
Cheers,
Ron
View attachment 61938
View attachment 61939
View attachment 174964
View attachment 174965
Andrew, you will get plenty of practice with the silicone during your kitchen re-fit, won't you?!!
I've finished making a snowman and have come indoors and added a second lot of silicone to the 'bottom fall'...Again, just flicking the stuff about with a nail to try and simulate lively water. That's just about it for the liquid, I'll come back to it later and have me a look at it and see if it needs anything else adding.
Also, I decided every respectful shack should have a chimberly, so I stuck two pieces of styrene together, then carved out the stonework, stuck this to the shack, then I rooted about on the drive for some suitable small stones and crushed them with a hammer and placed them around the base of the stack, then added some smoke staining.....so here it is - broken!
Nearly finished the dio. now, so I'll have a look with everything in place, then see if I can add bits to it.
Two pictures of this stage for you to have a blimp at, and I hope you approve.
Cheers,
Ron
View attachment 61938
View attachment 61939
View attachment 174964
View attachment 174965
Attachments
G
Guest
Guest
You never cease to amaze with your ingenuity Ron. Cheers Derek
Ditto, you half expect to see someone walk into view with the photos, it look's so real and not a model at all...\ said:Just how do you keep making something that is so good even better!!!You da man Ron!
Ian M
Just got a re-fill, so am ready again...
Andy...
Eyup mucker! just caught up with this, amazing work with the silicone! The waterfall effect looks superb and you know im a fan of using unexpected materials in our modelling so the weetabix really made me grin!! Keep it up mate , cheers tony
G
Guest
Guest
Brilliant work Ron, the effect is outstanding.
Andy
Andy
Thanks chaps, I'm glad it's passing muster!
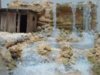
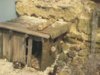
Guess what?...I've been fiddling - again! I reckoned it was as good as finished, then I came up with the idea that perhaps with the shack being so close to the waterfall, the roof started to rot and leak a bit......
Done with a bit of thin cloth, some cotton, a piece of coffee stirrer and a few spare 'rocks'
A bit fanciful, but here is my cowboy roof repair - cowboy, get it?
My coat is on and I'm wading into the snow!!!!
Cheers,
Ron
View attachment 61971
View attachment 61972
View attachment 174997
View attachment 174998
Attachments
G
Guest
Guest
Thats a nice touch, actually better than some council repairs i've seen ")
This just keeps getting better mate, great stuff!!
This just keeps getting better mate, great stuff!!
Yeah ... got it ..... did you bring a coat .... TAXI FOR RON !!\ said:- cowboy, get it?
Council Repairs.....I like it. Nice one Colin. I'm glad they are up to an acceptable standard!
Thanks for your post.
Cheers,
Ron
Thanks for your post.
Cheers,
Ron
- Status
- Not open for further replies.
Legal Notice
scalemodelling.co.uk is a privately operated online discussion forum. All content posted by members reflects their own views and opinions and does not necessarily represent those of the forum owners or administrators. While reasonable efforts are made to moderate content, no responsibility is accepted for user-generated material. By using this site, you agree to comply with UK law and the forum rules.